SOURCE: ford econovan
earth wire at light cluster is probably disconnected or not earthing properly causing indicators to energize the park lights check the earth wires black ones to body
SOURCE: I'm looking for an owner's
I found one at books 4 cars.com,enter vehicle info and book type(owners manual) they are 34.99.
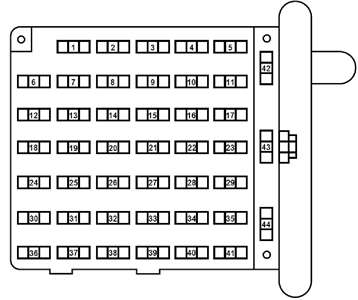
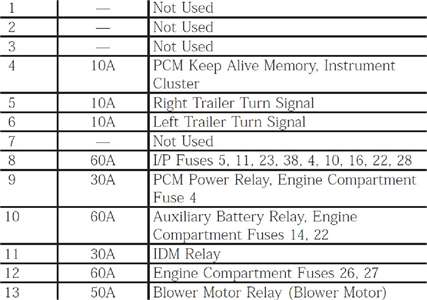
SOURCE: LOOKING FOR FUSE BOX DIAGRAM
Ther are 2 panels that have fuses in it. I went on and gave you both (see below). this should be in your owners manual if you have one. If you do not and would like a copy of the owners manual for your vehicle, you can email me at [email protected] with your make, model and year and I will be happy to email you a copy. No worries there would be no cost for it. I hope this helps and good luck.


SOURCE: Timing diagram for a jg ford econovan 1999
Why you need a diagram?
After the cover is removed. That's how it look like.
Mai Lor
SOURCE: how to take of lefthand bearing and replace bearing to econovan 1999 ford
I take it that the van is a rear wheel drive. So remove the wheel. Remove the brake caliper and lift off the disc. Undo the axle nut and remove hub from axle. Knock out both the bearing cups and clean hub center. Fit new cups into the hub ensuring they are tight against the seat. Thaking a small amount of grease in the palm of you hand take the cone and with the most open area tend to scrape the grease from you palm so that the grease is forced between the rollers until it come out the smallest end.This grease is all thaty you will need for a properly lubricated bearing. Spread grease evenly around the outside of the rollers. Fit inner cone into hub and tap in new grease seal (lip facing bearing) Having repeated lubricating process on outer cone fit hub back on axle and fit outer cone. Fitflat washer and nut . Do nut up while turning hub so as to seat bearings. Tighten nut until a slight drag is felt when turning the hub. Now comes the difficult part. Without touching the hub undo the nut until it is slightly loose then do it back up until it just touches the bearing. THis is a no preload -no freeplay position for the bearing. Having achieved this, pin the nut . IF it is necessary to turn the nut to allow this to happen tighten the nut slightly. Refit dust cap ,calpier, wheel etc REmember to replace both bearings cups and cones and use high temp grease Safety first --place the vehiocle in stands--- not bricks
209 views
Usually answered in minutes!


Hi adrian glendenning, I want to help you with your question, but I need more information from you. Can you please add details in the comment box?
×