Canon Pixma MP480 All-In-One InkJet Printer Logo

Related Topics:

Sofie Chimona Posted on Feb 08, 2012

Cleaning printer cartridge - Canon Pixma MP480 All-In-One InkJet Printer

Add Your Answer

×

Uploading: 0%

my-video-file.mp4

Complete. Click "Add" to insert your video. Add

×

Loading...
Loading...

Related Questions:

0helpful
1answer

Large black cartridge not recognized upon replacement for iP8720

Cheers Tom

In many cases when we place cartridge into the printer, they are not recognized, there may be many reasons why this happens, one of them is that the cartridges have dirty connectors.

The cartridge connectors are making contact with the printer, in this way as information is received and when to inject the ink, it is also who helps identify printer cartridges when they are connected.

Clean connectors cartridges helps in many cases to be recognized by the printer, it is recommended to clean something clean, and a small piece of cloth with water or isopropyl alcohol.

http://www.en.rellenadodecartuchos.com/2015/08/how-to-clean-connectors-connectors-in-ink-cartridges.html

If after cleaning the cartridge connectors, the problem persists, you should clean the connectors but in this case the printer.

For this you need to open the door that gives access to the cartridges, remove the cartridges from the printhead and then with something clean and a cloth to clean the connector head.

large-black-cartridge-not-recognized-3yd5oaqhykbr2qilonoqer23-2-2.jpg

Im putting my refilled cartridges back in the printer and the On Off...

These are possible solutions, but when the cartridges are not recognized by the printer, there are many factors influencing the error and can carry the cartridges are not recognized.

Look electricity, place stronger cartridges - it is possible that are not making contact properly - try to open the side door of the printer, something may be wrong with cartridges.

Take time and see if does not help, write a comment, I'll be around.
1helpful
1answer

We have a X5650 Lexmark printer. The ink cartridges were both replaced with certified cartridges (parts 36 and 37xl) . When installed the printer does not recognize that the cartridges have ink and...

It could be that the cartridges are not inserted properly in the carrier or just needs cleaning. Try to remove both cartridges from the printer and manually clean the nozzles. You may refer to this article on How to Clean the Print Cartridge Nozzles and Contacts Manually. Then reinsert one cartridge first and close the cover. If no error appears, reinsert the other cartridge. Replace whichever cartridge is causing the error. You can also try the Clean Cartridge function on the printer by pressing the Setup button -> Maintenance -> Clean Cartridges. It will then print the clean nozzles test page. If error continues, replace the faulty cartridge.
10helpful
2answers

How to reset ink level canon iP 2772??

Download and run the ipTool to reset your ink level :


http://www.mediafire.com/?nmj5nnzzjaw


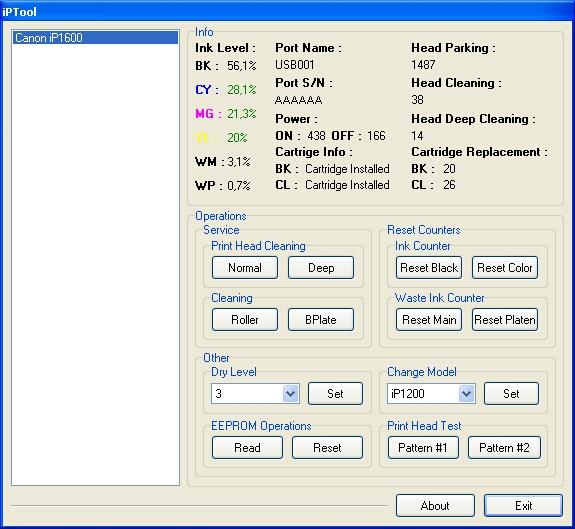
Features IP Tool software:

  • Showing all info on the printer such as ink level, ink counter number of cleaning, cartridge replacement and more.
  • Print test feature to test nozzle on the cartridge.
  • Cleaning and deep cleaning feature to clean head cartridge and cleaning the rollers.
  • Changing the delay value for drying.
  • Set the printer model manually.
  • Reading and reset EEPROM printer.
  • Reset counter and reset ink level on the color and black cartridges.
Ink Level - shows the level ink:
  • BK - black cartridge.
  • CY - Cyan cartridge.
  • MG - Magenta cartridge.
  • YL - Yellow cartridge.
  • WM - Waste ink counter status.
  • WP - "additional" waste ink counter status.
Port Name - displays the port where the printer installed.
Port S / N - shows the serial number of the printer port.
Power - shows the number of:
  • ON - inclusions printer.
  • OFF - to turn off the printer.
Cartridge Info - Displays information status of:
  • BK - black cartridge.
  • CL - colored cartridge.
Head Parking - displays the number of parking.
Head Cleaning - shows the number how many time the cartridge cleaned.
Head Deep Cleaning - displays the number of deep cleaning Printer cartridge.
Cartridge Replacement - shows the number of cartridge replacements:
BK - black cartridge.
CL - colored cartridge.


Click on this link or copy and paste the complete link into your browser.

If I could be of further assistance, let me know. If this helps or solves the issue, please rate it and give a testimonial for my response. Happy Holidays!

Thanks, Joe


I’m happy to assist further over the phone at https://www.6ya.com/expert/joe_8b8c2cd6ce148309

0helpful
1answer

Have hp deskjet 6540 printer. yellow light on right side under x keeps blinking not printing. Am I out of ink?

Follow each of these steps until the problem is resolved:

Remove and then reinsert the print cartridge(s) into the printer.
Clean the print cartridges automatically using the Clean Cartridges option in the Printer Assistant.
Manually clean the print cartridges and print cartridge cradles:

Open the printer cover and wait until the carriage moves to the center.

Press the Power button to turn off the printer.

Disconnect power cord from the back of the printer.

Remove the print cartridges and place them on a piece of paper with the nozzle plate facing up.

Lightly moisten a cotton swab with distilled water.

Clean the face and edges of the print cartridges with the swab. Do not touch the print cartridge ink nozzles or copper contacts.

Wipe the underside of the print cartridge cradle walls using a clean, moistened swab.

Reinsert the print cartridges.

Close the printer cover.

Connect the power cord to the back of the printer.
Press the Power button to turn on the printer.

Calibrate the print cartridges.

If the light is still flashing, replace the print cartridges.
0helpful
1answer

Printer carriage stuck?

To fix cartridge errors, complete the following steps:
  1. Remove both cartridges (even if the message indicates only one cartridge). See your printer's manual or help files for specific information on removing and inserting cartridges. Most HP printers must be turned on to remove the cartridges. WARNING: Make sure to complete the procedure and reinstall the cartridges within 30 minutes. The ink in the cartridges can dry in the nozzles if the cartridge is outside of the printer for too long.
  2. Unplug the printer.
  3. Inspect the cartridges:
      If the cartridges are new, make sure the protective tape has been removed completely.Make sure the cartridges are not damaged. If the copper-colored electrical strip is torn or punctured, the cartridge must be replaced.Make sure the cartridges are compatible with the printer. See the manual for a list of compatible cartridges.
  4. Reinstall the cartridges. NOTE: HP cannot guarantee the quality or reliability of refilled or remanufactured cartridges.
      Make sure each cartridge is in the correct slot.Make sure the cartridge is snapped into place and the latch is closed.Close the front cover and plug the printer back in.
  5. If the steps above do not fix the problem, follow the procedure below to clean the cartridge and electrical contacts:
    1. Gather cleaning supplies:
        Clean distilled water. Use bottled or filtered water if distilled water is not available.Clean cotton swabs or any soft, lint-free material (coffee filters work well).
    2. Remove both cartridges.
    3. Unplug the printer.
    4. Lightly moisten the lint-free cleaning material with clean water.
    5. Clean the cartridge contacts. Avoid touching the nozzles. Replace the cleaning material if it gets dirty. Figure 1: Cartridge nozzles and contactsc00059236.gif 1 - Nozzles 2 - Contacts Figure 2: Cartridge nozzles and contactsc00059237.gif 1 - Nozzles 2 - ContactsIf your cartridge doesn't look exactly like one of the illustrations above, locate the contacts by looking for an area with a number of small copper squares. The illustration below shows some representative cartridge contacts. Figure 3: Cartridge contactsc00059238.jpg
    6. Using a new swab, clean the cartridge contacts inside the printer (the print carriage). The illustrations below show contact locations for some representative carriages. If your carriage does not look like either of the pictures below, try to locate copper contacts inside of the printer that would touch the contacts on the cartridge when the cartridge is installed. Figure 4: Carriage contactsc00059239.gif Figure 5: Carriage contactsc00059240.gif
    7. Allow all the contacts to dry for at least five minutes, or dry them with a clean swab, then reinstall the cartridges.
    8. Close the front cover and plug the printer back in.
  6. If the steps above have not solved the problem, repeat them.
  7. If the error still occurs after repeating all the steps, replace the cartridges. If you have already replaced the cartridges once without solving the problem, contact HP. The printer might need to be serviced.
0helpful
1answer

I recenlty had the ink cartridge #57 and #58 refilled at my local walgrens and when i went to insert the refilled cartridges the printer screens reads: remove and check cartridges.....what do you think...

Check the Connection and Clean them
4b1f493.jpg
Step 1: Remove, inspect, and reset the problem cartridge
Step 2: Clean the problem cartridge contacts
Step 3: Repeat repeating and cleaning steps
Step 4. CONTACT TO HP SUPPORT


Step : Remove, inspect, and reseat the problem cartridge and Clean the problem cartridge contacts..

a) Make sure the printer is on. Press the Power button if it is not lit.

b) Open the printer cover, then wait until the print cartridge carriage is idle and silent

c) Press down lightly on the end of the problem cartridge to release it.

d) Slide the cartridge out and inspect it:
* Check the Copper electrical contacts (the Copper Part which touch the Connector inside)
* Clean it with the pirit or wet cotton)
* Check the Nozzles - Clean it with the worm wet cotton
* Wait for 2 to 5 min befour you connect them back
* Clean the contacts in the carriage, inside the product (Printer)
* Reinstall the cartridge.
* Reconnect the product to the electrical outlet.
* Close the product cover.

NOTE : you can also check the print cartridge label and make sure it iscompatible with your printer. Compatible print cartridges are listed inthe Printer Reference Guide supplied with your printer.

Note : If the cartridge is compatible, reinstall it in the printer:
* Cartridges marked with a triangle go into the left carriage slot.
* Cartridges marked with a square or pentagon go into the right carriage slot.

If issue not resolves Repeat repeating and cleaning steps
0helpful
1answer

The printer is printing blank pages.

STEP 1: Disconnect and Reconnect the Printer Power Supply
1. Unplug the power cord from the wall socket.
2. Disconnect the power supply from the back of the printer.
3. Wait 15 seconds.
4. Reconnect the power supply to the back of the printer.
5. Plug the power cord back into the wall socket.

STEP 2: Run a nozzle clean on the Dell A940 inkjet printer.

To run a nozzle clean, perform the following steps:

1. Click the Start button, point to All Programs, point to Dell Printers, point to Dell AIO Printer A940, and then click Dell Printer Solution Center.
The Dell Printer Solution Center menu appears.
2. Click the Maintenance button.
The Maintenance window appears.
3. Click the Clean to fix horizontal streaks button.
4. Click the Print button.
The Nozzle Clean function prints a page.
5. Check the Nozzle Clean Printout to verify that it is free of defects and that all expected color bars exist on the page

STEP 3: Restore the printer settings to factory default

To restore the printer settings to factory default, perform the following steps:

1. Click the Start button, and then click Control Panel.
2. Click Printers and Other Hardware.
3. Click Printers and Faxes.
4. Right-click the Dell Printer icon, and then left-click Properties.
5. Click Printing Preferences.
6. Click to select Save Settings.
7. Under Restore, click Factory Settings (Defaults).

STEP 4: Clean the Contacts and Wick the Ink Cartridge

Wicking the cartridges and cleaning the contacts on the back of the cartridge should be performed if the nozzle clean was performed and the quality was not satisfactory.

Wicking the Cartridge

1. Ensure the printer is powered on.
2. Lift the scanner unit.
3. Open the cartridge latches and remove the cartridges from the carrier.
4. Take a clean, damp cloth and wipe the nozzle of the print cartridge from front to back

Note: Never wipe the cartridges from side to side, as this causes cross-contamination in color cartridges.

Cleaning the Contacts

1. Turn the cartridge so that you are looking at the contacts on the back side of the cartridge
2. Using a clean dry cloth, wipe the contacts so that no dust or other contaminants are visible.

Note: Do not use the same cloth that was used to clean the cartridge nozzles. This may cause more contamination on the cartridge.

3. Clean the contact inside the printer with the dry cloth used to clean the cartridge contacts.
4. Replace the cartridges in the carrier and close the scanner unit.
5. Print the document again.
6. If the print quality does not improve, repeat the steps for cleaning the nozzles and contacts up to two more times as needed.


Then run again STEP 2. If the printer still prints in blank pages, contact Dell Technical Support. They may need to replace the Ink Cartridges.
0helpful
1answer

Cleaning cartridge

Both the black and colour cartridge must be installed for the printer to work. So you will need two cleaning cartridges. If you only have one cleaning cartridge, make sure your "other" cartridge is not out of ink. If you are sure both cartridges contain ink/cleaning fluid, post a new comment with this information.
0helpful
4answers

Replacing Colour Cartridge

Most likely dirty connections. Try cleaning the print cartridge, and the contacts inside of the printer with a swab of alcohol. The cartridge, and printer need to communicate properly, and sometimes a fingerprint or ink can interfere. (Yes I know I don't spell very well, sorry)
0helpful
1answer

Check black cartridge message

This happens if you refilled the cartridges, and forgot to take out the air..

Follow this steps..
1. Switch on the printer, open cartridge bay, remove cartridge, dont close the cartridge holder flaps, directly unplug the power supply from the printer end.

2. take a soft cotton, lint free cloth, slightly swab it with pure water, wring the cloth so any excess water is removed, and clean the contact pins inside the printer cartridge holder..

3. clean the cartridge head by keeping it in hot water (about 50C) and then wiping it clean, keep it upright for a few min, and when both printer and cartridge is completly dry put it back in, voila it should not display the message now...
Not finding what you are looking for?

33 views

Ask a Question

Usually answered in minutes!

Top Canon Office Equipment & Supplies Experts

old marine
old marine

Level 3 Expert

2426 Answers

ZJ Limited
ZJ Limited

Level 3 Expert

17989 Answers

Cindy Wells

Level 3 Expert

6688 Answers

Are you a Canon Office Equipment and Supply Expert? Answer questions, earn points and help others

Answer questions

Manuals & User Guides

Loading...