
Check you have correct TDC for the indicator marks, place a rod down the plug hole and slowly rotate to confirm top dead centre for one and two, and follow the clymer instructions again.
and always turn it over by hand(as you have done) 2 complete revolutions and recheck marks , before attempting to start.


Fig. Lining up the crankshaft sprocket mark with the colored link in the 5 o-clock position (2).

Fig. Aligning the intake camshaft sprocket mark with the colored link in the 2 o-clock position (1).

Fig. Aligning the exhaust camshaft sprocket (3).

Fig. Compressing the timing chain tensioner-2.2L engine.
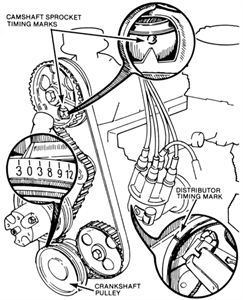
Crankshaft, camshaft, and distributor timing marks-2300 cc engine (© Ford Motor Co.)
On 2000 cc engines, turn the crankshaft until the two round locating holes in the camshaft pulley are visible from the rear side of the pulley, looking forward from the left-side of the car. When these two holes are parallel to the ground, the timing pointer on the crankshaft pulley should point to TDC. If the drive belt is dislocated, the crankshaft damper will be retarded or advanced 19° per cog on the belt.
If the engine you are working on does not have the two locating holes on the rear side of the camshaft pulley, then you will have to remove the drive belt cover and observe that when the crankshaft timing marks are aligned to TDC of the compression stroke of the No. 1 cylinder, the distributor rotor is pointing to the index mark on the upper lip of the distributor housing which coincides with No. 1 spark plug tower, and the pointer on the camshaft pulley is aligned with the index mark on the cylinder head.
On 2300 cc engines, there is an access plug provided in the cam drive belt cover so that the camshaft timing can be checked without removing the drive belt cover. Remove the access plug, turn the crankshaft until the timing mark on the crankshaft damper indicates TDC, and observe that the timing mark on the camshaft drive sprocket is aligned with the pointer on the inner belt cover. Also, the rotor of the distributor must align with the No. 1 cylinder firing position.
CAUTION:
After any procedure requiring removal of the rocker arms on the 2300, each lash adjuster must be fully collapsed after assembly, then released. This must be done before the camshaft is turned.
Crankshaft, camshaft, and distributor timing marks-2300 cc engine (© Ford Motor Co.)
Crankshaft, camshaft, and distributor timing marks-2300 cc engine (© Ford Motor Co.)
Checking 2000 cc overhead camshaft timing (© Ford Motor Co)


344 views
Usually answered in minutes!


×