2006 Toyota Camry Logo
Anonymous Posted on Apr 03, 2010

I can't get my rear brake drums off to replace the shoes, any tips??

1 Answer

Anonymous

Level 3:

An expert who has achieved level 3 by getting 1000 points

Superstar:

An expert that got 20 achievements.

All-Star:

An expert that got 10 achievements.

MVP:

An expert that got 5 achievements.

  • Master 10,319 Answers
  • Posted on Apr 03, 2010
Anonymous
Master
Level 3:

An expert who has achieved level 3 by getting 1000 points

Superstar:

An expert that got 20 achievements.

All-Star:

An expert that got 10 achievements.

MVP:

An expert that got 5 achievements.

Joined: May 22, 2009
Answers
10319
Questions
5
Helped
3075601
Points
30576

Generally they will stick from rust at the center hole to the hubs assembly. Get some WD40 and spray into the seams of that hole and let stand for an hour. You will need to retract the brake shoes inward also using the brake tool adjuster wrench. the shoes are expanded out against the drum making removal some what harder. If the drum is loose it will move away from the center hub and WD40 will not be needed

Testimonial: "Thanks for the fast response and great advice."

  • Tammy Monroe Oct 26, 2010

    If the brakes are expanded out against the drum how do we get the drum off if it will not move. It was forced on now wont come off.

×

5 Related Answers

Anonymous

  • 1665 Answers
  • Posted on Jun 03, 2008

SOURCE: remove rear brake drums
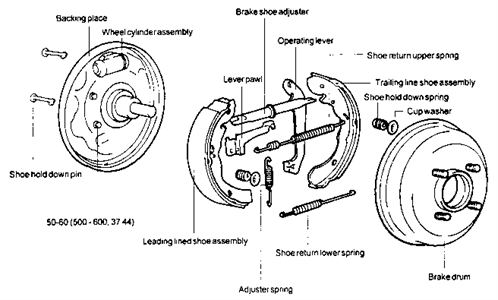
0f2c8a8.gif
1. After removing the wheel, remove the brake drum. 2. Remove the shoe hold down spring, the automatic adjuster spring and adjuster lever.
7b7d17f.gif
3. Spread the shoes and remove the shoe adjuster. 4. Remove the shoe to shoe spring and shoe hold down spring.
a1a62c3.gif

Ad

Anonymous

  • 126 Answers
  • Posted on Jul 01, 2008

SOURCE: REAR BRAKES

i think your aware of how to change the brakes if im right and your problem is the rusted drum doesnt want to come off the only way to get the old drum off is to remove adjuster plug from behind drum dustshield and adjust the shoes so that there not even close to the braking area of the drum then try and wiggle the drum off of the assembly if it is not coming off then you need to use the old nylon hammer on the drum and i mean you must hit the drum from side to side trying by hand to wiggle the drum off its a tight fit and you need to strike the drum on the face not on the fins not wanting to damage with persistance and care and patience you will eventually be able to remove the drum to service brakes take care and good luck with it

Mike

  • 4383 Answers
  • Posted on Sep 16, 2009

SOURCE: Rear drum brakes system operation

This flat bar is for the emergency brake, it is leveraged by a pivoting arm attached to the rear brake show and pushes the primary shoe, upon application.

Doc

Stu_26

Erik

  • 102 Answers
  • Posted on Oct 28, 2009

SOURCE: REPLACE REAR BRAKE SHOES ON 199 NISSAN ALTIMA

Have you tried a big c clamp and squezing it that way also try to loosen the emergency brake tensioner its in the back part of the brake assembly use a flat head to loosen it

Anonymous

  • 111 Answers
  • Posted on Feb 14, 2010

SOURCE: replacing rear brake shoes on 2007 silverado 4WD

when you pull the hub off take a picture of the brakes so you can see all the parts, so you can tell where everthing goes back together.

Ad

Add Your Answer

×

Uploading: 0%

my-video-file.mp4

Complete. Click "Add" to insert your video. Add

×

Loading...
Loading...

Related Questions:

0helpful
1answer

I have a 23 t bucket and i cant get a brake pedal.when i bought it had very little brake so i replaced rear shoes and cylinders,front pads and calipers,all new lines and the master cylinder

Once you have bled the air from the brake lines,clamp off the front brake hoses carefully.Does the pedal feel better now?
Then the pad /caliper fit is allowing too much play.Is the pedal the same?Then clamp the rear hose and try the pedal.Is it fine with the rear hose clamped?If so we now know the problem is at the rear brakes.One common low pedal rear brake cause is brake shoes that do not fit the drums.Remove the drums and look at the shoes,are they showing contact wear fully or just in the middle of the shoe?Remove a shoe and place it in the drum.Can you rock the shoe against the drum surface?Once drums have been resurfaced,the shoes will not fit fully against the drum allowing the shoe the flex when applying pressure to it and this can easily create a low soft brake pedal. Of course rear brake adjustment must be correct once brake shoe contact is correct.To correct brake shoe contact,have your shoes re arc-ed to fit resurfaced drums or install new drums.Don't overlook brake master cyl /brake pedal push rod adjustment too.
0helpful
1answer

How to replace a rear brake cylinder and new brake shoes?

remove rear wheel , pull off the brake drum , you may have to use two flat blade screwdrivers one eachside to prize the drum off,clamp the flexable brake hose behind the brake assembly so fluid does'nt drainout,at the rear of the back plate you will need to disssconnect the hand brake cable usually a spring needs compressing by hand and then are able to disconnect the cable from its seating,take a picture of the brake shoe assembly before dismantling it so you know where the components go when re building, there will be spring loaded pin holding the shoes in place ,with a pair of pliers push and twist the flat washer so the pin head comes through the retaining washer you should then be able to lift away the shoe's and mechanism , next at the rear of the cylinder disconnect the brake pipe and the two retaining screws , fittings is the reverse , if you can get a workshop manual for the vehicle this will give step by step guide a tips for that exact vehicle, once back to gether unclamp the brake hose and bleed the brakes , take your time and if not sure if it looks right have a look at the picture or alternatively take the other wheel and drum off to check good luck
0helpful
1answer

How to remove and clean and replace the rear brakes on a 2008Toyota yaris

REMOVING REAR BRAKE DRUM SUB-ASSEMBLY
1. Release the parking brake and remove the rear
brake drum.
If the rear brake drum cannot be removed easily,
do the following:-
2.Remove the hole rubber and insert a screwdriver
through the hole into the backing plate, and hold the
automatic adjust lever away from the adjuster.
3.Using another screwdriver, contract the brake shoe
by turning the adjuster.
4. Take out the brake drum from the flange.
5. remove the shoe hold down spring cup, shoe hold down spring, pin and front side brake shoe.
6. Remove the tension spring. Remove the shoe return spring from the rear brake shoe and remove the parking brake shoe strut set.
7. Remove the shoe holding spring cup, shoe hold spring, pin and rear brake shoe.
8. separate the parking brake cable.
9. Remove the automatic adjust lever tension spring and remove the automatic adjust lever.
10. remove the C-washer and remove the parking brake shoe lever.
NOTE: Do not use any solvent like gasoline to wash the brake parts.
Always wear safety goggles and mask before using compressed air.


3helpful
2answers

How do i take off the brake drums on a 2003 chevy cavalier

After you remove the tire, the drim should slide off. If it doesn't then try using a rubber mallet and gently tap on the outside edge as you pull on it. Sometimes you also need to tap on the drum in the center part. I have sprayed penetrating lubes like WD-40 or PB Blaster into the seam at the center. You may also have to back off the parking brake cable or even use the adjuster to back off the shoes.
1helpful
2answers

Parking brake cable stretched beyond adjustment how do you replace

Rear Brake Shoes- You'll need to know how to remove the rear brake shoes to remove the parking brake cable. REMOVAL AND INSTALLATION Amigo and Rodeo
  1. Raise and safely support the vehicle.
  2. Remove the rear wheels.
  3. Remove the brake drums.
  4. Remove the brake return springs.
  5. Remove the leading shoe holding pin and spring, and then the leading shoe.
  6. Remove the self-adjuster and the adjuster lever.
  7. Remove the trailing shoe holding pin and spring.
  8. Disconnect the parking brake cable from the trailing shoe and remove the trailing shoe. Remove the parking brake lever from the trailing shoe. To install:
  9. Attach the parking brake lever to the trailing shoe.
  10. Connect the parking brake cable to the parking brake lever.
  11. Apply a thin coat of high temperature grease to the shoe contact points on the brake backing plate (locations A and C in the accompanying illustration), piston contact surface (B), and self-adjuster (D). Fig. 1: Exploded view of the rear drum brakes — Amigo and Rodeo 93026g56.gif

  12. Position the trailing shoe on the backing plate and install the hold-down pin, spring, and retainer. Don't stretch the return spring when fitting the shoes onto the backing plate.
  13. Connect the upper return spring and the leading shoe to the trailing shoe and position the leading brake shoe on the backing plate.
  14. Install the adjuster assembly and the hold-down pin, spring, and retainer.
  15. Use a brake spring tool to install the lower return spring.
  16. Install the self-adjuster lever and adjuster spring.
  17. Adjust the shoe-to-drum clearance to 0.0098–0.0157 in. (0.25–0.40mm) and install the brake drum.
  18. Check the brake drum for scoring or other wear. Machine or replace as necessary. Check the maximum brake drum diameter specification when machining.
  19. Install the rear wheels. Lower the vehicle.
  20. Road-test the vehicle.
prev.gif next.gif
1helpful
1answer

Rear brake drum is stuck; cannot remove to replace brake shoes. Need some tips to try. 2002 ford zx2 rear brake replacement

Is the emergency brake on? If so release it the brake shoes should release the drum. Second option is to spray some WD40 on the threads next to the drum and replace the wheel putting the lug nuts on finger tight. Lower the vehicle and slowly drive forward for a couple of feet and slam on the brakes, then do the same in reverse. Raise the vehicle and remove the wheel and see if the drum is loose or give the drum a couple of whacks with a rubber hammer.
0helpful
1answer

How to remove rear brake shoes

How to Replace Brake Shoes
(DIY Complexity: Moderate / DIY Time: 3.2 hours)

Parts:
1. Brake Shoe Set

Tools:
1. Combination Wrench Set
2. Floor Jack
3. Jack Stand Set
4. Mallet Hammer
5. Brake Spring Tool
6. Flat Head Screwdriver
7. Needle Nose Pliers
8. Tire Iron
9. Brake Resetting Gauge

Supplies:
1. Brake Cleaner

Steps:
Step 1 * Secure your vehicle on a level surface, making sure your car will not roll or lean when jacked up.
o Tip: Safety Tip:Always wear safety glasses when working on your vehicle. Wear other personal protective equipment (PPE) when necessary, for example latex gloves or safety shoes.

Step 2 * Break the lug nuts loose but do not remove. Lift up your vehicle using a floor jack.
o Tip: Using an aftermarket floor jack, instead of the original equipment (OE) jack, can make the job easier and safer. Verify the condition of the floor jack before use.

o Tip: Lug nuts fasten the wheel to the hub and may be on very tight. To gain more leverage, use a breaker bar to loosen the nuts.

Step 3 * Secure the vehicle with jack stands on both sides for safety before starting any work. Do not rely on the jack to hold the vehicle up while working.

Step 4 * Remove the lug nuts. Remove the wheels.
o Tip: Make sure the parking brake is released before removing the brake drum.

Step 5 * Remove the brake drum. If necessary, back off the star wheel adjuster.
o Tip: Hit the brake drum with a rubber mallet to break it loose from a rusted hub.

Step 6 * Clean the brake assembly using a“wet wipe method”. This method uses a spray bottle with water and detergent. Do not use compressed air to clean the brakes. Inspect the brake shoes for wear or damage.
o Tip: It is a good idea to leave one side assembled to use as a reference while you work on the other side.

Step 7 * Remove the primary and secondary brake shoe return springs from the anchor pin and brake shoes.
o Tip: The primary spring is connected to the front (primary) brake shoe and the secondary spring is connected to the rear (secondary) brake shoe.

Step 8 * Remove the adjuster cable and spring assembly. Remove the star adjusting screw and thread the adjuster all the way in.

Step 9 * Remove the front brake shoe retainer. Remove the front brake shoe and parking brake link.

Step 10 * Remove the parking brake lever from the rear brake shoe. Remove the rear brake shoe retainer and remove the rear brake shoe.
o Tip: Specialty brake tools are available to make brake shoe removal easier; but it is possible to remove the brake components with pliers.
o Tip: While you have the drum brake assembly apart, pry the outer seal away from the wheel cylinder and check for leaking brake fluid. If any brake fluid is leaking, replace or rebuild the wheel cylinder

Step 11 * Apply white lithium grease to the backing plate contact points.

Step 12 * Install the new brake shoes in the reverse order of removal. Be careful to keep the new brake shoes clean.

Step 13 * Inspect the brake drum and resurface or replace if necessary. Install the brake drum and adjust the brake shoes.
o Tip: There is a slot on the back of the backing plate usually blocked with a rubber grommet. To adjust the brakes, insert a screw driver into the slot and turn the star wheel adjuster. Spin the brake drum and stop adjusting when you feel a slight drag.

Step 14 * Install the wheels. Torque lug nuts to manufacturer’s specifications.

Step 15 * Lower vehicle and test drive to verify repairs.

Hope help with this (remember rated and comment this help).
0helpful
1answer

2000 mercury mystique can not get drum back on after replacing brakes

make sure the brake shoe fits in the drum and is seated tip to tip and you can push it all the way around the inside of the drum.
then install the shoes.
and then trun the adjuster screw all theway in to colapse the shoes in all theway.then the drum will fit.
the adjust the adjuster screw back out untill it just begins to rub on the drum.not tight at all just enough to rub very lightly.
after a few miles you may have to go back to the rear brakes and adjust them a little more.
proper adjustment in the rear shoes is important to a good strong pedal.

hope this helps
thank you
jm
2helpful
1answer

I need a schematic for the rear brakes on an F150 super cab with 4.6L automatic trans 4wheel drive

Drum, Rear Brake System Standard Rear Brake
9969082.gif
Item Part Number Description 1 2069 Brake Shoe Hold-Down Spring Pin 2 — Rear Wheel Cylinder Retaining Bolt (2 Req'd) 3 — Washer (2 Req'd) 4 — Anchor Pin (Part of 2211) 5 — Wheel Cylinder 6 2028 Brake Shoe Anchor Pin Guide Plate 7 2A637 Parking Brake Lever 8 2296 Brake Shoe Retracting Spring (Short) 9 2296 Brake Shoe Retracting Spring (Long) 10 2200 Rear Brake Shoe and Lining (Secondary) 11 — Washer 12 2106 Parking Brake Lever Pin Retainer 13 — Brake Shoe Adjusting Lever Cable Guide 14 2A642 Primary Brake Shoe Parking Brake Lever Link 15 2A601 Parking Brake Link Spring 16 2068 Brake Shoe Hold-Down Spring 17 2A176 Brake Shoe Adjusting Lever 18 2048 Brake Shoe Adjusting Screw Socket 19 2047 Brake Shoe Adjusting Screw Nut 20 2041 Brake Adjusting Screw 21 2049 Brake Shoe Adjusting Screw Spring 22 2200 Rear Brake Shoe and Lining (Primary) 23 2A178 Brake Shoe Adjusting Lever Cable 24 2211 Brake Backing Plate
Heavy Duty Rear Brake
6dcb5d2.gif
Item Part Number Description 1 — Rear Wheel Cylinder Retaining Bolt 2 00538 Lock Nut 3 2212 Rear Brake Backing Plate 4 2262 Rear Wheel Cylinder 5 2A642 Primary Brake Shoe Parking Brake Lever Link 6 2A601 Parking Brake Link Spring 7 2A637 Parking Brake Lever 8 2106 Parking Brake Lever Pin Retainer 9 — Parking Brake Lever Bolt 10 — Secondary Shoe Assembly 11 2A179 Brake Shoe Adjusting Lever Cable Guide 12 2068 Brake Shoe Hold-Down Spring 13 — Adjusting Lever Pin 14 — Adjusting Lever Return Spring 15 2A176 Brake Shoe Adjusting Lever 16 2047 Brake Shoe Adjusting Screw Nut 17 2049 Brake Shoe Adjusting Screw Spring 18 2041 Brake Adjuster Screw 19 — Primary Shoe Assembly 20 2068 Brake Shoe Hold-Down Spring 21 2200 Rear Brake Shoe and Lining 22 2035 Brake Shoe Retracting Spring 23 2A178 Brake Shoe Adjusting Lever Cable 24 2092 Brake Adjusting Hole Cover 25 2069 Brake Shoe Hold-Down Spring Pin
The rear drum brakes:
  • Have internal shoes that expand against the brake drum (1126).
  • Are a single-anchor type.
  • Are actuated by one rear wheel cylinder (2262).
  • Have two pistons in the rear wheel cylinder (2261). One exerts force against the upper end of the primary shoe; the other exerts force against the upper end of the secondary shoe.
  • Adjust rear brake shoes and linings (2200) automatically.
  • Need manual brake adjustment if the adjusters are not operating properly or after the rear brake shoes and linings have been replaced.
When the brake pedal is applied, hydraulic fluid pressure forces the pistons in the rear wheel cylinder outward, moving the rear brake shoes and linings against the brake drum.
The rear drum brake system includes the parking brake mechanism. Refer to Section 206-05 .
5helpful
2answers

REAR BRAKES

i think your aware of how to change the brakes if im right and your problem is the rusted drum doesnt want to come off the only way to get the old drum off is to remove adjuster plug from behind drum dustshield and adjust the shoes so that there not even close to the braking area of the drum then try and wiggle the drum off of the assembly if it is not coming off then you need to use the old nylon hammer on the drum and i mean you must hit the drum from side to side trying by hand to wiggle the drum off its a tight fit and you need to strike the drum on the face not on the fins not wanting to damage with persistance and care and patience you will eventually be able to remove the drum to service brakes take care and good luck with it
Not finding what you are looking for?

400 views

Ask a Question

Usually answered in minutes!

Top Toyota Experts

ZJ Limited
ZJ Limited

Level 3 Expert

17989 Answers

Thomas Perkins
Thomas Perkins

Level 3 Expert

15088 Answers

ROBERT GARCIA
ROBERT GARCIA

Level 3 Expert

926 Answers

Are you a Toyota Expert? Answer questions, earn points and help others

Answer questions

Manuals & User Guides

Loading...