At Fixya.com, our trusted experts are meticulously vetted and possess extensive experience in their respective fields. Backed by a community of knowledgeable professionals, our platform ensures that the solutions provided are thoroughly researched and validated.
- If you need clarification, ask it in the comment box above.
- Better answers use proper spelling and grammar.
- Provide details, support with references or personal experience.
Tell us some more! Your answer needs to include more details to help people.You can't post answers that contain an email address.Please enter a valid email address.The email address entered is already associated to an account.Login to postPlease use English characters only.
Tip: The max point reward for answering a question is 15.
if it is that bad , go to a wreckers / junk yard and get the full wiring harness and replace the existing harness
wiring diagrams are in the workshop manual available from ant auto parts shop
Use a digital multimeter check for proper voltage. You also need to check for a good ground. In the diagram, the top wire at head lamp is voltage, headlamp switch on. The bottom wires are ground. Your headlamp switch/dimmer are part of the ground circuit for headlamps. You might be able to use redundant ground with jumper wire to see if lamp will brighten? If it does, problem on the ground circuit, either wiring itself or headlamp/dimmer switch.
its a bad earth thats all i think its the top connection out of the three connections on the back of the bulb ,nothing more is wrong iam sure and might i add another person after my own heart as to these add on alarms ,because they always go wrong with age and give me no end of headaches and the customer just will not beleave me they go to these web sites and then think they know it all and try telling my job .
A loose ground wire to the headlight will keep it dim,Or a headlight adjustment will bring the headlight up.If you can have your headlight turned on a garage door or something at night,and then watch as you change your headlights from low beam to high beam which ones are higher.the last thing to verify is that your high beam headlights are not the plastic lens type that turn dull which cuts the light power.
2000 Pontiac Grand Prix Car Stereo Wiring Guide
Car Radio Battery Constant 12v+ Wire: Orange Car Radio Accessory Switched 12v+ Wire: Yellow Car Radio Ground Wire: Black Car Radio Illumination Wire: Brown Car Stereo Dimmer Wire: Gray Car Stereo Antenna Trigger Wire: N/A Car Stereo Amp Trigger Wire: N/A Car Stereo Amplifier Location: N/A Car Audio Front Speakers Size: N/A Car Audio Front Speakers Location: Dash Left Front Speaker Positive Wire (+): Tan Left Front Speaker Negative Wire (-): Gray Right Front Speaker Positive Wire (+): Light Green Right Front Speaker Negative Wire (-): Dark Green Car Audio Rear Speakers Size: N/A Car Audio Rear Speakers Location: Rear Deck Left Rear Speaker Positive Wire (+): Brown Left Rear Speaker Negative Wire (-): Yellow Right Rear Speaker Positive Wire (+): Dark Blue Right Rear Speaker Negative Wire (-): Light Blue
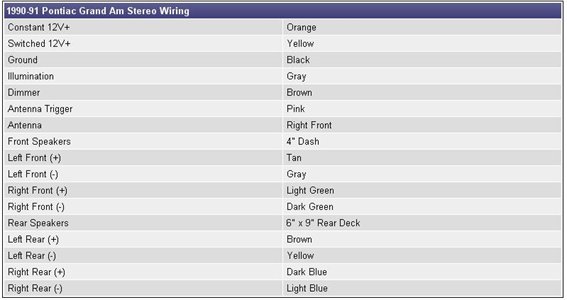
Here are the wires colors of the harness and what they do.
2001 Pontiac Grand Am Car Audio Wiring Diagram
Car Radio Battery Constant 12v+ Wire: Orange Car Radio Accessory Switched 12v+ Wire: The radio harness does not provide a switched power source. Run a wire to the fusebox for switched power. Car Radio Ground Wire: Black/White Car Radio Illumination Wire: Gray Car Stereo Dimmer Wire: Brown Car Stereo Antenna Trigger Wire: N/A Car Stereo Amp Trigger Wire: Pink Car Stereo Amplifier Location: Mounted behind trim in the left side of the trunk. Car Audio Front Speakers Size: N/A Car Audio Front Speakers Location: N/A Left Front Speaker Positive Wire (+): Tan Left Front Speaker Negative Wire (-): Gray Right Front Speaker Positive Wire (+): Light Green Right Front Speaker Negative Wire (-): Dark Green Car Audio Rear Speakers Size: N/A Car Audio Rear Speakers Location: N/A Left Rear Speaker Positive Wire (+): Brown Left Rear Speaker Negative Wire (-): Yellow Right Rear Speaker Positive Wire (+): Dark Blue Right Rear Speaker Negative Wire (-): Light Blue


×