2002 Kia Sportage Logo

Related Topics:

Posted on Sep 29, 2009
Answered by a Fixya Expert

Trustworthy Expert Solutions

At Fixya.com, our trusted experts are meticulously vetted and possess extensive experience in their respective fields. Backed by a community of knowledgeable professionals, our platform ensures that the solutions provided are thoroughly researched and validated.

View Our Top Experts

Timing marks on 2002 kia sportage 2.0 litre ,were are the marks on the camshaft sprockets lineing up when installing new belt

1 Answer

Anonymous

Level 3:

An expert who has achieved level 3 by getting 1000 points

All-Star:

An expert that got 10 achievements.

MVP:

An expert that got 5 achievements.

Brigadier General:

An expert that has over 10,000 points.

  • Master 7,353 Answers
  • Posted on Sep 29, 2009
Anonymous
Master
Level 3:

An expert who has achieved level 3 by getting 1000 points

All-Star:

An expert that got 10 achievements.

MVP:

An expert that got 5 achievements.

Brigadier General:

An expert that has over 10,000 points.

Joined: Sep 17, 2009
Answers
7353
Questions
1
Helped
2487945
Points
23804

They should be right at 12'oclock. there should be marks on the sprockets and the cover behind the sprockets.

Add Your Answer

×

Uploading: 0%

my-video-file.mp4

Complete. Click "Add" to insert your video. Add

×

Loading...
Loading...

Related Questions:

9helpful
1answer

I need the diagram for a 2006 kia sorento timing chain markings, (the chain has no coloured links)

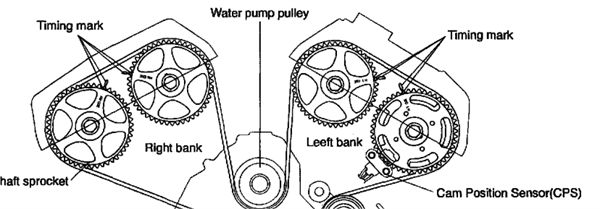
The Sorento has a timing BELT not a chain. Here is an image of the 3.5 litre engine & the timing marks. Note: special tools are required to hold the camshaft sprockets in place when belt is installed to prevent any movement....I hope this helps.

mr_brokrench.gif
1helpful
2answers

How do I time a 1994 dodge caravan 3 0L Problem PLEAS IF ANY ONE HAVE THE DIGRAM

Is this what you needed?

jturcotte_1784.gif

Fig. Fig. 14: Sprocket timing for belt installation-3.0L engines


0900c15280215dd8.jpg enlarge_icon.gifenlarge_tooltip.gif

Fig. Fig. 15: Secure the sprocket when removing or installing the nut-3.0L engines


0900c15280215dd9.jpg enlarge_icon.gifenlarge_tooltip.gif

Fig. Fig. 16: Timing belt tensioner-3.0L engines


0900c15280215dda.jpg enlarge_icon.gifenlarge_tooltip.gif

Fig. Fig. 17: Positioning the tensioner-3.0L engines
The timing belt can be inspected by removing the upper (front outer) timing cover.

  1. Disconnect the negative battery cable.
  2. Remove the accessory drive belts.
  3. Remove the timing belt covers.
  4. Identify the timing belt running direction to avoid reversal during installation.
  5. Loosen timing belt tensioner bolt and remove timing belt.
  6. Remove the crankshaft sprocket flange.

To install:
  1. Rotate the crankshaft sprocket until timing mark on crankshaft sprocket is lined up with the oil pump timing mark at 1 o'clock position.
  2. Rotate the (inner) camshaft sprocket until mark on (inner) camshaft sprocket is lined up with the timing mark on alternator bracket.
  3. Rotate the (outer) camshaft sprocket (radiator side) until mark on the sprocket is lined up with the timing mark on the timing belt inner cover. Refer to timing belt illustration.
  4. Install the timing belt on the crankshaft sprocket while maintaining pressure on the tensioner side.
  5. Position the timing belt over the camshaft sprocket (radiator side). Next, position the belt under the water pump pulley, then over the (inner) sprocket and finally over the tensioner.
  6. Apply rotating force in the opposite direction to the camshaft sprocket (radiator side) to create tension on the timing belt tension side.
  7. Rotate the crankshaft in a clockwise direction and recheck engine timing marks.
  8. Install the crankshaft sprocket flange.
  9. Loosen the tensioner bolt and allow tensioner spring to tension the belt.
  10. Again rotate the crankshaft in a clockwise direction (2) full turns. Recheck the engine timing. Tighten the tensioner bolt to 23 ft. lbs. (31 Nm).
  11. Install the timing covers.
  12. Install the accessory drive belts.
  13. Connect battery negative cable.
0helpful
1answer

I need to know how to change a timing belt on a 2002 Kia Sendona

  1. Record the radio anti theft code data.
  2. Remove or disconnect the following:

    Negative battery cable Engine cover Accessory drive belts Idler pulley Crankshaft pulley Power steering pump pulley Belt tensioner pulley Upper and lower timing belt covers
  3. Support the engine with a floor jack and remove the engine mount.
  4. Rotate the engine to align the camshaft sprocket timing marks with the cylinder head cover timing marks.

    0996b43f8022cb71.jpg

    Fig. Timing belt routing and timing marks-3.5L Engine

  5. Remove or disconnect the following:

    Auto tensioner Timing belt

    0996b43f8022cb72.jpg

    Fig. Timing belt and related components-3.5L Engine


To install:
  1. Ensure that the engine is set to Top Dead Center (TDC).
  2. Prepare the auto tensioner for installation by compressing it in a vise and installing a retaining pin.
  3. Install the timing belt in the following order:
    1. Crankshaft sprocket
    2. Idler pulley
    3. Left bank exhaust camshaft sprocket
    4. Left bank intake camshaft sprocket
    5. Water pump pulley
    6. Right bank intake camshaft sprocket
    7. Right bank exhaust camshaft sprocket
    8. Tensioner pulley

  4. Install the auto tensioner. Do not remove the retaining pin at this time.
  5. Check that the crankshaft and camshaft timing marks are aligned correctly.
  6. Rotate the crankshaft 1 / 4 turn Counterclockwise .
  7. Rotate the crankshaft 1 / 4 turn Clockwise to return the engine to TDC.
  8. Loosen the tensioner pulley center bolt.
  9. Apply 44 inch lbs. (5 Nm) torque to the tensioner pulley as shown and tighten the center bolt to 32-41 ft. lbs. (43-55 Nm).

    0996b43f8022cb73.jpg

    Fig. Adjusting the tensioner pulley-3.5L Engine

  10. Remove the auto tensioner retaining pin.
  11. Rotate the crankshaft 2 revolutions Clockwise , then wait 5 minutes for the auto tensioner to adjust.
  12. Measure the auto tensioner rod as shown. If the measurement is not 3.8-4.5 mm, then repeat the belt tensioning procedure.

    0996b43f8022cb74.jpg

    Fig. Measuring the auto tensioner rod-3.5L Engine

  13. When the auto tensioner measurement is correct, install or connect the following:

    Engine mount Upper and lower timing belt covers Belt tensioner pulley Power steering pump pulley Crankshaft pulley Idler pulley Accessory drive belts Engine cover Negative battery cable
  14. Reprogram the radio anti theft codes.
0helpful
1answer

Como poner la banda de tienpo de un toyota camery

Installation
1.Install No. 2 idler pulley (if removed). Install and tighten bolt to specification. See TORQUE SPECIFICATIONS . Ensure idler pulley is clean and rotates smoothly. 2.Install No. 1 idler pulley and tension spring (if removed). Pry No. 1 idler pulley away from timing belt area as far as possible. Temporarily tighten No. 1 idler pulley bolt. Ensure idler pulley is clean and rotates smoothly. 3.Using crankshaft pulley bolt, rotate crankshaft so timing mark on crankshaft sprocket aligns with timing mark on oil pump housing. See. This will position keyway in crankshaft sprocket at 12 o'clock position.

CAUTION:If reusing timing belt, ensure reference marks on timing belt align with reference marks placed on crankshaft and camshaft sprockets. Ensure timing belt is installed in original direction of rotation.
4.Ensure all sprockets and idler pulleys are clean. Install timing belt on crankshaft sprocket, oil pump sprocket, No. 1 idler pulley, and then No. 2 idler pulley in sequence. 5.Install timing belt guide with cupped side away from crankshaft sprocket and flat side toward timing belt. Install No. 1 timing belt cover and new gasket. 6.Align crankshaft pulley key groove with key in crankshaft. Install crankshaft pulley. Install and tighten crankshaft pulley bolt to specification. 7.Rotate crankshaft clockwise so cylinder No. 1 is at TDC on compression stroke. Ensure timing mark on crankshaft pulley aligns with "0" mark on No. 1 timing belt cover. If reusing timing belt, ensure reference mark on timing belt aligns with upper edge of No. 1 timing belt cover. 8.Rotate camshaft, and align hole in camshaft sprocket with alignment mark on camshaft bearing cap. See Fig. 2 . Install timing belt on camshaft sprocket. If reusing timing belt, ensure reference mark on timing belt aligns with the reference mark on camshaft sprocket. Ensure tension exists on timing belt between the crankshaft and camshaft sprockets.
CAUTION:DO NOT rotate crankshaft counterclockwise, as viewed from timing belt end of engine.
9.Loosen No. 1 idler pulley bolt 1/2 turn. Rotate crankshaft pulley 2 full revolutions clockwise from TDC to TDC. 10.Ensure timing mark on crankshaft pulley aligns with "0" mark on No. 1 timing belt cover, and hole in camshaft sprocket aligns with alignment mark on camshaft bearing cap. See Fig. 2 . If timing marks are not aligned, remove timing belt and reinstall. 11.Rotate crankshaft clockwise 1 and 7/8 revolutions and align crankshaft pulley "0" mark with 45-degree Before Top Dead Center (BTDC) mark on No. 1 timing belt cover. See Fig. 5 . 12.Tighten No. 1 idler pulley bolt to specification. See TORQUE SPECIFICATIONS . Install No. 2 timing belt cover and gaskets. Install and tighten spark plugs to specification. 13.To install remaining components, reverse removal procedure. Install all bolts/nuts on right (timing belt side) engine mount before tightening to specification. 14.On Camry, when installing control rod and bracket on strut tower and right (timing belt side engine mount, tighten bolts to specification in sequence.
1helpful
1answer

Fix timing belt and reset cam mark front and rear

Welcome to FIxYa.com


YOU WANT TO KNOW HOW TO REPLACE TIMING BELT?


Due to the amount of images FixYa can not handle them into one thread. Please e-mail me for the diagrams (PDF Format) at [email protected].
leedavidian_76.png


Timing Belt Service 2002 Kia Sedona 3.5 liter

Removal

1. Remove the engine cover

2. Remove the drive bell.

3. Remove the idler pulley, crankshaft pulley, power steering pulley and tensioner

pulley.

4. Remove the upper and lower timing belt cover.

5. Support the engine with garage jack or special tool, and then remove the engine

mounting insulator.

Caution: Take care not to deform the engine oil pan.

Image 1

6. Remove the auto tensioner.

Notice: Rotate the crankshaft clockwise and align the timing mark to get the No.1

cylinder's piston be in TðC position (compression stroke). At this time, the timing

marks of the camshaft sprocket and cylinder head cover should coincide with each

other.

Image 2

'. Remove the timing bell.

Notice: When re-using timing bell, make sure of marking the rotating direction on

the belt so as to install correctly.

Image 3

Installation

Method of installing timing bell and auto tensioner

Image 4

1. Install the idler pulley to the engine support lower bracket.

Image 5

2. Install the tensioner arm, shaft and plain washer to the cylinder block.

Tightening torque: 35 -55 Nm (350-550 kg-cm, 25.82 -40.57 ft. lbs.)

Image 6

3. Install the crankshaft sprocket.

Notice: Confirm if timing marks coincide with.

Image 7

Caution: Align the spacer with a pin, and assemble it exerting even force not to

deform the crankshaft sensing blade.

Image 8

4. Install the camshaft sprocket. Align it like initial state as shown.

Caution: When installing camshaft sprocket, tighten the bolt holding hexagonal

part of camshaft to prevent it from tuning.

5. Install the auto tensioner to the oil pump case.

Image 9

Caution: At this time the auto tensioner's set pin should be assembled completely.

Image 10

6. Align the timing marks of each sprocket and install the timing bell, maintaining the

proper belt tension between each shaft in this order. Crankshaft sprocket -> Idler

pulley -> Left bank exhaust camshaft sprocket -> Left bank intake camshaft sprocket

-> Water pump pulley -> Right bank intake camshaft sprocket -> Right bank exhaust

camshaft sprocket -> Tensioner pulley.

Caution:

1 As a result of this, position of No.1 cylinder comes to compression TDC.

2 As each camshaft sprocket tends to rotate by itself, pay attention not to injure

fingers or other bodily part. Especially be careful with the right bank.

3 In case the right bank camshaft sprocket rotates excessively, be cautious not to

rotate more than the initial stable position. Always align timing mark of rotating

sprocket by turning it reversely. In this case, pay attention not to rotate It

reversely from the initial position. (if. with one sprocket fixed at No.1

compression TDC position, the other sprocket is rotated one revolution

clockwise or counterclockwise, then the intake and exhaust valve might intetfere

each other)

7. After installing the timing bell, exert the reverse directed force to the right bank

exhaust camshaft sprocket to give tension on the belt. Holding this state, recheck it

each timing mark is correctly positioned.

S. With tensioner pulley slightly pushing the belt down, tighten the center bolt

slightly.

9. Pull out the auto tensioner set pin


How to adjust timing belt tension

1. Tension setting (While auto tensioner is not operating: And set pin being kept

installed.).

1) After rotating crankshaft 1/4 revolution reversely, rotate it clockwise to position

No.1 cylinder at TDC. Then, loosen the center bolt and give the belt 50 kg-cm of

tension with tensioner pulley socket (Two pins are attached) and torque wrench.

While maintaining this state, tighten the center bolt to the standard torque.

Center bolt standard torque 43 - 55 Nm (430 - 550 kg-cm, 31.72 - 40.57 ft. lbs.)

Image

2) Pull out the auto tensioner fixing pin.

2. How to check tension (While auto tensioner is operating: and fixing pin being

un-installed.)

1) After rotating crankshaft 2 revolutions clockwise to position No.1 cylinder at

TDC wait for about 5 minutes, and measure the amount of protruding of the auto

tensioner rod.

Caution: This is "leak down" time for the auto tensioner rod to protrude 1mm

when tension caused by rotation of the crankshaft has changed.

Image

2) Check if the amount of rod protruding is in the range of 3.8 -4.5 mm.

3. Recheck if each sprocket is within the specified range.

Notice: ¡fit is not within the specified range, repeat from procedure 6 as service

procedure of timing bell and auto tensioner installation method. Refer to Timing

Belt; Service and Repair.

leedavidian_75.png


Thank you for using FixYa.com

Regards, Lee Davidian

2helpful
1answer

Hi, I am looking for a timing belt diagram for a 1998 2.5ltr Subaru Outback or can you tell me which timing marks on the sprockets line up to the encasing.

Timing Belt Cover, Belt & Sprockets Removal & Installation 2.5L Engine To Remove:
  1. Remove the drive belts.
  2. Remove the A/C compressor drive belt tensioner. Timing belt & cover DOHC exploded view subaru-03-25-6470.gif

  3. Remove the crankshaft pulley.
  4. Remove the mounting bolts and left timing belt cover.
  5. Remove the mounting bolts and right timing belt cover.
  6. Remove the mounting bolts and front timing belt cover.
  7. Vehicles W/ M/T: Remove the timing belt guide.
  8. Ensure that the timing belt rotation arrows are still visible. If the marks are worn off, place new rotation marks on the belt. Timing belt alignment marks DOHC subaru-03-25-6472.gif

  9. Turn the crankshaft using a breaker bar and special adapter socket on the crankshaft. Align the timing mark on the crankshaft sprocket (1), left intake sprocket (2), left exhaust sprocket (3), right intake sprocket (4) and right exhaust sprocket (5) with the notches in cylinder block and timing belt cover.
  10. Paint alignment marks on the timing belt at the crankshaft and camshaft sprockets timing marks. CAUTION
    Do not turn the camshaft sprockets with the timing belt removed. The valves heads will contact each other causing the valve stems to bend.
  11. Remove the lower right idler pulley.
  12. Remove the timing belt.
  13. Remove the upper right idler pulley.
  14. Remove the lower left (toothed) idler pulley.
  15. Remove the belt tensioner.
  16. Hold the sprocket and remove the left intake and exhaust camshafts.
  17. Hold the sprocket and remove the right intake and exhaust camshafts.
  18. Remove the crankshaft sprocket.
To Install:
  1. Install the crankshaft sprocket.
  2. Hold the sprocket and install the right intake and exhaust camshafts with the mounting bolts. Tighten 58 ft-lb (78 Nm).
  3. Hold the sprocket and install the left intake and exhaust camshafts with the mounting bolts. Tighten 58 ft-lb (78 Nm).
  4. Reset the automatic belt tensioner as follows:
    • Remove the mounting bolt and belt tensioner. NOTE: Do not exceed more than 2,205 lb. (9,807 N).
    • Place the belt tensioner on a press. Press the adjuster rod down gradually (using more than 3 minutes) 66- lb (165 N) or more until the adjuster rod is aligned with the stop pin hole in the cylinder.
    • Insert a 0.08 in (2 mm) diameter pin or hex wrench into the pin hole to lock the adjuster rod.
    • Install the automatic belt tension adjuster with the mounting bolt. Tighten 18 ft-lb (25 Nm).
  5. Install the lower left (toothed) idler pulley. Tighten 29 ft-lb (39 Nm).
  6. Install the upper right idler pulley with the mounting bolt. Tighten 29 ft-lb (39 Nm). Crankshaft sprocket and oil pump cover alignment marks 2.5L DOHC subaru-03-25-4890.gif

  7. Align the timing mark on the crankshaft sprocket with the mark on the oil pump cover. Timing belt alignment marks DOHC subaru-03-25-6472.gif

  8. Align the single timing mark on the right exhaust camshaft sprocket with the notch on the timing belt cover.
  9. When the single timing mark on the right exhaust camshaft sprocket is aligned with the notch on the timing belt cover, ensure that the double lines on the intake camshaft and exhaust camshaft sprockets are aligned.
  10. Align the single timing mark on the left exhaust camshaft sprocket with the notch on the timing belt cover by turning the sprocket counter clockwise (viewed from front of engine).
  11. Ensure that the double lines on the intake camshaft and exhaust camshaft sprockets are aligned when the single timing mark on the left exhaust camshaft sprocket is aligned with the notch on the timing belt cover. CAUTION
    • The camshafts can be rotated independently causing the valves heads to contact each other resulting in bent valve stems.
    • When the timing belt is removed the camshafts will turn to the lowest cam lobe position by the force of the valve springs. Before installing the timing belt the 4 camshafts are in the lowest lift position (valves closed).
    • When the camshafts are rotated to install the timing belts, # 2 intake and # 4 exhaust cam lobes of the left camshafts are held to push their corresponding valves down. In this position, these valves are held in the open position. Right camshafts are held so their cam lobes do not push the valves down.
    • The left camshafts must be rotated from the lowest lobe position to the position where the timing belt can be installed at the smallest possible angle in order to prevent intake and exhaust valve contact. Camshaft sprockets rotation subaru-03-25-6473.gif

    • Do not turn the camshafts in the direction shown in the illustration because the valves will open at the same time and contact each other.
    CAUTION
    If the timing belt alignment is off the mark buy more than 3 teeth, the valves and pistons may have contact.
    Timing belt alignment marks DOHC subaru-03-25-6472.gif

  12. Align the timing marks on the belt with the marks on the sprockets in the numerical order shown in the illustration.
  13. Install the lower right idler pulley with the mounting bolt. Tighten 29 ft-lb (39 Nm).
  14. Ensure that the timing mark alignment is correct and remove the tensioner stop pin.
  15. Vehicles W/ M/T: Install the timing belt guide and temporarily tighten the mounting bolts.
  16. Vehicles W/ M/T: Measure the clearance between the guide and timing belt. The clearance should measure 0.039 ± 0.020 in (1.0 ± 0.5 mm).
  17. Vehicles W/ M/T: Tighten the guide bolts 7.2 ft-lb (9.8 Nm).
  18. Install and secure the front timing belt cover with the mounting bolts.
  19. Install and secure the right timing belt cover with the mounting bolts.
  20. Install and secure the left timing belt cover with the mounting bolts.
  21. Install the crankshaft pulley.
  22. Install the A/C compressor drive belt tensioner.
  23. Install the drive belts.
prev.gif next.gif
1helpful
1answer
20helpful
3answers

1999 kia sportage timing marks

dfd3ea1.gif Crankshaft match marks


Align marks on timing belt pulley and pump body.

Camshaft pulley alignment marks
9f1c7ef.gif
  1. Align marks on camshaft pulleys with alignment marks on seal plate.
  2. Install timing belt. NOTE: No looseness should exist on the tension side and at the camshaft pulleys.
  3. Loosen tensioner lock bolt.
  4. Turn crankshaft 2 revolutions in direction of rotation and check that timing marks are still in alignment.
  5. Tighten timing belt tension lock bolt to 27-38 ft lb (32-52 Nm).
  6. Apply a force of 22 lbs to timing belt between camshaft sprockets.
  7. Belt deflection should measure 0.30-0.33 in (7.5-8.5 mm)
  8. NOTE: Replace tensioner spring if timing belt deflection is excessive.
Timing Belt Installation


eb770f2.gif
  1. Install lower timing belt cover.
  2. Install upper timing belt cover.
  3. Install power steering drive belt and adjust belt tension.
  4. Install fan pulley.
  5. Install generator drive belt and adjust belt tension.
  6. Install A/C drive belt and adjust belt tension.
  7. Install splash guard.
  8. Install fan and fan shroud.
  9. Install 4 fan bolts. Tighten to 24 ft lb (33 Nm).
  10. Install fan shroud mounting bolts.
  11. Install fresh air duct.
  12. Connect hose to resonance chamber.
  13. Connect battery negative cable.
17helpful
2answers

Need instructions to replace 1993 Toyota Camry Timing Belt

Hi Kmcarroll77

TIMING BELT REPLACEMENT - 2.2L -1993 Toyota Camry

Installation
1.Install No. 2 idler pulley (if removed). Install and tighten bolt to specification. See TORQUE SPECIFICATIONS . Ensure idler pulley is clean and rotates smoothly. 2.Install No. 1 idler pulley and tension spring (if removed). Pry No. 1 idler pulley away from timing belt area as far as possible. Temporarily tighten No. 1 idler pulley bolt. Ensure idler pulley is clean and rotates smoothly. 3.Using crankshaft pulley bolt, rotate crankshaft so timing mark on crankshaft sprocket aligns with timing mark on oil pump housing. See. This will position keyway in crankshaft sprocket at 12 o'clock position.

CAUTION:If reusing timing belt, ensure reference marks on timing belt align with reference marks placed on crankshaft and camshaft sprockets. Ensure timing belt is installed in original direction of rotation.
4.Ensure all sprockets and idler pulleys are clean. Install timing belt on crankshaft sprocket, oil pump sprocket, No. 1 idler pulley, and then No. 2 idler pulley in sequence. 5.Install timing belt guide with cupped side away from crankshaft sprocket and flat side toward timing belt. Install No. 1 timing belt cover and new gasket. 6.Align crankshaft pulley key groove with key in crankshaft. Install crankshaft pulley. Install and tighten crankshaft pulley bolt to specification. 7.Rotate crankshaft clockwise so cylinder No. 1 is at TDC on compression stroke. Ensure timing mark on crankshaft pulley aligns with "0" mark on No. 1 timing belt cover. If reusing timing belt, ensure reference mark on timing belt aligns with upper edge of No. 1 timing belt cover. 8.Rotate camshaft, and align hole in camshaft sprocket with alignment mark on camshaft bearing cap. See Fig. 2 . Install timing belt on camshaft sprocket. If reusing timing belt, ensure reference mark on timing belt aligns with the reference mark on camshaft sprocket. Ensure tension exists on timing belt between the crankshaft and camshaft sprockets.
CAUTION:DO NOT rotate crankshaft counterclockwise, as viewed from timing belt end of engine.
9.Loosen No. 1 idler pulley bolt 1/2 turn. Rotate crankshaft pulley 2 full revolutions clockwise from TDC to TDC. 10.Ensure timing mark on crankshaft pulley aligns with "0" mark on No. 1 timing belt cover, and hole in camshaft sprocket aligns with alignment mark on camshaft bearing cap. See Fig. 2 . If timing marks are not aligned, remove timing belt and reinstall. 11.Rotate crankshaft clockwise 1 and 7/8 revolutions and align crankshaft pulley "0" mark with 45-degree Before Top Dead Center (BTDC) mark on No. 1 timing belt cover. See Fig. 5 . 12.Tighten No. 1 idler pulley bolt to specification. See TORQUE SPECIFICATIONS . Install No. 2 timing belt cover and gaskets. Install and tighten spark plugs to specification. 13.To install remaining components, reverse removal procedure. Install all bolts/nuts on right (timing belt side) engine mount before tightening to specification. 14.On Camry, when installing control rod and bracket on strut tower and right (timing belt side engine mount, tighten bolts to specification in sequence. See Fig. 6 . On MR2, tighten engine
b7619be.jpg
92cabaf.jpg
Hope this helps, don't forget to rate.

Lazaruselite
13helpful
3answers

How to replace timing belt on 1997 kia sportage

you have 2 sprokets to worry about the top two and crank gear, the crank gear has knocht on it and index on block ( towards back of gear visible from top) place on tdc mark ( top dead center), install the timing belt on this gear first then secure it with a piece of hose or anything that fits in between housing and belt to secure belt from moving from gear) then align the right side sproket on "E" for exhaust cam at top marks on cover and sprocket, then install belt over that sprocket, finally align left side sprocket "I" for intake to the top mark and install belt not too tight or it will make noise just make sure it is firm. now to double check from left to right with you standing in front of vehicle you should have left cam sprocket with "I" for intake to the top and right sproket with "E" for exhaust to the top. having bottom gear on tdc (top dead center mark) and all marks lined up with belt installed and proper tension secured, turn engine over twice and make sure marks meet in the same place then put everything back together. ( recommend you replace both idler and tension pulleys and check water pump, replace if needed or you'll be back.- this procedure goes the same to spectra, sephia, sportage, you will not damage the engine on these vehicles if belt goes out except rio. if timing belt goes out on the rio it will need an engine, if lucky just head. recommended replacement on all is every 60k miles) goo luck tightening the power steering drive belt when you put everything back together, just use a long bar to pry and good leverage. and a second hand comes in handy.
Not finding what you are looking for?

703 views

Ask a Question

Usually answered in minutes!

Top Kia Experts

ZJ Limited
ZJ Limited

Level 3 Expert

17989 Answers

Brad Brown

Level 3 Expert

19187 Answers

Thomas Perkins
Thomas Perkins

Level 3 Expert

15088 Answers

Are you a Kia Expert? Answer questions, earn points and help others

Answer questions

Manuals & User Guides

Loading...