Cars & Trucks Logo

Related Topics:

Raul De Felice Posted on Mar 09, 2013

Adjustable steering wheel loose

The adjustable steering column is loose, the handle wont tight the column into position

1 Answer

manie klopper

Level 1:

An expert who has achieved level 1.

New Friend:

An expert that has 1 follower.

Corporal:

An expert that hasĀ over 10 points.

Problem Solver:

An expert who has answered 5 questions.

  • Contributor 11 Answers
  • Posted on Mar 09, 2013
 manie klopper
Contributor
Level 1:

An expert who has achieved level 1.

New Friend:

An expert that has 1 follower.

Corporal:

An expert that hasĀ over 10 points.

Problem Solver:

An expert who has answered 5 questions.

Joined: Mar 09, 2013
Answers
11
Questions
0
Helped
2279
Points
27

Check to see if the bolts aernt striped that holds the clampe that holds the ajustebel steering

5 Related Answers

Anonymous

  • 186 Answers
  • Posted on May 16, 2009

SOURCE: play in the steering wheel column after position adjustment

When they did the alignment it's possible that they used a tool that locks the steering wheel straight while it's on the alignment rack.If they put too much pressure on the wheel when they used the steering wheel seat lock tool it may have stressed you tilt lock mech causing it not to lock where you want it.Hope this helps

Ad

Anonymous

  • 21 Answers
  • Posted on May 20, 2009

SOURCE: A rattle inside the steering wheel.

i would imagine the spring clip for the horn may be loose, or floating around in there, since you shouldnt have even touched the turn signal or any components there, i would definatlysay thats the problem, as far as the air bag, make sure to disconnect the battery and it should be ok, but work with it at your own risk

Anonymous

  • 335 Answers
  • Posted on Jul 19, 2009

SOURCE: 1989 GMC Sierra 3500 loose tilt steering column

Without taking the tilt mechanism off you can only reach 2 of the 3 bolts. If you use 1/4 in. socket on 1/4 in drive with 6 in extension you can just get at the left bolt. If you remove the tilt spring you can get to the bottom bolt. To remoce tilt spring retainer use standard Phillips.

Anonymous

  • 1 Answer
  • Posted on Jul 10, 2010

SOURCE: '89 chevy k1500 sloppy steering wheel (HELP PLEASE)

Everyone always gravitates to the suspension but folks, it's 99% sure that it is the EVO. The EVO is the sensor built into the steering column that senses movement of the steering wheel then controls the power steering pump accordingly. When it goes out (which is all too frequently) you get sloppy and loose steering at lower speeds and it does tighten up a bit on the highway at higher speeds. This is the way it is supposed to work but when it fails it's downright scary trying to keep the truck straight on a narrow two lane road!

Wayne Fraser

  • 83 Answers
  • Posted on Aug 31, 2010

SOURCE: steering wheel column very loose only holds in up position

I've had experience with two of these cars now. The mounting positions where the steering rack bolts to the fire wall rust away leaving the rack floating. Usually long before the rack starts to float the car leaks . Water starts to come in where the firewall rusted out. Its dangerous and should not be driven like this.

Ad

Add Your Answer

×

Uploading: 0%

my-video-file.mp4

Complete. Click "Add" to insert your video. Add

×

Loading...
Loading...

Related Questions:

1helpful
1answer

Have a grasshopper junior golf buggie. Steering column will not stay vertical whilst stationary. Tightened locating bolt at base of column but still falls towards the seat. Can you help??

Sure, I can help you with that. Here are a few things you can check to see why the steering column on your Grasshopper Junior golf buggy is not staying vertical: Make sure that the locating bolt at the base of the column is tightened all the way. Check for any loose or damaged components in the steering column assembly. Make sure that the steering wheel is properly aligned. If you have checked all of these things and the steering column is still not staying vertical, you may need to take the buggy to a qualified mechanic for further diagnosis and repair. Here are the steps on how to tighten the locating bolt at the base of the steering column on a Grasshopper Junior golf buggy: Locate the locating bolt at the base of the steering column. Use a wrench to tighten the locating bolt clockwise until it is snug. Do not overtighten the locating bolt, as you may strip the threads. Test the steering column to make sure that it is staying vertical. If you have tightened the locating bolt all the way and the steering column is still not staying vertical, you may need to check for any loose or damaged components in the steering column assembly. Here are some of the components you can check: Steering column shaft Steering column bearing Steering column joint Steering wheel If you find any loose or damaged components, you will need to replace them before the steering column will stay vertical. If you have checked all of the components in the steering column assembly and they are not loose or damaged, you may need to make sure that the steering wheel is properly aligned. Here are the steps on how to align the steering wheel on a Grasshopper Junior golf buggy: Locate the steering wheel adjustment screws. Turn the steering wheel adjustment screws clockwise or counterclockwise until the steering wheel is centered. Tighten the steering wheel adjustment screws to secure the steering wheel in place. If you have aligned the steering wheel and the steering column is still not staying vertical, you may need to take the buggy to a qualified mechanic for further diagnosis and repair.
0helpful
1answer

Steering wheel stuck and key wont turn

One of the things is a lock-out switch on the brake pedal lever. Some are coordinated with the gearshift, the Keyswitch, and the starter Relay. Check to see if the brake lights work when you press on the brake pedal. If no signal is going to the brake lights, then there is a chance that the Park shift lever, the steering wheel and the Keyswitch are bound up.

Sometimes a steering wheel is at the extreme reach of the travel in the front suspension. This can sometimes happen in cold weather when the car is sitting on ice or snow. When the ice or snow melts, the front tires settle into a position that puts pressure on the steering wheel and loads Torque up the steering column. Another possibility is that the car was bumped in the Parking lot and jammed into a position creating Torque on the steering column.

Last, the tumbler inside the Keyswitch could have fallen apart and that is why the mechanism is not releasing the steering wheel.

There are adjustments in the Keyswitch to be at the correct position to work with the lockout at the bottom of the steering column.
1helpful
1answer

Adjust height of Prizm steering wheel

Some Geo Prism's (and sister car Toyota Corolla) have adjustable steering columns, and some do not. The adjustment lever is on the left side of the steering column, underneath the turn signal arm. Pull this lever out...away from the steering column, and you will feel the entire column loosen for up and down positioning. To re-secure after fine tuning the desired height...push this lever firmly back into position beside the steering column. If your Prism does not have this lever...your car is not equipped with the adjustable optional column. Hope this helps.
2helpful
2answers

Engine cuts out when steering wheel tilt is adjusted. Also, cruise control not working.

For the cruise control, check the fuses under the steering wheel. As for the engine cutting out, don't adjust the steering wheel while driving.
0helpful
1answer

How do you remove a 1987 Ford Econoline ignition switch assembly

1982-88 Models Fig. 4: Align the flexible coupling to specifications (shown)--1982-88 models 89788g36.gif
Fig. 5: Exploded view of the steering column--1982-88 models 89788g41.gif
  1. Set the parking brake.
  2. Disconnect the battery ground cable.
  3. Disconnect the flexible coupling from the steering shaft flange.
  4. Disconnect the shift linkage rod(s) from the column.
  5. Remove the steering wheel. NOTE: If you have a tilt column, the steering wheel MUST be in the full UP position when it is removed.
  6. Remove the floor cover screws at the base of the column.
  7. Remove the steering column shroud by loosening the bottom screw and placing the shift lever in the No.1 position (on automatics) and pulling the shroud up and away from the column.
  8. Remove the instrument cluster column opening cover.
  9. Remove the 2 bolts securing the column support bracket to the pedal support bracket.
  10. Disconnect the turn signal/hazard warning harness and the ignition switch harness.
  11. Lift the column from the truck. To install:
  12. Position the column in the van.
  13. Connect the wiring.
  14. Insert the column through the floor so that the flange engages the flexible coupling, then, raise the column and loosely install the bracket bolts.
  15. Loosely install the flexible coupling nuts and floor plate screws.
  16. Install the steering wheel.
  17. Adjust the steering column as follows:
    1. Tighten the flexible coupling nuts to 35 ft. lbs. (47 Nm).
    2. Place the wheels in the straight-ahead position.
    3. Verify the safety pin-to-flange cut-out clearance of 0.160 in. with a feeler gauge.
    4. If necessary, loosen the flange nuts to adjust the clearance, then retighten the nuts when clearance is established.
    5. Tighten the column support bracket bolts to 20 ft. lbs. (27 Nm).
    6. Tighten the cover plate screws to 10 ft. lbs. (13.6 Nm).
    7. Tighten the lower clamp bolt to 10 ft. lbs. (13.6 Nm).
prev.gif next.gif
1helpful
1answer

96 Audi A4 2.8L how to replace combo head light switch on steering column?

For this repair you will need a 6mm Allen key or socket, long no. 1 phillips screwdriver, 24mm socket with extension and ratchet handle and a T20 Torx driver or socket.

Park the vehicle and make sure the front wheels are straight and the steering wheel centred. Remove the negative battery terminal (make sure you have the radio code first!). Loosen the two 6mm Allen bolts on the back of the steering wheel and CAREFULLY remove the airbag by pulling straight out on the orange connector on the back of the airbag. Always store the airbag, when removed from the vehicle, with the side facing the driver in the UP position, preferably out of the vehicle.

Loosen and remove the 24mm nut in the centre of the steering wheel. Make note of the position of the wheel relative to the steering shaft with a marker or scribe. Do not remove the steering wheel from the shaft as yet. Next remove the two phillips screws from the recess holes in the bottom steering column cover. Loosen the locking handle under the steering column to allow it to drop down and with the handle still loose, remove the Torx bolt from the centre of the lower cover. Next, remove the upper steering column cover and disconnect the two wiring connectors that come from the back of the steering wheel. With those two wires disconnected, remove the steering wheel by pulling it straight off towards you. Place the steering wheel on a bench or other flat surface so the wiring and connectors are not damaged.

Remove the three small phillips head screws from the lower steering column cover that were behind the steering wheel and carefully pull the cover free around the ignition tumbler. You now have access to the turn signal, headlamp and wiper switches. Be careful when removing electrical connectors and be sure to note the position of all screws and other fasteners.

Reinstall in the reverse order and follow procedure for entering radio code and resetting auto down feature on LH and RH front windows.
2helpful
1answer

Play in the steering wheel column after position adjustment

When they did the alignment it's possible that they used a tool that locks the steering wheel straight while it's on the alignment rack.If they put too much pressure on the wheel when they used the steering wheel seat lock tool it may have stressed you tilt lock mech causing it not to lock where you want it.Hope this helps
4helpful
1answer

2000 Mercury Villager: Is there a shift lever adjustment? When placing foot on brake pedal and pulling shift lever rearward it doesn't feel like the transmission is completely disengaging and it is...

You may have a loose shift linkage in the steering column. Remove the upper and lower plastic covers behind the steerong wheel (5 or 6 philips head) and see if you have any loose torx head or allen head screws. Ea
rlier models had this isue.

Also, go to this site for Villager Quest help.

http://autos.groups.yahoo.com/group/villagerquest/
Here's adjustment procedure too

SECTION 307-05: Automatic Transaxle/Transmission External Controls 2000 Villager Workshop Manual
GENERAL PROCEDURES Cable Adjustment —Shift Control
  1. Place the gearshift lever in PARK (P) position.
  1. Raise and support the vehicle. Refer to Section 100-02 .
  1. Remove the splash shield.
  1. Loosen the shift cable nut.
  1. Position the shift linkage in PARK (P) position.
  1. Tighten the shift cable nut.
b45630b.gif
  1. Move the gearshift lever through the entire shifting range.
  1. Verify that the engine will crank with the gearshift lever in PARK (P) or NEUTRAL (N) position.
  1. Adjust the transmission range (TR) switch as necessary, refer to Section 307-01 .
-------------------------------------------------
8d76d60.gif
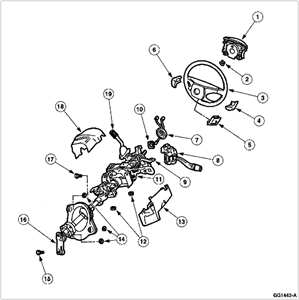
Item Part Number Description 1 043B13 Driver side air bag module 2 — Steering wheel nut 3 3600 Steering wheel 4 — Radio volume control cover 5 — Air bag sliding contact electrical connector access panel 6 — Cruise control cover 7 14A664 Air bag sliding contact 8 13K359 Multifunction switch 9 — Tilt wheel lever 10 13318 Turn indicator cancel cam 11 — Steering column assembly 12 — Steering column mounting bracket nuts (4 Req'd) 13 3C695 Lower column shroud 14 — Steering column opening cover nuts (3 Req'd) 15 — Steering column lower yoke bolt 16 3N725 Steering column lower yoke 17 — Steering column clamp bolt 18 3C695 Upper column shroud 19 7210 Gearshift lever
1helpful
1answer

My gear shifter is in the park position but says its in neutral. It wont move at all. The shifter is on the steering column and is a automatic.

It's a linkage adjustment on the bottom of the vehicle, or the pointer has broken loose from the steering column collar under the steering wheel.

You can sometimes crawl underneath the vehicle to figure out what needs to be adjusted if the problem is down there.
2helpful
3answers

Shifter sloppy, having trouble getting it into gear.

There is a bracket with two torx screws that gets loose. You need to tighten that. You will need to remove the plastic and metal shield under the dash, above the brake pedal to see the bracket. Look up above the brake pedal and wiggle the the shift lever and you will see what needs tightened. Worked for me.
Not finding what you are looking for?

145 views

Ask a Question

Usually answered in minutes!

Top Cars & Trucks Experts

ZJ Limited
ZJ Limited

Level 3 Expert

17989 Answers

john h

Level 3 Expert

29494 Answers

Arnie Burke
Arnie Burke

Level 3 Expert

7339 Answers

Are you a Car and Truck Expert? Answer questions, earn points and help others

Answer questions

Manuals & User Guides

Loading...