Lutron S2-LFSQ is made to control one ceiling paddle fan & 1 light. Switch will not work on florescent lights.
See manualTo use this product, your fan and light must already be controlled by 2 separate switches.
If you have just one switch that turns on the light & fan together, the S2-LFSQ will not work (without additional wiring).
Okay, you have two switches. One switch turns fan on-and-off. The other switch turns light on-and-off.
Here is wiring diagram from manual:
See diagram larger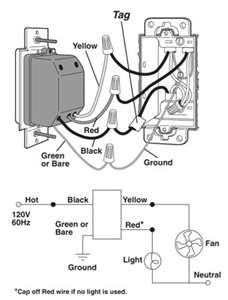
Here's how to wire:
-Before disconnecting wires from existing switches, mark each wire with tape and pen.
-There is one wire that feeds power to both switches > mark this the 'Hot wire' and it connects to Lutron black wire (if you are unsure about this wire, remove switches, separate wires, turn on power and test each wire to bare ground, tape tester leads to wood sticks so hands are away from power, Tester lights up on Hot wire)
-The switch that controls fan > mark this the 'Fan wire' and it will connect to Lutron Yellow wire
-the switch that controls light > mark this the 'light wire' and it will connect to Lutron Red wire
-Lutron Green wire or bare wire connects to bare ground wire.


I have the same problem. There is a diagram on th switch and the holes are marked but it still is not clear where the brush wires go in and where the red and black "field"?? wires go in.....Ken
Need to know if this is cordless or corded drill. Model and make would also help
Second request, what is the brand and model number we are talking about and also if you have the replacement switch number that would be great.
What is the brand and model number if you can furnish the type or serial number that would be helpful and I will see what I can do.
×