Micro Solutions RoadStor Pro (738909003104) DVD±RW Burner Logo

Related Topics:

Posted on Mar 08, 2017

Can't perform the first step...copying from memory card to CD!

I followed the instructions to the letter but could NOT get the thing to work! Charged the battery. Inserted 8 gig CF card with 5 images, turned on unit, inserted CD-R, pressed the backup button twice, waited a few seconds, then received the Message "backup error". Tried different CD-R discs, then tried different CD-RW discs, all of which were empty and formatted. Kept getting the above erroe message...sometimes the meassage would say"insert new disc." Man, I really thought this thing would be easy. I read many reviews before I bought it, most people found it to be easy to use, while some encountered the same problem as me, but never said if they ever solved the problem, or HOW to solve the problem. FRUSTRATING!!! New RoadStor...New CF memory card, and New CD's, and it just keeps spitting out the CD's!!! Any help you can provide would be greatly appreciated. Thanks for taking the time to read this and responding. Please help me get past this first "easy" step.

1 Related Answer

Anonymous

  • 6487 Answers
  • Posted on Dec 21, 2008

SOURCE: Just bought this RoadStor and

Yes you;re correct that alot of user have same problem as you and this problem is can be cause by a software glitch inside this portable burner that causes it not to work properly, fuirst thing that you can try is to contact the manufacturer and ask if there's any software update that you can do if none I suggest you replace this unit with adifferent brand...

Ad

Add Your Answer

×

Uploading: 0%

my-video-file.mp4

Complete. Click "Add" to insert your video. Add

×

Loading...
Loading...

Related Questions:

0helpful
1answer

Mu computer is windows 7 professional

Marie, If your computer is not equipped with a SD/Micro SD card Reader you will have to purchase one to simplify looking at it and copying it on computer. You can also use appropriate cable possibly to hook your camera up to computer.
Step 1/ Insert a USB card reader into an available USB port on your PC.
Step 2/ Insert the micro SD card into the card reader. Some card readers will only accept standard SD cards. If that's the case, insert your micro SD card into an SD card adapter and insert the adapter into the card reader.
Step 3/ Click "Open Folder to View Files" in the Auto Play window to launch Windows Explorer in the appropriate drive letter. Alternatively, press "Windows-E" and click the card reader's drive letter.
Step 4/ Drag and drop files to or from the micro SD card's drive letter to copy files. Alternatively, right-click and drag files and then select "Move Here" to move the files without keeping the files in the original location.
Step 5/ Select a file, press "Delete" and select "Yes" to delete files from the micro SD Card.
Step 6/ Right-click the micro SD card's drive letter and select "Eject." Once ejected, you may safely remove the card.
Check the attached links,instruction and guides, Good luck
"I hope this helped you out, if so let me know by pressing the helpful button. Check out some of my other posts if you need more tips and info."
How to Transfer Pictures From MicroSD Card to PC
How to use card reader
Card Readers Adapters
Memory Card Readers
Aug 20, 2016 • Cameras
1helpful
4answers

How to convert 2gb sd card into 4gb

How to convert 1 or 2GB memory stick into 4GB?
Just follow the simple instructions:
Step1: Insert your memory stick in USB port
Step 2: Open the Drive increaser software folder (download the software)
Step 3: Rename the Pendrive or memorystickimage_thumb%25255b35%25255d.png?imgmax=800
image_thumb%25255b32%25255d.png?imgmax=800
Step 4: Open Drive Increaser 2 icon from the Downloaded folder.
image_thumb%25255b6%25255d.png?imgmax=800
Step 5: The opened file is asks USB drive Name. (Before enter the name first Rename the Memory stick or Pen drive). Just enter the renamed pen drive name. Ex: 2341
image_thumb%25255b16%25255d.png?imgmax=800
Step 6: After that, it will ask USB pendrive letter (Ex: H or I or J). Repeat this two times
image_thumb%25255b43%25255d.png?imgmax=800
Step 7: After Drive letter entry some process will be done with Red color like this image
image_thumb%25255b49%25255d.png?imgmax=800
Step 8: Finally it shows Done Please enter any key to done.
image_thumb%25255b56%25255d.png?imgmax=800

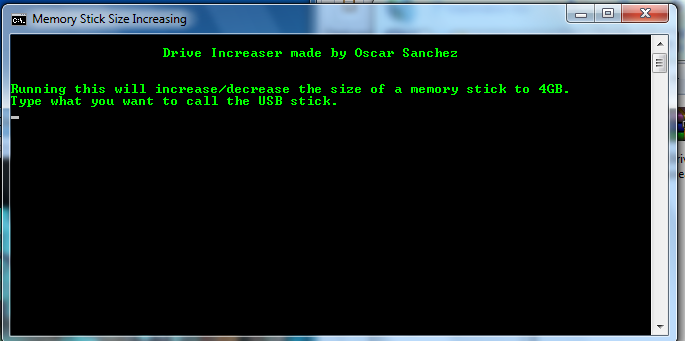
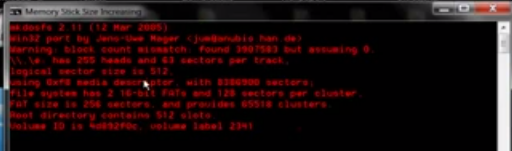
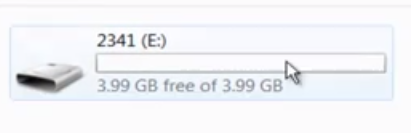
Now your Pen drive is 4GB
image_thumb%25255b63%25255d.png?imgmax=800

0helpful
1answer

I want my sandisk memory card of 2gb to be formatted which needs drivers.

there is no requirement of driver to format any external memory card
you may format the card by following this step:

First connect you memory card to the PC and check the drive letter of your memory card
Start - run - (type) cmd - (press enter)
a black window will come
write the command

format (drive letter followed by :)
for example if your memory card has a drive letter as "K" then you may write like this
c:\format k: (press enter) you may also use the command
c:\format /s k: (press enter)
0helpful
1answer

Won't turn turn on. A red and green light comes on, but nothing on the screen.

Step one: Reset the camera
  1. If you have an optional memory card installed, remove it.
    NOTE: Although removing an optional memory card is not necessary for performing the reset, it eliminates the memory card as a possible cause of the problem.
  2. Remove all batteries from the camera for at least five seconds.
  3. Reinsert the batteries and close the Battery/Memory card door.
  4. After verifying that the camera works without an optional memory card, reinsert the card if you removed one in Step 2.
Try to turn the camera on. If it now works properly, the camera experienced a temporary electrical problem and should now work properly.
  • If the issue is resolved , you do not need to continue with the rest of the instructions in this document.
  • If the is not resolved , continue with the next step.
Step two: Check for damage or corrosion on the batteries
  1. Open the Battery/Memory card door on the camera.
  2. Remove the batteries.
  3. If the batteries are damaged or show corrosion, replace the batteries.
  • If the issue is resolved , you do not need to continue with the rest of the instructions in this document.
  • If the is not resolved , continue with the next step.
Step three: Recharge the batteries
  1. Recharge the batteries or replace the batteries if they are damaged or will not charge.
  2. Try turning the camera on after the batteries are fully charged or have been replaced.
  • If the issue is resolved , you do not need to continue with the rest of the instructions in this document.
  • If the is not resolved , continue with the next step.
Step five: Ensure the batteries are installed correctly
  1. Re-insert the batteries correctly into the camera by referring to the image on the Battery/Memory card door for proper battery placement.
  2. Try turning the camera on.
  • If the issue is resolved , you do not need to continue with the rest of the instructions in this document.
  • If the is not resolved , continue with the next step.
Step six: Turn on the camera without the memory card
  1. Open the Battery/Memory card door on the camera.
  2. Remove the batteries and optional memory card from the camera.
  3. Wait 15 seconds.
  4. Re-insert the batteries into the camera, but not the memory card.
  5. Try turning the camera on.
    • If the issue is resolved , format the memory card in the camera and then you do not need to continue with the rest of the instructions in this document.
    • If the is not resolved , continue with the next step.
    WARNING: Formatting the memory card in the camera will erase any images stored on the memory card. To avoid losing the images on the memory card, first save the images to a computer or another disk.
Step seven: Service the camera If the camera still will not turn on, service the camera.
1helpful
2answers

I want to copy contacts in Nokia N70 to another phone

hiiiiiiii first of all delete all the contact in sim memeory by performing following step.
goto contact>>then on option>>sim contacts>>sim directory and see all the sim contact and the one you wanna delete delete their.and if you want to keep all the contact then make a folder in memory card by
goto menu>>tools>>file manager>>memory card>>make a new folder contact. and copy your contact to memory card.then put your memory card in card reader and from memory card to computer
0helpful
1answer

I tried to reload the SD memory with the original DVD Nokia -Route 66. The SD has been reformatted but reloading does not work. Program cannot find SD memory.

Hi, this comes very late - just surfed inn - but may be help to someone. To reload R66 from your cd/dvd don't download it, follow these steps in stead:
1. Insert the memory card into the memory card reader/writer.
2. Format your memory card in FAT (not FAT32).
3. Insert the CD/DVD into the DVD drive. Select 'Browse Contents' in opened Route66 window.
4. Select and open 'MemoryImage'
5. Select the folder 'R66' and copy it to the formatted memory card.
6. Remove the memory card from the memory card reader/writer and insert it into the Nokia 330 device.

Now it should work, at least worked for me.
2helpful
1answer

Camera wont turn on

  1. Step one: Reset the camera
    1. If you have an optional memory card installed, remove it. (Although removing an optional memory card is not necessary for performing the reset, it eliminates the memory card as a possible cause of the problem.)
    2. Remove all power sources (batteries and AC power) from the camera for at least 5 seconds.
    3. Reinsert the batteries and close the Battery/Memory card door and/or reconnect the HP AC power adapter to the camera.
    4. After verifying that the camera works without an optional memory card, reinsert the card, if you have one.
    Try to turn the camera on. If it now works properly, the camera experienced a temporary electrical problem and should now work properly.
    • If the issue is resolved , you do not need to continue with the rest of the instructions in this document.
    • If the is not resolved , continue with the next step.
    Step two: Check for damage or corrosion on the batteries
    1. Open the Battery/Memory card door on the camera.
    2. Remove the batteries.
    3. If the batteries are damaged or show corrosion, replace the batteries.
    • If the issue is resolved , you do not need to continue with the rest of the instructions in this document.
    • If the is not resolved , continue with the next step.
    Step three: Recharge the batteries
    1. Recharge the batteries or replace the batteries if they are damaged or will not charge.
    2. Try turning the camera on after the batteries are fully charged or have been replaced.
    • If the issue is resolved , you do not need to continue with the rest of the instructions in this document.
    • If the is not resolved , continue with the next step.
    Step four: Ensure the batteries are installed correctly
    1. Re-insert the batteries correctly into the camera by referring to the image on the Battery/Memory card door for proper battery placement.
    2. Try turning the camera on.
    • If the issue is resolved , you do not need to continue with the rest of the instructions in this document.
    • If the is not resolved , continue with the next step.
    Step five: Turn on the camera without the memory card
    1. Open the Battery/Memory card door on the camera.
    2. Remove the batteries and optional memory card from the camera.
    3. Wait 15 seconds.
    4. Re-insert the batteries into the camera, but not the memory card.
    5. Try turning the camera on.
      • If the issue is resolved , format the memory card in the camera and then you do not need to continue with the rest of the instructions in this document.
      • If the is not resolved , continue with the next step.
      WARNING: Formatting the memory card in the camera will erase any images stored on the memory card. To avoid losing the images on the memory card, first save the images to a computer or another disk.
    Step six: Connect the camera to the optional AC power supply
    1. Connect the camera to the optional AC power supply. Ensure that the AC power supply is connected to a working power outlet.
    2. Try turning the camera on.
    • If the issue is resolved , you do not need to continue with the rest of the instructions in this document.
    • If the is not resolved , continue with the next step.
    Step seven: Service the camera If the camera still will not turn on, service the camera. Cause The following conditions can cause the camera to not turn on:
    • Improperly formatted memory card - memory cards should be formatted in the camera they are going to be used in
    • Corrupt images on the memory card
    • More than 300 pictures on a memory card
    • Damaged batteries
    • Dead batteries
    • Incorrectly installed batteries
    • Damaged camera


0helpful
1answer

Status light blinking red

Hi,
please follow the steps given below to power cycle and reset the product.

Perform a power cycle
  1. Turn the product off.
  2. Unplug the power cord from the product..
  3. Wait 30 seconds, and then connect the power cord to the product.
  4. Turn the product on.
  5. Make a color copy by pressing the Start Copy Color button on the control panel.
  • If the copy job is successful, you do not need to continue troubleshooting.
Reset the product Follow these steps to reset the product. Step one: Perform a partial reset
  1. Disconnect the power cord from the product.
  2. Press and hold # and 3 while reconnecting the power cord to the product, and then release both buttons.
  3. Try making a color copy by pressing the Start Copy Color button on the product control panel.
    • If the partial reset resolves the issue, you do not need to continue troubleshooting.
    • If the error message displays again, proceed to the next step to try a semi-full reset.
Step two: Perform a semi-full reset CAUTION: Performing a semi-full reset deletes any saved phone numbers on the product.
  1. Disconnect the power cord from the product.
  2. Press and hold # and 6 while reconnecting the power cord to the product, and then release both buttons.
  3. Try making a color copy by pressing the Start Copy Color button on the product control panel.
    • If the semi-full reset resolves the issue, you do not need to continue troubleshooting.
    • If the error message displays again, proceed to the next solution.


0helpful
3answers

Reinstalled windows , DVD drive is D: but so is hardrive now !

follow these steps to change the drive letter: Step 1: Open computer management by right clicking on my computer: 4595def.gif

Step 2. highlight Disk Management and then look for the drive letter you want to change. 73f7bbe.gif

Step 3. click change drive letter and select the one you would prefer for the drives make sure the one that is assigned will not be taken up so you will need to follow proper sequence to assigne the drive letters in the previous sequence. 7581077.gif

you shud be back to how it was before.gud luck
0helpful
1answer

When a camera is inoperable or fails to function, or an error code appears in the liquid crystal display (LCD)

Follow the steps below in the order presented: Perform a power reset on the camera. Performing a power reset on the digital camera will normally correct issues such as the camera locking up or not turning off. When the power reset is performed properly, the camera will prompt you to update the camera’s date and time. This is an indication that the memory has been cleared and no further reset time is required. The power reset procedure must only be performed on a camera that has been running on battery power. If an AC power adapter is being used, the power reset procedure does not apply. This is due to the fact that the internal capacitor is fully charged. To execute a camera power reset, perform the following steps: Turn off the Digital Camera. Remove the Compact Flash Card or Secure Digital Card, if one is being used. Turn on the Digital Camera. CAUTION: To avoid damaging the camera, ensure the shutter button is not pressed during the following steps. Turn on Live View on the rear LCD. CAUTION: Care should be used when performing Step 5 to ensure that the camera is not dropped. Open the battery door and remove the batteries with the camera turned on. Re-insert the batteries after five minutes have elapsed. Turn on the camera. The camera should request an update for date and time (with the exception of the HP Photosmart 120 and 912 series cameras). Format the memory card. Navigate to the delete menu which varies with each camera, and format the internal memory and/or the memory card. CAUTION: Reformatting the memory card erases all of the files that are stored in the card. All photos, scripts, and miscellaneous files are deleted permanently. To preserve the existing images, use a spare card or a card that is already formatted.
Not finding what you are looking for?

56 views

Ask a Question

Usually answered in minutes!

Top Micro Solutions Computers & Internet Experts

Grand Canyon Tech
Grand Canyon Tech

Level 3 Expert

3867 Answers

Brad Brown

Level 3 Expert

19187 Answers

Cindy Wells

Level 3 Expert

6688 Answers

Are you a Micro Solutions Computer and Internet Expert? Answer questions, earn points and help others

Answer questions

Manuals & User Guides

Loading...