1996 Chevrolet Blazer Logo
Anonymous Posted on Oct 20, 2011

Front stabilizer arm has come loose on drivers side could bolt head be worn off? does bolt screw uup from bottom through stabilizer arm?

1 Answer

Jeremy W.

Level 3:

An expert who has achieved level 3 by getting 1000 points

Top Expert:

An expert who has finished #1 on the weekly Top 10 Fixya Experts Leaderboard.

Superstar:

An expert that got 20 achievements.

All-Star:

An expert that got 10 achievements.

  • Chevrolet Master 5,332 Answers
  • Posted on Oct 20, 2011
Jeremy W.
Chevrolet Master
Level 3:

An expert who has achieved level 3 by getting 1000 points

Top Expert:

An expert who has finished #1 on the weekly Top 10 Fixya Experts Leaderboard.

Superstar:

An expert that got 20 achievements.

All-Star:

An expert that got 10 achievements.

Joined: Sep 24, 2010
Answers
5332
Questions
0
Helped
2058659
Points
17799

The stabalizer bar is connected to the lower control arm with a stabilizer link. It sounds like the link has gone bad from your description. You can purchase a new link kit from your local parts store. You will assemble the new link starting at the control arm and working your way to the stabilizer bar with the threaded end of the bolt going through the opening on the bar. Good luck and thank you for using fixya.com!

I’m happy to assist further over the phone at https://www.6ya.com/expert/jeremy_d728a59f986299fa

Add Your Answer

×

Uploading: 0%

my-video-file.mp4

Complete. Click "Add" to insert your video. Add

×

Loading...
Loading...

Related Questions:

2helpful
1answer

What does the control arm on the front left driver side supposed to look like fully assembled

Hello! First diagram is the lower...Second is the upper..Guru...saailer

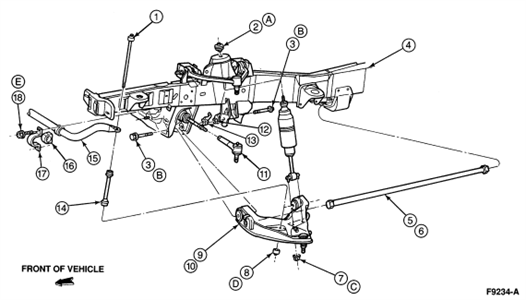
LOWER IDENTIFICATION:


Item
Part Number Description 1
5495 Stabilizer Bar Link Bolt and Bushing Assembly 2
18A192 Nut, Washer and Bushing Assembly 3
808264 Bolt 4
5005 Frame 5
5B326 Torsion Bar (LH) 6
5B327 Torsion Bar (RH) 7
620481 Nut 8
5C491 Nut and Washer 9
3079 Front Suspension Lower Arm (LH) 10
3078 Front Suspension Lower Arm (RH) 11
3A130 Tie Rod End 12
808166 Nut 13
808167 Nut 14
5K483 Front Stabilizer Bar Link 15
5482 Front Stabilizer Bar 16
5484 Front Stabilizer Bar Bushing 17
3B353 Front Stabilizer Retainer 18
N807396-S100 Bolt A
- Tighten to 40-55 Nm
(30-40 Lb-Ft) B
- Tighten to 150-200 Nm (111-148 Lb-Ft) C
- Tighten to 21-29 Nm
(15-21 Lb-Ft)


UPPER IDENTIFICATION:
Item Part Number Description 1 3C156 Damper Assembly (RH) 2 805348 Nut and Washer 3 - Shock Absorber Insulator
(Part of 18198) 4 3C157 Damper Assembly (LH) 5 3020 Front Suspension Bumper 6 3083 Front Suspension Upper Arm Assembly A - Tighten to 34-47 Nm
(25-35 Lb-Ft)


LOWER DIAGRAM FOLLOWED BY UPPER:

2_12_2012_9_47_51_pm.gif2_12_2012_9_54_26_pm.gif

I’m happy to help further over the phone at https://www.6ya.com/expert/david_6df67de3b14de867

2helpful
3answers

There is a squeek in the front end, Just put new brakes in but it still squeeks. Could this be a CV joint or a Bearing? The noise is present with or without the brake s applied. There is no vibration and...

worn CV joints "click," but only upon turning.
worn bearings "grind," with a faint metal-on-metal sound.
So, squeaking in the front end is unlikely to be a CV joint or a bearing.
Squeak could be almost any front suspension component, but here's the reason to stop
guessing what it is and jack up the car, remove the two front tires and inspect the
front suspension: it could be a bolt/nut
that is loosening - and by catching it, and tightening it, you could save yourself the cost of
replacing the missing hardware. Also, be aware that an inspecting mechanic (if your state or
county requires a safety inspection (like Pennsylvania)) will inspect all components of your car's
front suspension as a routine component of your car's safety inspection.
Also:

1-----Inspect----- Coil Spring----- Broken or Weak Coil Springs.
2-----Inspect----- Sway Bar Bushing----- Worn, Damaged, or Faulty Stabilizer Bar Bushings.
3-----Inspect----- Steering Stabilizer Bracket----- Loose or Broken Steering Stabilizer Bracket.
4-----Inspect-----lower ball joints-----Loose bolt/rubber bushing to lower control arm.
5-----Inspect-----Upper Ball Joints-----Loose bolt/missing rubber bushing.
6-----Inspect-----Connecting Rods-----(these are the rods that connect the lower control arm to the
front of the frame) Check for loose nut (on the frame side), or loose bolts (on the control arm side).
2helpful
1answer

I have loose tie rod ends on both the right and left side of a ford 1999 expedition. On the passenger side the bottom bolt is missing completely. Do I need to replae both with a whole new assembly?

If the tie rods are just loose,you replace the bolts

Obviously if the end joint or brg is worn & loose you replace
them. (not the entire arm,just the joint)

You can replace the bolt or the tie rods yourself,
then have the front aligned within a few days as the
toe will be off.

I assume your talking outer ties rod ends,
not inner --- inside the steering rack boots!!

The inner joint does require the complete, what
looks like a rod or arm to be replaced
0helpful
1answer

I have a 2003 volkswagen jetta. i need to remove the glass on the front drivers side and front passenger side doors and replace it with new glass.after i remove the door panel how do i do this?

The panels have 3 t20 torx screws on the bottom and one philips head near the mirror. Under pull handles there are 3 philips on the drivers and 2 philips on the passengers sides. Pull the panels from the bottom and lift the panels up. There are 2 black rubber plugs in each door, pop each plug out and the glass is held in place to the clips on each side with either a 10 mm bolt or t30 torx bolt. Move the glass to the point where you can see the bolts, loosen, but don't remove the bolts. Once loose, you can pull the glass loose. Once loose, lower the window a bit, angle the rear of the glass up and pull it out. The glass may be epoxied in place, as VW had a problem with windows coming loose. If so, try to pop the rubber in the clamp loose (above the bolts you see through the holes) and reinstall it with the window removed.
0helpful
1answer

Remove and replace Front Sway bar

Hello ggagne.
Here is the procedure.

  1. Raise and suitably support the vehicle.
  2. Remove the left tire and wheel assembly.
  3. Remove the pinch bolt from the lower intermediate steering shaft
  4. Loosen all insulator clamp attaching bolts.
  5. Place a jack stand under the center of the rear frame cross member.
  6. Remove the rear frame-to-body bolts.
  7. Lower the rear of the frame just enough to gain access to the stabilizer shaft.
  8. Remove the insulator clamp bolts and the clamps from the frame.
  9. Remove the insulators from the stabilizer bar.
  10. Remove the stabilizer bar links from the control arms.
  11. Pull the stabilizer shaft rearward.
Installation
  1. Insert the stabilizer shaft to the left side of the vehicle. Important: DO NOT tighten the stabilizer link nut at this time. The weight of the vehicle must be supported by the control arms such that you can obtain the vehicle design trim heights before tightening the link nut.
  2. Loosely install the stabilizer shaft link at the control arm.
  3. Install the insulators on to the stabilizer bar.
  4. Connect the insulator clamps to the frame.
    • Tighten the stabilizer shaft bracket bolts to 48 Nm (35 ft. lbs.) .
  5. Raise the frame into position while you guide the steering shaft onto the gear.
  6. Install the new frame-to-body attaching bolts.
  7. Remove the jack stand.
  8. Install the pinch bolt and tighten.
  9. Install the left tire and wheel assembly.
  10. Lower the vehicle.
  11. Support the weight of the vehicle by the control arms.
  12. Tighten the stabilizer link nut.
    • Tighten the stabilizer shaft link nut to 23 Nm (17 ft. lbs.)
There you are, I hope your job goes well.
Thank you for using FixYa.

KL
0helpful
1answer

How do you put in the control arms in a 1966 vw bug

Loosen the wheel nuts on both wheels, jack-up the car, and support on jack-stands.Take out both front tires. Detach the stabilizer link from the control-arm, remove the ball-joint clamp bolt and nut. Separate the balljoint stud from the steering knuckle with a big screw-driver. Remove bolts that's holding the control-arms to frame.
1helpful
1answer

Can't get door open, so can't remove panel to fix door open prob

These door panels are held in place to the interior door frame with push-in fasteners which are located around the side and bottom perimeter of the panel. These fasteners are popped out by placing a screw driver or other flat tool between the panel and the door frame. Usually there are screws and/or small bolts which hold the arm rest and door handle portion of the door panel. You need to locate any of these first and remove them. some screws/bolt heads may be hidden by small plastic caps which cover the heads. In some models, there is a piece of molding which is snapped in around the handle or on top of the arm rest. Once the perimeter fasteners are loose and all screws are removed, the panel is lifted up to disengage it from the bottom window frame. Be careful not to move the panel too far away from the door frame until you disconnect all wiring connections on the back side. Those nylon buttons that hold the panel in place sometimes break off when you remove them. They are replaceable(auto parts store).
0helpful
1answer

Driver side lower control arm, striped bolt.

can you email me a picture of the area ur talking about? blue_dragon45801@yahoo
Not finding what you are looking for?

148 views

Ask a Question

Usually answered in minutes!

Top Chevrolet Experts

ZJ Limited
ZJ Limited

Level 3 Expert

17989 Answers

Ronny Bennett Sr.
Ronny Bennett Sr.

Level 3 Expert

6988 Answers

john h

Level 3 Expert

29494 Answers

Are you a Chevrolet Expert? Answer questions, earn points and help others

Answer questions

Manuals & User Guides

Loading...