
IF U BROKE THIS BELT WHILE DRIVING U HAVE BENT THE VALVES IN THE ENGINE, THIS IS WHAT IS CALLED AN INTERFERENCE DESIGN ENGINE, THAT MEANS WHEN THE TIMING BELT BREAKS THE PISTONS HIT THE ENGINES VALVES
Testimonial: "THanks - was not able to accept this last answer, but thankfully I found another way to say THANKS. That notch was suspicious!"
THE IMPORTANT POINT HERE IS THE CYLINDER HEAD WILL NEED TO BE REMOVED TO REPLACE THE BENT VALVES, SO SINCE THAT IS A JOB FOR A PROFESSIONAL YOU WILL NEED TO HAVE IT REPAIRED BY A SHOP, PUTTING A NEW BELT ON AT THIS TIME WOULD BE A WASTE, U WILL ALSO NEED TO REPLACE THE WATER PUMP AND THE TIMING BELT IDLER PULLEY AS PART OF THE REPAIR.
IF THE ENGINE WAS TURNED OVER WHILE THE BELT WAS OFF OR BROKEN U HAVE BENT VALVES.
THIS IS FROM ANOTHER SITE, SAME PROBLEM AND ENGINE TYPE.
CRANK MARK IS NOTCH ON THE TOOTH LINES UP WITH RAISED MLINE ON ALUMUNIM PIECE BEHIND PULLEY.THE CAM MARKS ARE 2 SMALL NOTCHES ONE ON EACH PULLEY THEY LINE UP WITH v SHAPED MARKES ON THE UPPER TIMING BELT COVER THAT HANGS OVER THE TOPS OF THE PULLEYS.THEY SHOULD BE AT ABOUT 2 LEFT PULLEY AND 11 OCLOCK FOR THE RIGHT PULLEY.
IF IT WAS RUNNING WHEN BELT CAME OFF PUTTING BELT ON IS A WASTE OF TIME.IT WILL NEED A NEW CYLINDER HEAD.
×
Cam belt snapped while driving mechanic says the water pump seized causing this to happen is this possible and also would the valves also need to be replaced thanking you eddie ezra

The cam marks on the cam gears align with to v cut outs on the timing cover backing,they will point inward ,one at about one o clock,and the other at about ten o clock.,on the crankshaft timing cog,there is a mark on the oil pump housing that aligns with the mark on the crankshaft pulley
If you are facing the cams dead on,the one on your left Timing mark will be at about one o clock,and the one on your right is at about ten o clock .I hope this is what you need thank you Ron.
What engine size (liters) is this?


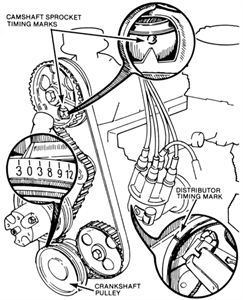
Crankshaft, camshaft, and distributor timing marks-2300 cc engine (© Ford Motor Co.)
On 2000 cc engines, turn the crankshaft until the two round locating holes in the camshaft pulley are visible from the rear side of the pulley, looking forward from the left-side of the car. When these two holes are parallel to the ground, the timing pointer on the crankshaft pulley should point to TDC. If the drive belt is dislocated, the crankshaft damper will be retarded or advanced 19° per cog on the belt.
If the engine you are working on does not have the two locating holes on the rear side of the camshaft pulley, then you will have to remove the drive belt cover and observe that when the crankshaft timing marks are aligned to TDC of the compression stroke of the No. 1 cylinder, the distributor rotor is pointing to the index mark on the upper lip of the distributor housing which coincides with No. 1 spark plug tower, and the pointer on the camshaft pulley is aligned with the index mark on the cylinder head.
On 2300 cc engines, there is an access plug provided in the cam drive belt cover so that the camshaft timing can be checked without removing the drive belt cover. Remove the access plug, turn the crankshaft until the timing mark on the crankshaft damper indicates TDC, and observe that the timing mark on the camshaft drive sprocket is aligned with the pointer on the inner belt cover. Also, the rotor of the distributor must align with the No. 1 cylinder firing position.
CAUTION:
After any procedure requiring removal of the rocker arms on the 2300, each lash adjuster must be fully collapsed after assembly, then released. This must be done before the camshaft is turned.
Crankshaft, camshaft, and distributor timing marks-2300 cc engine (© Ford Motor Co.)
Crankshaft, camshaft, and distributor timing marks-2300 cc engine (© Ford Motor Co.)
Checking 2000 cc overhead camshaft timing (© Ford Motor Co)


 Fig. 2: If the special tool is unavailable, a suitable length and width straight edge can be used to align the camshafts
 Fig. 3: Camshaft alignment using the special service tool
 Fig. 4: Insert the crankshaft damper bolt to turn the crankshaft and . . .
 Fig. 5: . . . align the camshafts and the . . .
 Fig. 6: . . . crankshaft before removing the old belt
 Fig. 7: Loosen the timing belt tensioner pulley bolt, slide the tensioner back and . . .
 Fig. 8: . . . tighten the bolt to the farthest right hand side as possible to hold the release the tensioner pulley so that the belt can be removed
 Fig. 9: . . . remove the belt starting from around the camshaft pulleys
 Fig. 10: Installation of the tensioner spring and retaining bolt
 For information on timing belt recommended replacement interval, refer to Section 1.
CAUTION
For information on timing belt recommended replacement interval, refer to Section 1.
CAUTION 

1,080 views
Usually answered in minutes!


"U HAVE BENT THE VALVES IN THE ENGINE"
100%, or just a probability?
I was not driving - crankmoved AFTER timing belt was removed. Therefore, need to locate markings on crank for TDC or other position with associated references.
IF U BROKE THIS BELT WHILE DRIVING..."
IF THE ENGINE WAS TURNED OVER WHILE THE BELT WAS OFF..."
While the answers where helpful they did not answer MY question, which was simply the location of the timing marks on the crank.
Furthermore - I was aware of ALL the information that was provided.
"IF U BROKE THIS BELT WHILE DRIVING..."
I DID NOT say that I was driving
"IF THE ENGINE WAS TURNED OVER WHILE THE BELT WAS OFF..."
I DID NOT say that the engine turned over! I said that the crank moved [car was cranked..bad choice of words I know]
Crank can move many ways (belt breaks while car is running, starter is engage after belt breaks, your are a ******** and move the crank after the belt is removed)
MY QUESTION IS SIMPLE: I NEED THE MARKS.
NOT "IF [insert your own terms] THEN [insert answer]"
Sorry - Cranky - pun intended.
camshaft aligning marks ?
×