Cars & Trucks Logo

Related Topics:

thomas Posted on Mar 04, 2020
Answered by a Fixya Expert

Trustworthy Expert Solutions

At Fixya.com, our trusted experts are meticulously vetted and possess extensive experience in their respective fields. Backed by a community of knowledgeable professionals, our platform ensures that the solutions provided are thoroughly researched and validated.

View Our Top Experts

I have 2002 mish. montero sport,3.5,I'm need to reinstall timing belt.How do I set#1 on comp.stroke.Do I position crank sprocket timing mark about 1/4 before the embossed pointer for 5 degree TDC?

1 Answer

Dan Hooper

Level 3:

An expert who has achieved level 3 by getting 1000 points

Superstar:

An expert that got 20 achievements.

All-Star:

An expert that got 10 achievements.

MVP:

An expert that got 5 achievements.

  • Cars & Trucks Master 4,521 Answers
  • Posted on Mar 04, 2020
Dan Hooper
Cars & Trucks Master
Level 3:

An expert who has achieved level 3 by getting 1000 points

Superstar:

An expert that got 20 achievements.

All-Star:

An expert that got 10 achievements.

MVP:

An expert that got 5 achievements.

Joined: Apr 15, 2015
Answers
4521
Questions
2
Helped
809251
Points
14307

The easiest way to get the crank to TDC is to pull the #1 spark plug and just watch for the piston to be at the top of the stroke. You can either look down the hole with a light or use a small screwdriver to rest on the top of the piston and watch for it to be at full stroke. just make sure that you are gentle as to not damage anything.

  • Dan Hooper
    Dan Hooper Mar 04, 2020

    But there should still be a mark on the timing gear that needs to align with a mark on the block or housing. And all marks on the crank and cams have to be in alignment when the new belt is installed.

×

5 Related Answers

jerry1938

  • 37 Answers
  • Posted on Dec 13, 2008

SOURCE: 1991 mazda b2200- timing belt changed

The keyway and or the dot on the crank should be line at 12 oclock. You will see a point on the oil pump housing to go by. On the camshaft the pointer will be at 12 oclock also. Use the O on the camshaft to the top at mark. Be sure to look at the dist. roter to make sure that it is pointing at the #1 spark plug wire. I could get 180 out of time. If you do it right it should start up right away. then you can use a timing light to finish it.
Good Luck [email protected]

Ad

Anonymous

  • 114 Answers
  • Posted on Sep 16, 2009

SOURCE: 1997AudiA6Quatro2.8L-aligning cam and crankshaft for timing belt

You must find the cam lock bar and crank lock pin to do this job properly, otherwise you can bend some valves and that becomes expensive..the front crank damper has a mark to line up with a mark on the timing cover for #1 TDC, but the cam lock bar is what aligns the cams into position. The crank lock pin is helpful but not 100% necessary...

Anonymous

  • 172 Answers
  • Posted on Nov 25, 2009

SOURCE: Timing marks on 1999 Ford Ranger 2.5L.

Rotate the engine so that No. 1 cylinder is at TDC on the compression stroke. Check that the timing marks are aligned on the camshaft and crankshaft pulleys. An access plug is provided in the cam belt cover so that the camshaft timing can be checked without removal of the cover or any other parts. Set the crankshaft to TDC by aligning the timing mark on the crank pulley with the TDC mark on the belt cover. Look through the access hole in the belt cover to make sure that the timing mark on the cam drive sprocket is lined up with the pointer on the inner belt cover.

  1. Loosen the alternator retaining bolts and remove the drive belt from the pulleys. Remove the water pump pulley.
  2. Loosen and position the power steering pump mounting bracket and position it aside.
  3. Remove the four timing belt outer cover retaining bolts and remove the cover. Remove the crankshaft pulley and belt guide.
  4. Loosen the belt tensioner pulley assembly, then position a camshaft belt adjuster tool (T74P-6254-A or equivalent) on the tension spring rollpin and retract the belt tensioner away from the timing belt. Tighten the adjustment bolt to lock the tensioner in the retracted position.
  5. Remove the timing belt.

To install:
  1. Install the new belt over the crankshaft sprocket and then counterclockwise over the auxiliary and camshaft sprockets, making sure the lugs on the belt properly engage the sprocket teeth on the pulleys. Be careful not to rotate the pulleys when installing the belt.
  2. Release the timing belt tensioner pulley, allowing the tensioner to take up the belt slack. If the spring does not have enough tension to move the roller against the belt (belt hangs loose), it might be necessary to manually push the roller against the belt and tighten the bolt.

The spring cannot be used to set belt tension; a wrench must be used on the tensioner assembly.
  1. Rotate the crankshaft two complete turns by hand (in the normal direction of rotation) to remove the slack from the belt, then tighten the tensioner adjustment and pivot bolts to specifications. Refer to the necessary illustrations. Make sure the belt is seated properly on the pulleys and that the timing marks are still in alignment when No. 1 cylinder is again at TDC/compression.
  2. Install the crankshaft pulley and belt guide.
  3. Install the timing belt cover.
  4. Install the water pump pulley and fan blades. Install upper radiator hose if necessary. Refill the cooling system.
  5. Position the alternator and drive belts, then adjust and tighten it to specifications.
  6. Start the engine and check the ignition timing. Adjust the timing, if necessary.

leedavidian

Auto Repair Help

  • 1420 Answers
  • Posted on Oct 04, 2010

SOURCE: Diagram of how to set

Welcome To FixYa.com,

a65650b.pnga6bce9b.png


Regards, Lee Davidian


A 4'''' Thumbs up is appreciated so please take the time to rate me. Testimonials are accepted,

Thank you, Lee Davidian

Anonymous

  • 83 Answers
  • Posted on Mar 17, 2011

SOURCE: i need to find a

Hope this helps!!!
ldtrisch_4.jpg

Ad

Add Your Answer

×

Uploading: 0%

my-video-file.mp4

Complete. Click "Add" to insert your video. Add

×

Loading...
Loading...

Related Questions:

0helpful
1answer

Mitsubishi wont start

Did you install the belt with the number one piston on the compression stroke and have the distributor pointed at the number 1 plug connector wire. If so, you must of missed the belt placement by one tooth. If everything was correct like you mentioned it should of started. So, you made a small mistake that you will have to check again where, Im sorry :.(

Number 1 piston on the TDC of it's compression stroke, distributor pointed at the number 1 plug wire.
When on the compression stroke, the valve rockers on that piston will be relaxed (sealed) and the rockers will have play in them at that setting. Both rockers, intake and exhaust on number 1 will be loose when on the compression stroke of that piston.
0helpful
1answer

1987 toyota 22re. head was taken off by siomeone who did not mark or align anything. I need to know how to get it on the compression stroke.

With the head off, the bottom end doesn't know compression from exhaust from squat. The crank just keeps pushing the pistons up and down. You set the #1 cylinder at the top of travel, the mark on the pointer scale must be at zero, then when you have the head on with the camshaft sprocket on its mark, and the timing belt or chain on, you should be at TDC on the compression stroke. To verify, both valves on #1 should be closed-the camshaft lobes for #1 should be more or less pointing up-away from the valves.
See? The valve train is what determines compression stroke vs. exhaust stroke. On compression, both valves are closed. On the exhaust stroke, the exhaust valve will be open. As long as you get the camshaft sprocket on the right mark and the crank sprocket at zero-or on its mark-the timing should be right.
0helpful
1answer

2004 mitsubishi outlander 2.4 litre how do you get the timing right again after belt broke repaired head putting back together today and need to know what to do to get all points of timing right so I

The compression stroke is relative to the head (actually the position of the valves), so TDC is all the same on the block, the lower end. Just line it up at TDC on #1.

Have you checked for bent valves or broken pistons? If the timing belt broke while it was running, and you have an interference engine, there could be damage from a piston touching a valve.
I don't know if that 2.4L engine is an interference motor. google it to find out. I don't think the position of any mark on the oil sprocket makes any difference.
2helpful
1answer

Where are the timing marks on a 1994 honda civic 1.5

On the Cam gear are three marks. On the face of the gear it should say "up", then you have three marks one at 3 o'clock one at 7 o'clock one at 9 o'clock. the one at 7 should align up with a mark on the block. Some have a raised semicircle and you line up the 7 o'clock mark on the cam with the far left hand end of that semicircle. Now on the crack end you have a mark at the 2 o'clock position and it lines up with a mark on the block. Do not turn the crank or the cam independent of one another, as the valves can be bent. Remove the spark plugs to ease turning the engine when needed. The engine will turn counterclockwise. Remove all necessary left hand front wheel, inner fender splash guard, covers, top engine mount. turn the engine until number 1 cyl. is at TDC compression stroke, and all timing marks align as noted. Remove the lower crankshaft bolt and pulley, and lower belt cover. Loosen tensioner bolt and push it out of your way and remove the belt. Put on the new timing belt in this order, crank sprocket, cam sprocket, water pump sprocket, tensioner. Belt must be tight on no tensioner side. Push the tensioner against the belt. Turn the engine 4 turns counterclockwise, until the timing marks realign, loosen the tensioner and turn the engine again 3 teeth, torque the tensioner to 30 flbs. reinstall all the mounts and covers. all should be good.
0helpful
1answer

Gearbox chatter on tick over do they suffer from dualmass problems also is there a quick way to change the cambelt

Dual Mass Flywheel, and will also need new clutch Remove the engine coverUsing a [16 mm], rotate the tensioner arm clockwise (about 14° )and remove the belt from the pulley.
Remove the power steering pump pulley, idler pulley, tensioner pulley and crankshaft pulley.
Remove the upper and lower timing belt covers.

Remove the auto tensioner.
NOTE
Rotate the crankshaft clockwise and align the timing mark to set the No.1 cylinder's piston to TDC (compression stroke).
At this time, the timing marks of the camshaft sprocket and cylinder head cover should coincide with each other.


Unbolt the tensioner to remove the timing belt.
NOTE
If you plan to use the timing belt again, mark the rotation direction on the belt so you reinstall it correctly.

SERVICE MANUAL
Applies to: Santa Fe 2004
GROUP
Engine Mechanical System Timing System


INSTALLATION
Install the idler pulley to water pump boss.
NOTE
Insert and install the idler pulley to the roll pin that is pressed in the water pump boss.


Install the tensioner arm and plain washer to the cylinder block.
Install the tensioner pulley to the tensioner arm.
Install the camshaft sprockets and align the timing marks.

NOTE
When installing the camshaft sprockets, fasten them tightly while holding the hexagonal part of the camshaft.
Before installing the timing belt, if the timing marks of the cam sprocket and the cylinder head cover do not coincide, do not rotate the cam sprocket more than 3 teeth in either direction.
Rotating the sprocket more than 3 teeth may allow the valve and piston to touch each other.
If the cam sprocket is rotated more than 3 teeth unavoidably, rotate the crankshaft counter - clock wise a bit before rotating the cam sprocket.
Install the auto tensioner to the front case.
NOTE
At this time auto tensioner's set pin should be compressed and secured with set pin.


Align the timing marks of each sprocket and install the timing belt in the following order. Crankshaft sprocket--> Idler pulley--> camshaft sprocket (LH side)--> Water pump pulley--> camshaft sprocket (RH side)--> Tensioner pulley.
NOTE
In this step, No. 1 cylinder is in the TDC (Compression stroke).
Be very careful if you use your fingers.


Pull out the set pin of the auto tensioner.


Install the upper and lower timing belt covers.
Install the power steering pump pulley, idler pulley, tensioner pulley and crankshaft pulley.
Using the wrench [16mm], rotate the tensioner arm clockwise (about 14°) and install the belt to the pulley.
Install the engine cover.
How to adjust the tension of the timing belt
Rotate the crankshaft 2 turns clockwise and measure the projected length of the auto tensioner at TDC (# 1 Compression stroke) after 5 minutes.
The projected length should be 6-8 mm.
Verify that the timing marks of each sprocket are in their specified position.
NOTE
If the timing marks are not in their specified position, repeat from 6 above.
0helpful
1answer

Como poner la banda de tienpo de un toyota camery

Installation
1.Install No. 2 idler pulley (if removed). Install and tighten bolt to specification. See TORQUE SPECIFICATIONS . Ensure idler pulley is clean and rotates smoothly. 2.Install No. 1 idler pulley and tension spring (if removed). Pry No. 1 idler pulley away from timing belt area as far as possible. Temporarily tighten No. 1 idler pulley bolt. Ensure idler pulley is clean and rotates smoothly. 3.Using crankshaft pulley bolt, rotate crankshaft so timing mark on crankshaft sprocket aligns with timing mark on oil pump housing. See. This will position keyway in crankshaft sprocket at 12 o'clock position.

CAUTION:If reusing timing belt, ensure reference marks on timing belt align with reference marks placed on crankshaft and camshaft sprockets. Ensure timing belt is installed in original direction of rotation.
4.Ensure all sprockets and idler pulleys are clean. Install timing belt on crankshaft sprocket, oil pump sprocket, No. 1 idler pulley, and then No. 2 idler pulley in sequence. 5.Install timing belt guide with cupped side away from crankshaft sprocket and flat side toward timing belt. Install No. 1 timing belt cover and new gasket. 6.Align crankshaft pulley key groove with key in crankshaft. Install crankshaft pulley. Install and tighten crankshaft pulley bolt to specification. 7.Rotate crankshaft clockwise so cylinder No. 1 is at TDC on compression stroke. Ensure timing mark on crankshaft pulley aligns with "0" mark on No. 1 timing belt cover. If reusing timing belt, ensure reference mark on timing belt aligns with upper edge of No. 1 timing belt cover. 8.Rotate camshaft, and align hole in camshaft sprocket with alignment mark on camshaft bearing cap. See Fig. 2 . Install timing belt on camshaft sprocket. If reusing timing belt, ensure reference mark on timing belt aligns with the reference mark on camshaft sprocket. Ensure tension exists on timing belt between the crankshaft and camshaft sprockets.
CAUTION:DO NOT rotate crankshaft counterclockwise, as viewed from timing belt end of engine.
9.Loosen No. 1 idler pulley bolt 1/2 turn. Rotate crankshaft pulley 2 full revolutions clockwise from TDC to TDC. 10.Ensure timing mark on crankshaft pulley aligns with "0" mark on No. 1 timing belt cover, and hole in camshaft sprocket aligns with alignment mark on camshaft bearing cap. See Fig. 2 . If timing marks are not aligned, remove timing belt and reinstall. 11.Rotate crankshaft clockwise 1 and 7/8 revolutions and align crankshaft pulley "0" mark with 45-degree Before Top Dead Center (BTDC) mark on No. 1 timing belt cover. See Fig. 5 . 12.Tighten No. 1 idler pulley bolt to specification. See TORQUE SPECIFICATIONS . Install No. 2 timing belt cover and gaskets. Install and tighten spark plugs to specification. 13.To install remaining components, reverse removal procedure. Install all bolts/nuts on right (timing belt side) engine mount before tightening to specification. 14.On Camry, when installing control rod and bracket on strut tower and right (timing belt side engine mount, tighten bolts to specification in sequence.
3helpful
1answer

Timing Chain Replacement procedure steps

1. Jack up front of vehicle and support on safety stands. Remove left front wheel.
2. Remove alternator/water pump drive belt. Remove water pump pulley.
3. Remove A/C belt if equipped.
4. Remove valve cover.
5. Remove upper timing belt cover.
6. Rotate crankshaft until No. 1 cylinder is at TDC compression stroke and camshaft sprocket timing marks align with edge of cylinder head. "UP" cast on sprocket will be at top when sprocket is in correct position. Crankshaft may be rotated using a socket wrench inserted through access hole in left fender well (engine rotates counterclockwise).
7. Unbolt and remove crank pulley. Remove rubber seal washers from belt tensioner pivot and adjustment bolts protruding through lower belt cover. Remove belt cover retaining bolts and remove cover from below.
8. Remove concave belt retainer from end of crankshaft. If timing belt is to be reused, mark direction of rotation before removing.
9. Loosen belt tensioner pivot and adjustment bolts. Push tensioner away from belt and retighten adjustment bolt to hold tensioner in this position. Remove belt.
10. Insert a suitable tool through cam sprocket and brace against cylinder head. Remove bolt and pull sprocket from camshaft.
11. Without dislodging key, install new sprocket on camshaft. Torque bolt to 22 ftlb (30 Nm).
12. Install new timing belt by starting at crank gear and working it over cam sprocket in clockwise direction. Ensure that timing marks are properly aligned.
13. Release tensioner by loosening adjustment bolt. After tensioner contacts belt, retighten bolt.
14. Rotate engine at least one full turn (counterclockwise) and check that timing marks are aligned. Loosen adjustment bolt and allow tensioner to take out any remaining belt slack. Torque adjustment and pivot bolts to 22 ftlb (30 Nm).
15. Install remaining components in reverse order of removal. Torque fasteners to following values:

TORQUE VALUES

Valve Cover Nuts - 7 ftlb (10 Nm)
Cam Sprocket Bolt - 22 ftlb (30 Nm)
Tensioner Pivot Bolt - 22 ftlb (30 Nm)
Tensioner Adjust Bolt - 22 ftlb (30 Nm)
Belt Cover Bolts - 7 ftlb (10 Nm)
Crank Pulley Bolt - 83 ftlb (115 Nm)
Water Pump Pulley Bolts - 9 ftlb (12 Nm)

daves944_3.jpg
1helpful
1answer

Fix timing belt and reset cam mark front and rear

Welcome to FIxYa.com


YOU WANT TO KNOW HOW TO REPLACE TIMING BELT?


Due to the amount of images FixYa can not handle them into one thread. Please e-mail me for the diagrams (PDF Format) at [email protected].

leedavidian_76.png


Timing Belt Service 2002 Kia Sedona 3.5 liter

Removal

1. Remove the engine cover

2. Remove the drive bell.

3. Remove the idler pulley, crankshaft pulley, power steering pulley and tensioner

pulley.

4. Remove the upper and lower timing belt cover.

5. Support the engine with garage jack or special tool, and then remove the engine

mounting insulator.

Caution: Take care not to deform the engine oil pan.

Image 1

6. Remove the auto tensioner.

Notice: Rotate the crankshaft clockwise and align the timing mark to get the No.1

cylinder's piston be in TðC position (compression stroke). At this time, the timing

marks of the camshaft sprocket and cylinder head cover should coincide with each

other.

Image 2

'. Remove the timing bell.

Notice: When re-using timing bell, make sure of marking the rotating direction on

the belt so as to install correctly.

Image 3

Installation

Method of installing timing bell and auto tensioner

Image 4

1. Install the idler pulley to the engine support lower bracket.

Image 5

2. Install the tensioner arm, shaft and plain washer to the cylinder block.

Tightening torque: 35 -55 Nm (350-550 kg-cm, 25.82 -40.57 ft. lbs.)

Image 6

3. Install the crankshaft sprocket.

Notice: Confirm if timing marks coincide with.

Image 7

Caution: Align the spacer with a pin, and assemble it exerting even force not to

deform the crankshaft sensing blade.

Image 8

4. Install the camshaft sprocket. Align it like initial state as shown.

Caution: When installing camshaft sprocket, tighten the bolt holding hexagonal

part of camshaft to prevent it from tuning.

5. Install the auto tensioner to the oil pump case.

Image 9

Caution: At this time the auto tensioner's set pin should be assembled completely.

Image 10

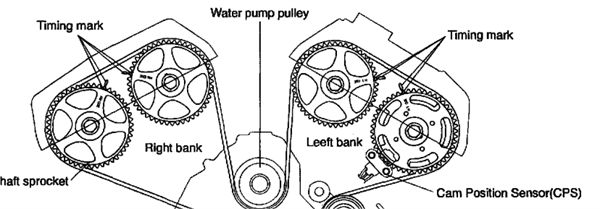
6. Align the timing marks of each sprocket and install the timing bell, maintaining the

proper belt tension between each shaft in this order. Crankshaft sprocket -> Idler

pulley -> Left bank exhaust camshaft sprocket -> Left bank intake camshaft sprocket

-> Water pump pulley -> Right bank intake camshaft sprocket -> Right bank exhaust

camshaft sprocket -> Tensioner pulley.

Caution:

1 As a result of this, position of No.1 cylinder comes to compression TDC.

2 As each camshaft sprocket tends to rotate by itself, pay attention not to injure

fingers or other bodily part. Especially be careful with the right bank.

3 In case the right bank camshaft sprocket rotates excessively, be cautious not to

rotate more than the initial stable position. Always align timing mark of rotating

sprocket by turning it reversely. In this case, pay attention not to rotate It

reversely from the initial position. (if. with one sprocket fixed at No.1

compression TDC position, the other sprocket is rotated one revolution

clockwise or counterclockwise, then the intake and exhaust valve might intetfere

each other)

7. After installing the timing bell, exert the reverse directed force to the right bank

exhaust camshaft sprocket to give tension on the belt. Holding this state, recheck it

each timing mark is correctly positioned.

S. With tensioner pulley slightly pushing the belt down, tighten the center bolt

slightly.

9. Pull out the auto tensioner set pin


How to adjust timing belt tension

1. Tension setting (While auto tensioner is not operating: And set pin being kept

installed.).

1) After rotating crankshaft 1/4 revolution reversely, rotate it clockwise to position

No.1 cylinder at TDC. Then, loosen the center bolt and give the belt 50 kg-cm of

tension with tensioner pulley socket (Two pins are attached) and torque wrench.

While maintaining this state, tighten the center bolt to the standard torque.

Center bolt standard torque 43 - 55 Nm (430 - 550 kg-cm, 31.72 - 40.57 ft. lbs.)

Image

2) Pull out the auto tensioner fixing pin.

2. How to check tension (While auto tensioner is operating: and fixing pin being

un-installed.)

1) After rotating crankshaft 2 revolutions clockwise to position No.1 cylinder at

TDC wait for about 5 minutes, and measure the amount of protruding of the auto

tensioner rod.

Caution: This is "leak down" time for the auto tensioner rod to protrude 1mm

when tension caused by rotation of the crankshaft has changed.

Image

2) Check if the amount of rod protruding is in the range of 3.8 -4.5 mm.

3. Recheck if each sprocket is within the specified range.

Notice: ¡fit is not within the specified range, repeat from procedure 6 as service

procedure of timing bell and auto tensioner installation method. Refer to Timing

Belt; Service and Repair.

leedavidian_75.png


Thank you for using FixYa.com

Regards, Lee Davidian

8helpful
2answers

1989 Isuzu pickup how to align timing marks on cam and crank?

The Isuzu is a strange animal-when you do the timing belt you set it with #1 TDC "BUT" the distributor is timed with TDC #4 I found this the hard way and finally had to buy a cd with the procedures on it. Send me an e-mail address and I will forward the associated pictures &
info to you.
Jim Young
[email protected]

TIMING BELT & SPROCKETS R & I
NOTE: Some procedures may differ slightly due to engine
construction.
Removal
1) Remove all necessary air ducts. Position No. 4 piston at
TDC of compression stroke. Align timing marks. See Fig. 2. Remove fan
and fan shroud. Remove belts. If necessary, remove radiator and
splashguard.
2) Prevent engine from rotating and remove crankshaft timing
pulley retaining bolt. Remove upper and lower timing belt covers.
Remove spring from tension pulley. Loosen adjusting bolt and move
pulley toward water pump. Remove timing belt.
CAUTION: Ensure pistons are at TDC when rotating camshaft or damage
may result.
Inspection
1) Handle timing belt carefully. Avoid twisting or kinking
belt. Do not allow belt to become contaminated by water, oil, dirt or
other contaminates. Inspect belt for cracks or damage. If necessary,
replace.
2) Measure tension pulley spring length and force. Spring
length should not exceed 2.76" (70.2 mm) and spring force should not
be less than 197-347 lbs. (27-48 kg).
3) Replace tension pulley spring if not within specification.
Installation
1) Pull tensioner fully toward water pump side and
temporarily tighten retaining bolt. Ensure No. 4 cylinder is at TDC on
compression stroke by rotating crankshaft until keyway aligns with
mark on front crankshaft seal housing (12 o’clock). Rotate camshaft
until timing mark on cam gear (arrow) aligns with mark on upper
camshaft cover (notch). See Fig. 2.
NOTE: When timing marks are aligned as stated above, No. 4 piston
is at TDC on compression stroke.
2) Position timing belt over crankshaft sprocket, oil pump
sprocket, camshaft sprocket and tensioner in that order. Ensure belt
is positioned in sequence given and without slack between sprockets.
Loosen tension sprocket adjusting bolt allowing spring tension to
tighten belt. Tighten adjusting bolt temporarily.
3) Temporarily install crankshaft pulley bolt and rotate
crankshaft 2 complete revolutions in opposite direction of engine
rotation, until marks on crankshaft and front oil seal retainer are
aligned again. See Fig. 2. Loosen tensioner lock bolt, allowing
tesioner spring to fully adjust tension. Tighten tensioner lock bolt.
4) Install timing belt covers. To complete installation,
reverse removal procedures. Tighten all bolts to specification. See
TORQUE SPECIFICATIONS table at end of this article.
Fig. 2: 2.3L & 2.6L Timing Alignment Marks
Courtesy of Isuzu Motor Co.

Not finding what you are looking for?

189 views

Ask a Question

Usually answered in minutes!

Top Cars & Trucks Experts

ZJ Limited
ZJ Limited

Level 3 Expert

17989 Answers

john h

Level 3 Expert

29494 Answers

Arnie Burke
Arnie Burke

Level 3 Expert

7339 Answers

Are you a Car and Truck Expert? Answer questions, earn points and help others

Answer questions

Manuals & User Guides

Loading...