Cars & Trucks Logo

Related Topics:

A
Anonymous Posted on Sep 15, 2017

NEED A QUOTATION FOR HONDA HR-V 1999 1.6 VIN GH3-1001960

REAR SCREEEN, WIND SCREEN, DOOR MIRROR L, TAIL LAMPS L&R, QUARTER GLASSES L&R, HEAd lamps L&R

1 Answer

Steve P

Level 3:

An expert who has achieved level 3 by getting 1000 points

Superstar:

An expert that got 20 achievements.

All-Star:

An expert that got 10 achievements.

MVP:

An expert that got 5 achievements.

  • Honda Master 3,912 Answers
  • Posted on Sep 15, 2017
Steve P
Honda Master
Level 3:

An expert who has achieved level 3 by getting 1000 points

Superstar:

An expert that got 20 achievements.

All-Star:

An expert that got 10 achievements.

MVP:

An expert that got 5 achievements.

Joined: Jul 15, 2012
Answers
3912
Questions
5
Helped
1307842
Points
15904

Hello Anon,, NO ONE on Fixya has a way to give you the info (quote) you are inquiring about...please contact your local Honda dealer..OR.. check out these links..

http://www.hondapartshouse.com/oemparts/#/c/honda_motorcycle_1999/parts

Honda Motorcycle Parts

Honda Motorcycle Parts Accessories

Honda 1999 Motorcycle OEM Parts

Honda Motorcycle Parts

5 Related Answers

Anonymous

  • 272 Answers
  • Posted on Dec 01, 2008

SOURCE: Radio code for Honda CRV 1999

If the radio has not been changed in the past, then I am almost certain that your local Honda dealaship can help but as always they may charge you. There are auto centres that are equipt to change the radio code and they do charge.

Ad
johnthejag

John Quinn

  • 286 Answers
  • Posted on Feb 06, 2009

SOURCE: Changing Door Mirror Glass XJ6(X300)

Hi

You need to put on a pair of gloves, and safety glasses. (Safety First !)
Prise off the broken mirror from the plastic base that it is stuck too.
Give the plastic a clean with nail polish remover or similar.
Peel off the backing on new mirror glass, and carefully stick it on.

Good Luck !

Don´t forget to FixYa Rate Me Please !

John.

s60six

  • 328 Answers
  • Posted on Feb 16, 2009

SOURCE: How do you remove the door panel on a 1997 GMC 1/2 ton trucks?

http://www.autozone.com/shopping/repairGuide.htm?pageId=0900c1528008f768
Hope this helps!

Anonymous

  • 23 Answers
  • Posted on Feb 25, 2009

SOURCE: Changing Door Mirror Glass XJ6(X300)

just clips into place use wd40 and be very carefull

Anonymous

  • 5 Answers
  • Posted on Jun 02, 2009

SOURCE: replacing a rear view mirror

You will need to remove the broken glass by prying with a screwdriver/small putty knife. You can apply heat (being careful not to melt or distort the backing plate) if there are area which just won't pry up. Installation of the new glass will depend upon the style of backing plate you may have. The following website highlights them with links to the proper technique on the right-hand side of the page: http://www.burcoinc.com/products/redi_cuts/installation/

Ad

Add Your Answer

×

Uploading: 0%

my-video-file.mp4

Complete. Click "Add" to insert your video. Add

×

Loading...
Loading...

Related Questions:

0helpful
2answers

On 2004 pontiac montana what does fuse 7 control

7-BATT MAIN 1
60A
Fuses: •
CIGAR/DLC/APO FRT
• CLUSTER BATT
• CTSY LAMP
• ON STAR
• PWR LOCK
• PWR MIRROR
• RAP RELAY
• RR PWR SCKT

look below for above listed componet's , pull those fuse's one at a time till arc stop's ,then you found your problem circuit . Do you know where the I/P fuse box is ?
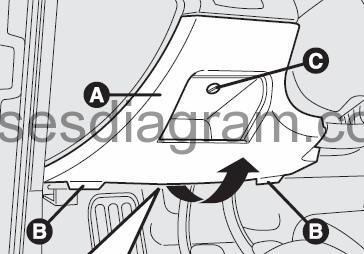
Fuse Block- I/P
Right side of the I/P, in the right front door opening


Fuse Block-I/P Label
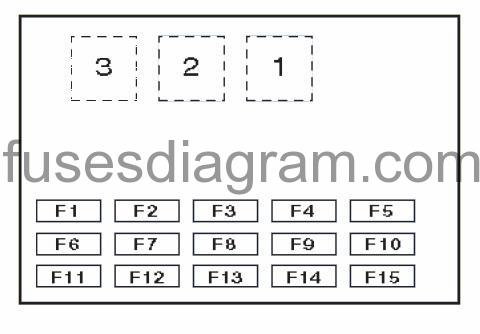
Fuse Block-I/P Application Table Fuse/Circuit Breaker
Rating
Description
BCM PRGRM
10A
Body Control Module (BCM)
ENHANCED EVAP/AWD
15A
Evaporative Emission (EVAP) Canister Vent Solenoid, Clutch Pump Check Valve
CIGAR/DLC/APO FRT
20A
Auxiliary Power Outlet-Front, Cigar Lighter, Data Link Connector (DLC)
CLUSTER/BATT
10A
Instrument Panel Cluster (IPC)
CRUISE
10A
Cruise Control Module (CCM), Cruise Control Release Switch, Cruise Control ON/OFF Switch
CTSY LAMP
10A
Body Control Module (BCM)
DRL
10A
Daytime Running Lamps (DRL) Control Module
HVAC/DIC/DRL/HEATED SEAT
10A
Air Temperature Actuator-Left, Air Temperature Actuator-Right, Daytime Running Lamps (DRL) Control Module, Driver Information Center (DIC), Mode Actuator, Rear Window Wiper/Washer and Multifunction Switch (Heated Seat Switch), Recirculation Actuator, Relay Block (Rear Window Defogger Relay)
ELC/TRAILER
25A
Auto Level Control (ALC) Air Compressor, Auto Level Control (ALC) Air Inflator Relay, Auto Level Control (ALC) Sensor
FRT HVAC HI BLWR
30A
Blower Motor Resistor Assembly
FRT WPR/WSHR
25A
Windshield Wiper Motor, Windshield Wiper/Washer Switch
HAZARD
15A
Turn Signal/Multifunction Switch
HEADLAMP
20A
Daytime Running Lamps (DRL) Control Module, Headlamp Dimmer Switch, Headlamp Switch
HTD MIRROR
10A
Outside Rearview Mirrors-Left, Right
HVAC/BLOWER
25A
HVAC Control Module
IGN1
10A
Body Control Module (BCM), Instrument Panel Cluster (IPC), Left Rear Side Door Actuator Control Module, Rear Object Sensor Control Module, Right Rear Side Door Actuator Control Module, Stop Lamp Switch
LH HEADLP HIGH
10A
Headlamp High Beam-Left
LH HEADLP LOW
10A
Headlamp Low Beam-Left
LH T/LP
10A
Tail Lamp-Left, Trailer Rear Wiring Harness
MALL/CLUSTER
10A
Body Control Module (BCM), Instrument Panel Cluster (IPC)
ON STAR
5A
Vehicle Interface Unit (VIU)
PASS KEY
10A
Theft Deterrent Control Module
PCM/ABS
10A
Electronic Brake Control Module (EBCM), Fuse Block-Underhood, Powertrain Control Module (PCM), Park/Neutral Position (PNP) Switch
PCM/CRANK
10A
Powertrain Control Module (PCM)
PCM/PASS KEY/CLUSTER
10A
Instrument Panel Cluster (IPC), Powertrain Control Module (PCM), Theft Deterrent Control Module, Instrument Panel Cluster (IPC), Powertrain Control Module (PCM)
PWR LOCK
20A
Body Control Module (BCM)
PWR MIRROR
10A
Outside Rearview Mirror Switch
PWR QTR VENT
10A
Auto Level Control (ALC) Air Compressor, Auto Level Control (ALC) Sensor, Rear Quarter Window Switch
PWR/HEATED SEAT PSD
30A
Driver Seat Assembly, Passenger Seat Assembly
PWR SLDG DR
30A
Left Rear Side Door Actuator Control Module, Right Rear Side Door Actuator Control Module
PWR WDO
30A
Window Switch-Driver, Window Switch-Front Passenger
RAP RELAY
10A
Relay Block (RAP Relay)
RH HEADLP HIGH
10A
Headlamp High Beam-Right
RH HEADLP LOW
10A
Headlamp Low Beam-Right
RR HVAC/TEMP CONT
25A
Air Temperature Actuator-Auxiliary, Blower Motor-Auxiliary, Blower Motor Relay-Auxiliary, HVAC Control Assembly-Auxiliary, Mode Actuator-Auxiliary
RR DEFOG/ HTD MIRROR
30A
Window Defogger Relay-Rear
RR FOG LP
10A
Fog Lamp Relay-Rear
RR PWR SCKT
20A
Auxiliary Power Outlet-Rear
RH T/LP
10A
Tail Lamp-Right, Trailer Rear Wiring Harness
RR WPR/WSHR
20A
Window Wiper Motor-Rear, Rear Window Wiper/Washer and Multifunction Switch
SIR
15A
Inflatable Restraint Sensing and Diagnostic Module (SDM)
STOP LAMP
15A
Stop Lamp Switch
SWC BACKLIGHT
2A
Steering Wheel Controls-Left, Right
T/SIG
10A
Turn Signal Switch and Backup Lamp Relay
0helpful
1answer

Hi,I have an Alfa 2001 156 cigarette lighter not working found some fuses near the battery but not one for the cigarette lighter

Fuse box in passenger compartment Alfa Romeo 156.
fuse box location.
The fuses for the main devices are housed in a control unit under the dashboard, to the left of the steering column. To gain access to them, remove the panel (A) releasing the tabs (B) in the direction of the arrow below and remove the screw (C).

fuse box layout.

1 Ignition auxiliary circuits relay 1 2 Heated rear window relay 3 Horn relay F1 (10A) RH headlamp- high beam F2 (10A) Headlamp high beam warning lamp, LH headlamp-high beam F3 (20A) Boot lid/tailgate lamp, central locking F4 (10A) Headlamp adjustment, RH headlamp-low beam F5 (30A) Electric windows(front) F6 (10A) LH stop lamp, LH tail lamp, RH licence plate lamp, RH rear fog lamp, RH side lamp F7 (10A) LH licence plate lamp, LH rear fog lamp, LH side lamp, RH stop lamp, RH tail lamp F8 (10A) LH head lamp-low beam F9 (15A) Cigarette lighter, heater/air conditioning (AC) F10 (20A) Wind screen wash/wipe system F11 (20A) Horn F12 (10A) Alarm system, anti-lock brake system (ABS)(with ESP), audio system, instrument panel, interior lamps F13 (10A) Anti-lock brake system (ABS), central locking, electric door mirrors, electric windows, glove box lamp, reversing lamps, stop lamp (high level) F14 (10A) Hazard warning lamps F15 (30A) Door mirror heater, heated rear window
0helpful
1answer

I have a 2004 chev Express box van and my tail lights wont work every blinker works just not the lights both sides replaced bulbs still nothing

Fuse Usage 1 Climate Control 2 (HVAC) 2 Compass 3 Ignition Switch, Theft Deterrent System Module (PK3) 4 Upfitter Courtesy Lamps 5 Climate Control 1 (HVAC) 6 Empty 7 Instrument Panel Cluster 8 Audio System, Chime 9 Auxiliary Park Lamp 10 Auxiliary Trailer Back-up Lamps 11 Remote Function Actuator, Tire Pressure Monitor (TPM) 12 Climate Control (HVAC) Controls 13 Trailer Park Lamps 14 Front Park Lamps 15 Taillamps, Back-up Lamps 16 Empty 17 Steering Wheel Sensor 18 Outside Rearview Mirror Switch 19 Empty 20 Empty 21 Rear Defogger 22 Outside Rearview Mirror Heater 23 Empty 24 Empty 25 Cargo Door Unlock 26 Rear Door Lock 27 Front Door Lock 28 Rear Passenger Door Unlock 29 Upfitter Park Lamps 30 Front Passenger Door Unlock 31 Driver Door Unlock 32 Airbag System, Automatic Occupant Sensing (AOS) System 33 Right Rear Park Lamp 34 Left Rear Park Lamp 35 Upfitter Auxiliary 2 (J-Case) 36 Upfitter Auxiliary 1 (J-Case) 37 Rear Blower (J-Case) 38 Empty (J-Case) 39 Run (High Current Micro) 40 Park Lamps (High Current Micro) 41 Empty (Mini Micro) 42 Upfitter Auxiliary 2 (High Current ISO Relay) 43 Retained Accessory Power (RAP) (High Current Micro) 44 Rear Defogger (High Current Micro) chevrolet-express-fuse-box-floor-console-fuse-block-247x300-3m55w415sdhfmumhyuzqkab2-3-0.jpg
1helpful
1answer

A lose rear veiw mirror 99 s10

If its the windshield mirror, gm usually uses a phillips or torx head screw to tighten the mirror to the base, which is glued to the glass with a special adhesive. If the screw is tight and it's the mirror joints that are loose, replace the mirror. If it's the door mirror, the inner trim on the door needs to be removed to tighten the mounting bolts. If the outside foldaway joint is loose, you will probably need to replace the complete mirror.
4helpful
1answer

How do i get the rear view mirror back on?

I am assuming you are talking about the interior rear view mirror and not the side rear view mirror. Most auto parts stores sell an adhesive glue to fix the interior rear view mirror. Most of these mirrors have two parts to them. One part is the bracket that glues to the windshield and the other part is the rear view mirror assembly. Before gluing the bracket to the glass check and see how the mirror assembly attaches to the bracket. There will often be a screw that fixed the two together.
0helpful
1answer

99 explorer drivers side mirror vibrates

are you trting to tighten the mirror glass or the mirror where it attaches to the body? I don't think glass is removable in 99. Only can try to press on glass to seat if unseated. not too hard.

  1. Remove the front door trim panel; refer to Section 501-05 .
  2. go to car-part.com for a used mirror. Page with * is cheapest seller.
  1. Remove the speaker.
    1. Remove the screws.
    1. Disconnect the electrical connector.
    1. Remove the speaker.
  1. Remove the outside rear view mirror (17682).
    1. Disconnect the power mirror wiring clips.
    1. Remove the outside rear view mirror nuts.
    1. Remove the outside rear view mirror.
      • Feed the power mirror wiring through the opening in the front door (20124).
------------------------------------------------------
f9d70e9.gif
----------------------------
SECTION 501-09: Rear View Mirrors 2001 Explorer/Mountaineer Workshop Manual
REMOVAL AND INSTALLATION Exterior Mirror Glass, 2001 model Removal
NOTE: Exterior mirror glass is serviceable only on vehicles built after July of 2001.
NOTE: Passenger side exterior mirror shown, driver side exterior mirror similar.
All mirrors
  1. Position the glass in the full up position.
  1. Locate the notch at the bottom of the exterior mirror glass.
  1. Release the exterior mirror glass.
    1. Insert a long flat-bladed screwdriver in the notch.
    1. Push the screwdriver into the notch until the glass is released.
Heated mirrors
  1. Position aside the exterior mirror glass.
  1. Disconnect the electrical connectors.
All mirrors
  1. Remove the exterior mirror glass (17K707) passenger side or (17T675) driver side.
Installation
Heated mirrors
  1. Connect the electrical connectors.
All mirrors
  1. Position the exterior mirror glass on the exterior mirror motor.
  1. Place a hand against the back of the exterior mirror housing and a hand flat against the exterior mirror glass. Press the glass in place until fully seated.
4d9527f.gif
0helpful
1answer

HOW DO I REPLACE THE DRIVER SIDE POWER MIRROR ON AN 98 F-150?

Remove the sail panel,the little panel on inside of door at the mirror.
Remove the window regulator switch plate, pry up on the front of it with a small pick or screw driver. Disconnect the electrical connectors.
Remove the top door trim panel screw that is behind the sail panel you removed.
Remove door trim panel screw at window regulator switch plate opening.
Remove door trim panel screw in the courtesy lamp housing. Remove the courtesy lamp lens.Remove the screw.
Remove the inside door handle trim cover.
Remove the bolt.
Remove the inside door handle.
Lift upward to remove the front door trim panel.
Remove the courtesy lamp.
Turn the courtesy lamp bulb socket one quarter turn and remove.
Disconnect the power mirror electrical connector.
Remove the three outside rear view mirror nuts.
Remove the mirror.
0helpful
1answer

How do you get to the tail lights to change a bulb on a 1999 Ford Taurus?

open luggage compartment and remove quarter trim panel then remove 3 nuts from the rear lamp mounting studs. Gently pull front section of rear lamp outward and push rear lamp rearward away from vehicle.
0helpful
1answer

Replacing the left rear driver side tail lamp assembly

Most of these type lights do not have a plug. I am assuming that you want to replace a burnt out lamp.

Here's what you do. Remove the assembtail lamp assembly. It is usually held on with 2 or 3 phillips head screws. If the problem is a burnt out lamp, the lamp assembly will unscrew from the unit by turning it counterclockwise about a quarter turn. Take the bad bulb to an auto parts store and get a replacement. The bulb will only fit one way into its socket. Then take the socket with the new bulb and insert it back in the housing. Again it will only fit one way. remount the tail light assembly.

If the actual plastic tail light assembly is broken or cracked remove the lamp assembly as described above, take the broken tail light to a dealer and ghet a new one. They are expensive. I just replaced one for my 95 F-150 pickup and it was $40.
0helpful
1answer

Glass

is that glass a half pane on the rear door ?

Robert
Not finding what you are looking for?

65 views

Ask a Question

Usually answered in minutes!

Top Honda Experts

ZJ Limited
ZJ Limited

Level 3 Expert

17989 Answers

Thomas Perkins
Thomas Perkins

Level 3 Expert

15088 Answers

john h

Level 3 Expert

29494 Answers

Are you a Honda Expert? Answer questions, earn points and help others

Answer questions

Manuals & User Guides

Loading...