Cars & Trucks Logo

Related Topics:

Lito Alano Posted on Jul 23, 2016
Answered by a Fixya Expert

Trustworthy Expert Solutions

At Fixya.com, our trusted experts are meticulously vetted and possess extensive experience in their respective fields. Backed by a community of knowledgeable professionals, our platform ensures that the solutions provided are thoroughly researched and validated.

View Our Top Experts

What is the rotation of d4cb crankshaft bolt if I want to remove the pulley

1 Answer

Bill Boyd

Level 3:

An expert who has achieved level 3 by getting 1000 points

Top Expert:

An expert who has finished #1 on the weekly Top 10 Fixya Experts Leaderboard.

Superstar:

An expert that got 20 achievements.

All-Star:

An expert that got 10 achievements.

  • Cars & Trucks Master 53,816 Answers
  • Posted on Jul 23, 2016
Bill Boyd
Cars & Trucks Master
Level 3:

An expert who has achieved level 3 by getting 1000 points

Top Expert:

An expert who has finished #1 on the weekly Top 10 Fixya Experts Leaderboard.

Superstar:

An expert that got 20 achievements.

All-Star:

An expert that got 10 achievements.

Joined: Jan 04, 2013
Answers
53816
Questions
7
Helped
11946019
Points
172802

Undo it as you would any other bolt
crankshaft pulley bolts can be tensioned to around 90 ft/lb so an impact gun is the best method of removal and tightening

5 Related Answers

A

Anonymous

  • Posted on Sep 17, 2008

SOURCE: Crankshaft pulley removal - no clearance between frame!

Put a jack under the engine. Loosen the upper engine mount bolts and lower the engine until you have enough clearance.

Ad

garcuda

  • 36 Answers
  • Posted on Sep 25, 2008

SOURCE: crankshaft pulley removal

Just put a big screwdriver into the fly wheel teeth, thru the hole in the bellhousing, (on the right side). Hold the flywheel still in this manner, while a friend breaks the big bolt loose on the balancer. Be sure to torque it back to the specified torque when you're finished with the belt replacement. Worked for me, back when I replaced my timing belt..Gary

freetek

Steve Allison

  • 5569 Answers
  • Posted on Oct 13, 2008

SOURCE: broken crankshaft pulley bolt on

The only possibility I can suggest is that which is called and 'Easyout.' These are available at parts stores and come (normally) with a sized drill and a special bit with left-hand threads.
First a hole is drilled with the provided drill bit, then the removal bit is screwed into the new hole and turned counter-clockwise which further inserts the removal bit and, if the removal bit does not snap, the broken threaded shank should back out.
I would suggest soaking the broken part with penetrating lubricant first and allowing it time to seep into the threads of the broken bolt.   

Anonymous

  • 316 Answers
  • Posted on May 12, 2009

SOURCE: can't remove crankshaft timing belt pulley BOLT!

You will have to brace the crankshaft somehow, either by way of the flywheel, or the pulley. The trick to getting the bolt to break is "heat". Propane will sometimes work, but it's generally not hot enough. You want to get that bolt glowing if you can, and hit it with air impact then. Be careful not to burn yourself!

I hope this helps you, and I wish you luck on your repair.

Anonymous

  • 1489 Answers
  • Posted on May 31, 2009

SOURCE: which way do you turn the crankshaft pulley bolt to loosen it?

It turns left (counterclockwise) to remove. An impact wrench is best if you can get one on it.

If you don't use an impact wrench, you may need to somehow keep the crank from turning when you loosen the bolt.

One way is to pull the belt tighter to put more tension on the crank pulley.

There are other creative ways I've used. If you have any trouble let me know.

Ad

Add Your Answer

×

Uploading: 0%

my-video-file.mp4

Complete. Click "Add" to insert your video. Add

×

Loading...
Loading...

Related Questions:

0helpful
1answer

Como poner la banda de tienpo de un toyota camery

Installation
1.Install No. 2 idler pulley (if removed). Install and tighten bolt to specification. See TORQUE SPECIFICATIONS . Ensure idler pulley is clean and rotates smoothly. 2.Install No. 1 idler pulley and tension spring (if removed). Pry No. 1 idler pulley away from timing belt area as far as possible. Temporarily tighten No. 1 idler pulley bolt. Ensure idler pulley is clean and rotates smoothly. 3.Using crankshaft pulley bolt, rotate crankshaft so timing mark on crankshaft sprocket aligns with timing mark on oil pump housing. See. This will position keyway in crankshaft sprocket at 12 o'clock position.

CAUTION:If reusing timing belt, ensure reference marks on timing belt align with reference marks placed on crankshaft and camshaft sprockets. Ensure timing belt is installed in original direction of rotation.
4.Ensure all sprockets and idler pulleys are clean. Install timing belt on crankshaft sprocket, oil pump sprocket, No. 1 idler pulley, and then No. 2 idler pulley in sequence. 5.Install timing belt guide with cupped side away from crankshaft sprocket and flat side toward timing belt. Install No. 1 timing belt cover and new gasket. 6.Align crankshaft pulley key groove with key in crankshaft. Install crankshaft pulley. Install and tighten crankshaft pulley bolt to specification. 7.Rotate crankshaft clockwise so cylinder No. 1 is at TDC on compression stroke. Ensure timing mark on crankshaft pulley aligns with "0" mark on No. 1 timing belt cover. If reusing timing belt, ensure reference mark on timing belt aligns with upper edge of No. 1 timing belt cover. 8.Rotate camshaft, and align hole in camshaft sprocket with alignment mark on camshaft bearing cap. See Fig. 2 . Install timing belt on camshaft sprocket. If reusing timing belt, ensure reference mark on timing belt aligns with the reference mark on camshaft sprocket. Ensure tension exists on timing belt between the crankshaft and camshaft sprockets.
CAUTION:DO NOT rotate crankshaft counterclockwise, as viewed from timing belt end of engine.
9.Loosen No. 1 idler pulley bolt 1/2 turn. Rotate crankshaft pulley 2 full revolutions clockwise from TDC to TDC. 10.Ensure timing mark on crankshaft pulley aligns with "0" mark on No. 1 timing belt cover, and hole in camshaft sprocket aligns with alignment mark on camshaft bearing cap. See Fig. 2 . If timing marks are not aligned, remove timing belt and reinstall. 11.Rotate crankshaft clockwise 1 and 7/8 revolutions and align crankshaft pulley "0" mark with 45-degree Before Top Dead Center (BTDC) mark on No. 1 timing belt cover. See Fig. 5 . 12.Tighten No. 1 idler pulley bolt to specification. See TORQUE SPECIFICATIONS . Install No. 2 timing belt cover and gaskets. Install and tighten spark plugs to specification. 13.To install remaining components, reverse removal procedure. Install all bolts/nuts on right (timing belt side) engine mount before tightening to specification. 14.On Camry, when installing control rod and bracket on strut tower and right (timing belt side engine mount, tighten bolts to specification in sequence.
0helpful
2answers

Timing belt

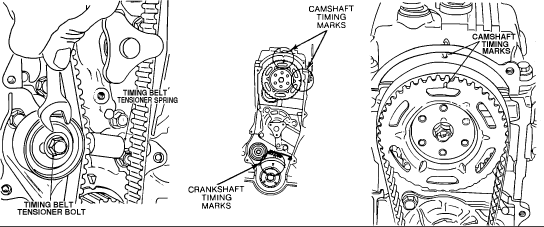
TIMING BELT & SPROCKETS R & I
NOTE: Some procedures may differ slightly due to engine
construction.
Removal
1) Remove all necessary air ducts. Position No. 4 piston at
TDC of compression stroke. Align timing marks. See Fig. 2. Remove fan
and fan shroud. Remove belts. If necessary, remove radiator and
splashguard.
2) Prevent engine from rotating and remove crankshaft timing
pulley retaining bolt. Remove upper and lower timing belt covers.
Remove spring from tension pulley. Loosen adjusting bolt and move
pulley toward water pump. Remove timing belt.
CAUTION: Ensure pistons are at TDC when rotating camshaft or damage
may result.
Inspection
1) Handle timing belt carefully. Avoid twisting or kinking
belt. Do not allow belt to become contaminated by water, oil, dirt or
other contaminates. Inspect belt for cracks or damage. If necessary,
replace.
2) Measure tension pulley spring length and force. Spring
length should not exceed 2.76" (70.2 mm) and spring force should not
be less than 197-347 lbs. (27-48 kg).
3) Replace tension pulley spring if not within specification.
Installation
1) Pull tensioner fully toward water pump side and
temporarily tighten retaining bolt. Ensure No. 4 cylinder is at TDC on
compression stroke by rotating crankshaft until keyway aligns with
mark on front crankshaft seal housing (12 o'clock). Rotate camshaft
until timing mark on cam gear (arrow) aligns with mark on upper
camshaft cover (notch). See Fig. 2.
NOTE: When timing marks are aligned as stated above, No. 4 piston
is at TDC on compression stroke.
2) Position timing belt over crankshaft sprocket, oil pump
sprocket, camshaft sprocket and tensioner in that order. Ensure belt
is positioned in sequence given and without slack between sprockets.
Loosen tension sprocket adjusting bolt allowing spring tension to
tighten belt. Tighten adjusting bolt temporarily.
3) Temporarily install crankshaft pulley bolt and rotate
crankshaft 2 complete revolutions in opposite direction of engine
rotation, until marks on crankshaft and front oil seal retainer are
aligned again. See Fig. 2. Loosen tensioner lock bolt, allowing
tesioner spring to fully adjust tension. Tighten tensioner lock bolt.
4) Install timing belt covers. To complete installation,
reverse removal procedures. Tighten all bolts to specification. See
TORQUE SPECIFICATIONS table at end of this article.
Fig. 2: 2.3L & 2.6L Timing Alignment Marks
Courtesy of Isuzu Motor Co
0helpful
1answer

4cyl 2000 honda accord engine stalls while idling, recently died and will only start for short periods... possible problems/solutions?

check for spark and fuel after it dies.

If there is spark but no fuel, then the fuel pump may be bad or a clogged fuel filter.

If there is fuel but not spark, then the ignition control module or the ignition coil could be bad.

Also, check that the timing belt is timing the engine correctly.
Timing Belt & Balancer Belt

Removal & Installation

2.3L Engine

To Remove:


  1. Record anti-theft code for radio.
  2. Disconnect battery negative cable then positive cable.


    honda-03-23-3542.gif


  3. Turn crankshaft pulley until TDC is achieved.
  4. Raise and safely support vehicle.
  5. Remove front tire assembly.
  6. Remove splash shield.
  7. Remove power steering belt.
  8. Remove alternator and alternator bracket.
  9. Safely support engine under oil pan.


    Upper bracket removal
    honda-03-23-3420.gif


  10. Remove stop, detach ground cable and remove upper bracket.
  11. Remove cylinder head cover.
  12. Remove upper cover.
  13. Remove dipstick and tube assembly.
  14. Remove crankshaft pulley.
  15. Remove adjusting nut rubber seal and remove lower cover.


    Timing belt/balancer belt removal
    honda-03-23-3544.gif


  16. Loosen adjusting nut 1 turn.
  17. Push up on balancer belt tensioner to relieve belt tension.
  18. Push down on timing belt tensioner to relieve belt tension.
  19. Tighten adjusting nut 1 turn.
  20. Remove balancer belt and timing belt.


To Install:


NOTE: Clean balancer belt drive pulley, timing belt pulleys and
upper/lower timing cover prior to belt installation.


honda-03-23-3425.gif


  1. Set timing belt drive pulley to TDC by aligning dimple on pulley with dimple
    on oil pump.


    honda-03-23-3426.gif


  2. Set camshaft pulley to TDC so that "UP" mark is at top and grooves align
    with top of cylinder head.


    Timing belt installation
    honda-03-23-3549.gif


  3. Starting with driver pulley, install timing belt in a counterclockwise
    sequence.
  4. Loosen and ten retighten adjusting nut.
  5. Install balancer belt drive pulley.
    NOTE: Inspect rubber seal on lower cover and replace as necessary.

  6. Install lower cover.
  7. Install crankshaft pulley and bolt.
  8. Rotate crankshaft pulley counterclockwise several times to seat belt.
  9. Loosen adjusting nut 1 turn.
  10. Rotate crankshaft counterclockwise 3 teeth on camshaft pulley.
  11. Tighten adjusting nut to 33 ft lb (44 Nm).


    honda-03-23-3542.gif


  12. Turn crankshaft pulley until TDC is achieved.


    honda-03-23-3426.gif


  13. Ensure that camshaft pulley "UP" mark is at top and grooves align with top
    of cylinder head.
  14. Remove crankshaft pulley and lower cover.
  15. Rotate crankshaft to TDC again and lock timing belt adjuster arm with a 6 mm
    timing cover bolt.
  16. Loosen adjuster nut 1 turn and ensure that belt tensioner freely moves.
  17. Push tensioner up and tighten adjusting nut.


    Balancer shaft alignment
    honda-03-23-3556.gif


  18. Remove bolt and washer from maintenance hole.
  19. Using a 6 X 100 mm bolt, scribe a mark 2.9 in (74 mm) from end.
  20. Insert bolt into maintenance hole and hole in balancer shaft.
  21. Install bolt up to scribed line.


    Balancer shaft alignment
    honda-03-23-3557.gif


  22. Align groove on balancer shaft with pointer on oil pump housing.
  23. Install balancer belt and loosen adjusting nut 1 turn to tension.
  24. Retighten bolt.


    Balancer shaft alignment
    honda-03-23-3556.gif


  25. Remove bolt from maintenance hole and install bolt and washer. Tighten to
    22 ft lb (29 Nm).
  26. Reinstall crankshaft pulley.
  27. Loosen adjusting nut 1 turn.
  28. Rotate crankshaft pulley counterclockwise 1 turn and tighten adjusting nut.
  29. Remove bolt from timing belt adjuster arm.
    NOTE: Inspect rubber seal on lower cover and replace as necessary.

  30. Remove crankshaft pulley.
  31. Install lower cover.
  32. Install seal at adjusting nut.
    NOTE: Crankshaft pulley, bolt and washer must be cleaned prior to
    installation.

  33. Lubricate crankshaft pulley bolt between head and washer and bolt threads
    with clean engine oil.


    honda-03-23-3537.gif


    CAUTION
    Do not use impact wrench to perform
    following step.

  34. Install crankshaft pulley and tighten bolt using special tools to 181 ft
    lb (245 Nm)
    .
  35. Install dipstick/tube assembly.
  36. Install upper cover. Tighten bolts to 9 ft lb (12 Nm).
  37. Install cylinder head cover.
  38. Install alternator bracket and alternator.
  39. Install power steering pump belt and alternator belt.


    Upper bracket installation
    honda-03-23-3420.gif


  40. Install upper bracket and tighten fasteners in proper numbered sequence.
  41. Install stop.
  42. Install battery and enter radio anti-theft code.


prev.gif next.gif
0helpful
1answer

Replacing a timing belt on a 1994 Ford Ranger

Instructions Things You'll Need:
  • Drain pan
  • Ratchet
  • Ratchet extension
  • Socket set
  • Small standard screwdriver
  • Phillips screwdriver
  • Timing belt tensioner wrench No. T74P-6254-A
  • Large standard screwdriver
  • Torque wrench
  • Timing belt
  • Timing belt cover gasket
    Preparation
  1. Place a drain pan under the radiator and drain the coolant from the radiator.

  2. Squeeze the spring clamp holding the upper radiator hose to the radiator fitting with a pair of rib joint pliers and slide the clamp towards the engine.

  3. Twist and pull the upper radiator hose off the radiator.

  4. Remove the fan blade using a ratchet, ratchet extension and socket.

  5. Rotate the belt tensioner pulley using a breaker bar and remove the drive belt.

  6. Detach the water pump pulley using a ratchet, ratchet extension and socket.

  7. Pry off the access plug from the upper part of the timing belt cover using a small standard screwdriver.

  8. Set the transmission to Neutral and apply the Parking brakes.

  9. Rotate the crankshaft pulley with a ratchet, ratchet extension and socket to align the "O" mark on the crankshaft pulley and the "O" mark on the belt cover.

  10. Look through the cover access hole. If you see another timing mark on the camshaft sprocket aligned with the mark on the inner belt cover, cylinder number 1 is at Top Dead Center (TDC). If not, rotate the crankshaft one complete turn again and check for the alignment marks.

  11. Removing the Timing Belt
  12. Unscrew the four mounting bolts and the Phillips screw next to the access plug from the timing belt cover using a ratchet, ratchet extension and socket and Phillips screwdriver.

  13. Detach the crankshaft pulley using a ratchet, ratchet extension and socket and remove the belt guide (large washer) from behind the crankshaft pulley. You may need a pulley remover to take the crankshaft pulley off. If so, you can rent one from most auto parts stores.

  14. Loosen the adjusting bolt on the tensioner pulley assembly using a ratchet, ratchet extension and socket.

  15. Rotate the tension spring rollpin (this is the screw next to the adjuster bolt on the tensioner pulley assembly) away from the timing belt using timing belt tensioner wrench number T74P-6254-A. As you hold the timing belt loose, tighten the assembly adjuster bolt to lock the tensioner using the ratchet, ratchet extension and socket. Now remove the tensioner wrench.

  16. Remove the timing belt.

  17. Installing the New Timing Belt
  18. Install the new timing belt starting at the crankshaft sprocket. Route the belt in a counterclockwise direction over the auxiliary and camshaft sprockets. Properly engage the belt lugs on the sprockets' teeth and keep any slack on the belt to the right side, between the crankshaft and camshaft sprockets. Make sure not to rotate any of the sprockets as you install the timing belt.

  19. Loosen the adjuster bolt on the tensioner pulley assembly so the tensioner rolls against the belt. If necessary, push the tensioner pulley against the belt with a large standard screwdriver to remove any remaining slack on the belt.

  20. Make sure the transmission is in the Neutral position and the Parking brakes are engaged.

  21. Rotate the crankshaft two complete revolutions so that cylinder No.1 is back in TDC. This will help to tighten the timing belt on the sprockets.

  22. Tighten the adjuster bolt on the tensioner pulley assembly between 14- and 21-foot lbs. (19.0 to 29.0 Nm) using a torque wrench.

  23. Tighten the tension-spring bolt between 28- and 40-foot lbs. (38.0-54.0 Nm) using the torque wrench.

  24. Install the belt guide (large washer) and the crankshaft pulley. Tighten the pulley bolt with the ratchet, ratchet extension and socket.

  25. Install the timing belt cover with a new gasket using the ratchet, ratchet extension and socket and Phillips screwdriver.

  26. Reinstall the water pump pulley, drive belt, fan blade and upper radiator hose.

  27. Refill the cooling system with coolant.

0helpful
1answer

Need to know what the timing marks and locations for replacing the timing belt

Timing Belt Removal & Installation 3.0L Engine To Remove:
Exploded view of the timing belt and sprocket assembly (3.0L engine) 86723255.gif

  1. Disconnect the negative battery cable.
  2. Remove the accessory drive belts. Remove the engine mount insulator from the engine support bracket.
  3. Remove the engine support bracket. Remove the crankshaft pulleys and torsional damper. Remove the timing belt covers.
  4. Rotate the crankshaft until the sprocket timing marks are aligned. The crankshaft sprocket timing mark should align with the oil pump timing mark. The rear camshaft sprocket timing mark should align with the generator bracket timing mark and the front camshaft sprocket timing mark should align with the inner timing belt cover timing mark.
  5. If the belt is to be reused, mark the direction of rotation on the belt for installation reference. Mark the direction of travel for the timing belt for correct installation 86723p72.jpg
  6. Loosen the timing belt tensioner bolt and remove the timing belt.
  7. If necessary, remove the timing belt tensioner. Turn the center tensioner pulley bolt until the timing belt has enough slack . . . 86723p73.jpg
    . . . then slide the timing belt off of the camshaft sprockets 86723p74.jpg
  8. Remove the crankshaft sprocket flange shield and crankshaft sprocket.
  9. Hold the camshaft sprocket using spanner tool MB990775 or equivalent, and remove the camshaft sprocket bolt and washer. Remove the camshaft sprocket.
To Install:
  1. Install the camshaft sprocket on the camshaft with the retaining bolt and washer. Hold the camshaft sprocket using spanner tool MB990775 or equivalent, and tighten the bolt to 70 ft. lbs. (95 Nm).
  2. Install the crankshaft sprocket.
  3. If removed, install the timing belt tensioner and tensioner spring. Hook the spring upper end to the water pump pin and the lower end to the tensioner bracket with the hook out.
  4. Turn the timing belt tensioner counterclockwise full travel in the adjustment slot and tighten the bolt to temporarily hold it in this position.
  5. Rotate the crankshaft sprocket until its timing mark is aligned with the oil pump timing mark.
  6. Rotate the rear camshaft sprocket until its timing mark is aligned with the timing mark on the generator bracket.
  7. Rotate the front (radiator side) camshaft sprocket until its mark is aligned with the timing mark on the inner timing belt cover.
  8. Install the timing belt on the crankshaft sprocket while keeping the belt tight on the tension side. NOTE: If the original belt is being reused, be sure to install it in the same rotational direction.
  9. Position the timing belt over the front camshaft sprocket (radiator side). Next, position the belt under the water pump pulley, then over the rear camshaft sprocket and finally over the tensioner. CAUTION
    If any binding is felt when adjusting the timing belt tension by turning the crankshaft, STOP turning the engine, because the pistons may be hitting the valves.
    Rent or borrow the special tool to hold the camshaft sprockets steady . . . 86723p75.jpg
    . . . while loosening the center retaining bolt on the camshaft pulley, then . . . 86723p76.jpg
    . . . remove the camshaft sprocket from the end of the camshaft 86723p77.jpg
    Timing belt tensioner and spring positions 86723254.gif
    Timing belt routing and timing mark locations 86723256.gif

  10. Apply rotating force in the opposite direction to the front camshaft sprocket (radiator side) to create tension on the timing belt tension side. Check that all timing marks are aligned.
  11. Install the crankshaft sprocket flange.
  12. Loosen the tensioner bolt and allow the tensioner spring to tension the belt.
  13. Rotate the crankshaft two full turns in a clockwise direction. Turn the crankshaft smoothly and in a clockwise direction only.
  14. Again line up the timing marks. If all marks are aligned, tighten the tensioner bolt to 250 in. lbs. (28 Nm). Otherwise repeat the installation procedure.
  15. Install the timing belt covers. Install the engine support bracket. Tighten the support bracket mounting bolts to 35 ft. lbs. (47 Nm).
  16. Install the engine mount insulator, torsional damper and crankshaft pulleys. Tighten the crankshaft pulley bolt to 112 ft. lbs. (151 Nm).
  17. Install the accessory drive belts.
  18. Reconnect the negative battery cable.
  19. Run the engine and check for proper operation.
prev.gif next.gif
0helpful
1answer

Timing belt removal 94 mercury villager

Hi, Disconnect battery ground cable, then drain coolant. Remove accessory drive belts. Remove A/C compressor drive belt idler pulley (tensioner) bolts, then idler pulley (tensioner). Remove upper radiator hose bracket bolt. Loosen two upper radiator hose clamps, then remove upper hose and bracket. Remove coolant bypass hose between thermostat housing and intake manifold coolant outlet. Disconnect main wiring harness from upper front cover (timing belt) cover, then remove eight upper timing belt cover bolts, then the upper cover, Fig. 20. Raise and support vehicle. Remove right front wheel and tire assembly and splash shield. Use strap wrench tool No. D85L-6000-A, or equivalent, to hold water pump pulley while removing water pump pulley bolts. Remove water pump pulley from water pump. Remove crankshaft pulley. Remove five lower timing belt cover attaching bolts and the cover. Rotate crankshaft in a clockwise direction to align crankshaft and camshaft sprocket timing marks, Fig. 21. If timing belt is to be reused, mark direction of rotation. Loosen timing belt tensioner nut, then remove timing belt. CAUTION: With timing belt removed, avoid turning camshaft or crankshaft. If movement is required, exercise extreme caution to avoid valve damage caused by piston contact.
Take care
0helpful
1answer

Hiwich timing mark I used to time the balancer shaft on a 99 honda accord with a 2.3L

To Install:
NOTE: Clean balancer belt drive pulley, timing belt pulleys and upper/lower timing cover prior to belt installation.
honda-03-23-3425.gif

  1. Set timing belt drive pulley to TDC by aligning dimple on pulley with dimple on oil pump. honda-03-23-3426.gif

  2. Set camshaft pulley to TDC so that "UP" mark is at top and grooves align with top of cylinder head. Timing belt installation honda-03-23-3549.gif

  3. Starting with driver pulley, install timing belt in a counterclockwise sequence.
  4. Loosen and ten retighten adjusting nut.
  5. Install balancer belt drive pulley. NOTE: Inspect rubber seal on lower cover and replace as necessary.
  6. Install lower cover.
  7. Install crankshaft pulley and bolt.
  8. Rotate crankshaft pulley counterclockwise several times to seat belt.
  9. Loosen adjusting nut 1 turn.
  10. Rotate crankshaft counterclockwise 3 teeth on camshaft pulley.
  11. Tighten adjusting nut to 33 ft lb (44 Nm). honda-03-23-3542.gif

  12. Turn crankshaft pulley until TDC is achieved. honda-03-23-3426.gif

  13. Ensure that camshaft pulley "UP" mark is at top and grooves align with top of cylinder head.
  14. Remove crankshaft pulley and lower cover.
  15. Rotate crankshaft to TDC again and lock timing belt adjuster arm with a 6 mm timing cover bolt.
  16. Loosen adjuster nut 1 turn and ensure that belt tensioner freely moves.
  17. Push tensioner up and tighten adjusting nut. Balancer shaft alignment honda-03-23-3556.gif

  18. Remove bolt and washer from maintenance hole.
  19. Using a 6 X 100 mm bolt, scribe a mark 2.9 in (74 mm) from end.
  20. Insert bolt into maintenance hole and hole in balancer shaft.
  21. Install bolt up to scribed line. Balancer shaft alignment honda-03-23-3557.gif

  22. Align groove on balancer shaft with pointer on oil pump housing.
  23. Install balancer belt and loosen adjusting nut 1 turn to tension.
  24. Retighten bolt. Balancer shaft alignment honda-03-23-3556.gif

  25. Remove bolt from maintenance hole and install bolt and washer. Tighten to 22 ft lb (29 Nm).
  26. Reinstall crankshaft pulley.
  27. Loosen adjusting nut 1 turn.
  28. Rotate crankshaft pulley counterclockwise 1 turn and tighten adjusting nut.
  29. Remove bolt from timing belt adjuster arm. NOTE: Inspect rubber seal on lower cover and replace as necessary.
  30. Remove crankshaft pulley.
  31. Install lower cover.
  32. Install seal at adjusting nut. NOTE: Crankshaft pulley, bolt and washer must be cleaned prior to installation.
  33. Lubricate crankshaft pulley bolt between head and washer and bolt threads with clean engine oil. honda-03-23-3537.gif

    CAUTION
    Do not use impact wrench to perform following step.
  34. Install crankshaft pulley and tighten bolt using special tools to 181 ft lb (245 Nm).
  35. Install dipstick/tube assembly.
  36. Install upper cover. Tighten bolts to 9 ft lb (12 Nm).
  37. Install cylinder head cover.
  38. Install alternator bracket and alternator.
  39. Install power steering pump belt and alternator belt. Upper bracket installation honda-03-23-3420.gif

  40. Install upper bracket and tighten fasteners in proper numbered sequence.
  41. Install stop.
  42. Install battery and enter radio anti-theft code.
prev.gif next.gif
7helpful
1answer

Can you tell me where I can print instructions for free to help me change my timing belt in a 93 ford festiva

Here are the instructions for removing the timing cover, and for replacing the timing belt. If this is helpful, please click my accept button! Thanks!
Remove accessory drive belts.
  1. Remove water pump pulley to pump hub attaching bolts, then the pulley.
  2. Remove right inner fender panel to gain access to crankshaft pulley.
  3. Remove outer crankshaft pulley attaching bolts, then the outer stiffener/spacer and outer pulley
  4. Remove inner stiffener/spacer, attaching screws, inner pulley and baffle plate.
  5. Remove attaching bolts, then the upper and lower timing covers.
  6. Reverse procedure to install. When installing crankshaft pulley, ensure curved lip on baffle plate and deep recess of inner pulley face outward

8fb9fc4.gif
  1. Remove timing belt covers as outlined previously.
  2. Remove timing belt tensioner pulley attaching bolt, then the tensioner pulley, spring and spring cover
  3. If reusing old belt, mark direction of rotation on belt to aid installation.
  4. Remove timing belt from crankshaft and camshaft sprockets.
  5. Check crankshaft and camshaft sprockets, tensioner pulley and timing belt for wear or damage. Replace components as necessary.
  6. Align camshaft and crankshaft sprocket timing marks with marks on cylinder head and oil pump housing
  7. Install timing belt. If reusing old belt, ensure belt is installed so that direction of rotation mark made during removal is positioned correctly.
  8. Install spring and spring cover onto tensioner pulley, then install pulley and attaching bolt. Do not tighten bolt at this time.
  9. Install tensioner spring onto anchor, then tighten pulley attaching bolt to torque listed at the end of this section.
  10. Reinstall timing belt covers.

spacer.gif 2006-05-25_081817_fest2.thumb.gif
This photo shows timing marks.


59f76eb.gif
0helpful
1answer

Replace timing belt

1993–96 2.3L and 2.6L Engines
  1. Disconnect the negative battery cable.
  2. Loosen and remove the engine accessory drive belts.
  3. Remove the cooling fan assembly and the water pump pulley.
  4. Drain the fluid from the power steering reservoir.
  5. Unbolt and remove the power steering pump. Unbolt the hydraulic line brackets from the upper timing cover and move the pump out of the work area without disconnecting the hydraulic lines.
  6. Disconnect and remove the starter motor if a flywheel holder (part No. J–38674) is to be used.
  7. Remove the upper timing belt cover.
  8. Rotate the crankshaft to set the engine at TDC/compression for the No. 1 cylinder. The arrow mark on camshaft sprocket aligns with mark on the rear timing cover.
  9. Remove the crankshaft pulley.
  10. Remove the lower timing belt cover.
  11. Verify that the engine is set at TDC/compression for the No. 1 cylinder. The notch on the crankshaft sprocket aligns with the pointer on the oil seal retainer.
  12. Release and remove the tensioner spring to release the timing belt's tension.
  13. Remove the timing belt.
  14. Unbolt the tensioner pulley bracket from the engine's front cover.
  15. If necessary, unbolt and remove the camshaft sprockets. Use a puller to remove the crankshaft pulley if necessary. Don't loose the crankshaft sprocket key. To install:
  16. Install the camshaft and crankshaft sprockets if they were removed. Align the timing marks and be sure to install any keys. Tighten the camshaft sprocket bolt to 43 ft. lbs. (59 Nm).
  17. Install the tensioner assembly. Tighten the tensioner mounting bolt to 14 ft. lbs. (19 Nm). Tighten the cap bolt to 9 ft. lbs. (13 Nm).
  18. Make sure the crankshaft and the camshaft sprockets are aligned with their timing marks. Install the timing belt onto the sprockets using the following sequence: first, crankshaft sprocket; second, oil pump sprocket; third, camshaft sprocket.
  19. Loosen the tensioner mounting bolt. This will allow the tensioner spring to apply pressure to the timing belt.
  20. After the spring has pulled the timing belt as far as possible, temporarily tighten the tensioner mounting bolt to 14 ft. lbs. (19 Nm). NOTE: Remove the flywheel holder before rotating the crankshaft. Reinstall the holder to torque the crankshaft pulley bolt.
  21. Rotate the crankshaft counterclockwise two complete revolutions to check the rotation of the belt and the alignment of the timing marks. Listen for any rubbing noises which may mean the belt is binding.
  22. Loosen the tensioner pulley bolt to allow the spring to adjust the correct tension. Then, retighten the tensioner pulley bolt to 14 ft. lbs (19 Nm).
  23. Install the lower timing cover and the crankshaft pulley.
  24. Tighten the crankshaft pulley bolt to 87 ft. lbs. (118 Nm). Tighten the small pulley bolts to 6 ft. lbs. (8 Nm).
  25. Install the upper timing cover.
  26. Install the starter if it was removed. Tighten the bolts to 30 ft. lbs. (40 Nm).
  27. Install the power steering pump. If the hydraulic lines were disconnected, refill and bleed the power steering system.
  28. Install the water pump pulley and tighten its nut to 20 ft. lbs. (26 Nm).
  29. Install the cooling fan assembly.
  30. Install and adjust the accessory drive belts.
  31. Connect the negative battery cable.
17helpful
2answers

Need instructions to replace 1993 Toyota Camry Timing Belt

Hi Kmcarroll77

TIMING BELT REPLACEMENT - 2.2L -1993 Toyota Camry

Installation
1.Install No. 2 idler pulley (if removed). Install and tighten bolt to specification. See TORQUE SPECIFICATIONS . Ensure idler pulley is clean and rotates smoothly. 2.Install No. 1 idler pulley and tension spring (if removed). Pry No. 1 idler pulley away from timing belt area as far as possible. Temporarily tighten No. 1 idler pulley bolt. Ensure idler pulley is clean and rotates smoothly. 3.Using crankshaft pulley bolt, rotate crankshaft so timing mark on crankshaft sprocket aligns with timing mark on oil pump housing. See. This will position keyway in crankshaft sprocket at 12 o'clock position.

CAUTION:If reusing timing belt, ensure reference marks on timing belt align with reference marks placed on crankshaft and camshaft sprockets. Ensure timing belt is installed in original direction of rotation.
4.Ensure all sprockets and idler pulleys are clean. Install timing belt on crankshaft sprocket, oil pump sprocket, No. 1 idler pulley, and then No. 2 idler pulley in sequence. 5.Install timing belt guide with cupped side away from crankshaft sprocket and flat side toward timing belt. Install No. 1 timing belt cover and new gasket. 6.Align crankshaft pulley key groove with key in crankshaft. Install crankshaft pulley. Install and tighten crankshaft pulley bolt to specification. 7.Rotate crankshaft clockwise so cylinder No. 1 is at TDC on compression stroke. Ensure timing mark on crankshaft pulley aligns with "0" mark on No. 1 timing belt cover. If reusing timing belt, ensure reference mark on timing belt aligns with upper edge of No. 1 timing belt cover. 8.Rotate camshaft, and align hole in camshaft sprocket with alignment mark on camshaft bearing cap. See Fig. 2 . Install timing belt on camshaft sprocket. If reusing timing belt, ensure reference mark on timing belt aligns with the reference mark on camshaft sprocket. Ensure tension exists on timing belt between the crankshaft and camshaft sprockets.
CAUTION:DO NOT rotate crankshaft counterclockwise, as viewed from timing belt end of engine.
9.Loosen No. 1 idler pulley bolt 1/2 turn. Rotate crankshaft pulley 2 full revolutions clockwise from TDC to TDC. 10.Ensure timing mark on crankshaft pulley aligns with "0" mark on No. 1 timing belt cover, and hole in camshaft sprocket aligns with alignment mark on camshaft bearing cap. See Fig. 2 . If timing marks are not aligned, remove timing belt and reinstall. 11.Rotate crankshaft clockwise 1 and 7/8 revolutions and align crankshaft pulley "0" mark with 45-degree Before Top Dead Center (BTDC) mark on No. 1 timing belt cover. See Fig. 5 . 12.Tighten No. 1 idler pulley bolt to specification. See TORQUE SPECIFICATIONS . Install No. 2 timing belt cover and gaskets. Install and tighten spark plugs to specification. 13.To install remaining components, reverse removal procedure. Install all bolts/nuts on right (timing belt side) engine mount before tightening to specification. 14.On Camry, when installing control rod and bracket on strut tower and right (timing belt side engine mount, tighten bolts to specification in sequence. See Fig. 6 . On MR2, tighten engine
b7619be.jpg
92cabaf.jpg
Hope this helps, don't forget to rate.

Lazaruselite
Not finding what you are looking for?

132 views

Ask a Question

Usually answered in minutes!

Top Cars & Trucks Experts

ZJ Limited
ZJ Limited

Level 3 Expert

17989 Answers

john h

Level 3 Expert

29494 Answers

Arnie Burke
Arnie Burke

Level 3 Expert

7339 Answers

Are you a Car and Truck Expert? Answer questions, earn points and help others

Answer questions

Manuals & User Guides

Loading...