AIMING THE HEADLIGHTS
On 1989-91
vehicles, the headlights can be aimed using the adjusting screws
located above and to the side of the headlight bulbs. A rough
adjustment can be made while shining the headlights on a wall or on the
rear of another vehicle, but headlight adjustment should really be made
using proper headlight aiming equipment.
On 1992-98 vehicles, the
aerodynamically styled headlights necessitate the use of headlight
aiming kit 107-00003 or equivalent. The adjustable aimer adapters
provided in the kit must be used to aim the headlights. Adjustment
aimer adapter positions are moulded into the bottom edge of the
headlight lens. Set and lock the adjustable adapters, attach each
adapter to its mechanical aimer and aim the headlights according to the
instructions in the kit.
Headlight aim adjustment should be made
with the fuel tank approximately half full, the vehicle unloaded and
the trunk empty, except for the spare tire and jacking equipment. Make
sure all tires are inflated to the proper pressure.
The
headlights must be properly aimed to provide the best, safest road
illumination. The lights should be checked for proper aim and adjusted
as necessary. Certain state and local authorities have requirements for
headlight aiming; these should be checked before adjustment is made.
CAUTION
About once a year, when the headlights are replaced or any time
front end work is performed on your vehicle, the headlight should be
accurately aimed by a reputable repair shop using the proper equipment.
Headlights not properly aimed can make it virtually impossible to see
and may blind other drivers on the road, possibly causing an accident.
Note that the following procedure is a temporary fix, until you can
take your vehicle to a repair shop for a proper adjustment.
Headlight adjustment may be temporarily made using a wall,
as described below, or on the rear of another vehicle. When adjusted,
the lights should not glare in oncoming car or truck windshields, nor
should they illuminate the passenger compartment of vehicles driving in
front of you. These adjustments are rough and should always be
fine-tuned by a repair shop which is equipped with headlight aiming
tools. Improper adjustments may be both dangerous and illegal.
For
most of the vehicles covered by this guide, horizontal and vertical
aiming of each sealed beam unit is provided by two adjusting screws
which move the retaining ring and adjusting plate against the tension
of a coil spring. There is no adjustment for focus; this is done during
headlight manufacturing.
Because the composite headlight assembly is bolted into position, no
adjustment should be necessary or possible. Some applications, however,
may be bolted to an adjuster plate or may be retained by adjusting
screws. If so, follow this procedure when adjusting the lights, BUT
always have the adjustment checked by a reputable shop.
Before removing the headlight bulb or disturbing the headlamp in
any way, note the current settings in order to ease headlight
adjustment upon reassembly. If the high or low beam setting of the old
lamp still works, this can be done using the wall of a garage or a
building:
-
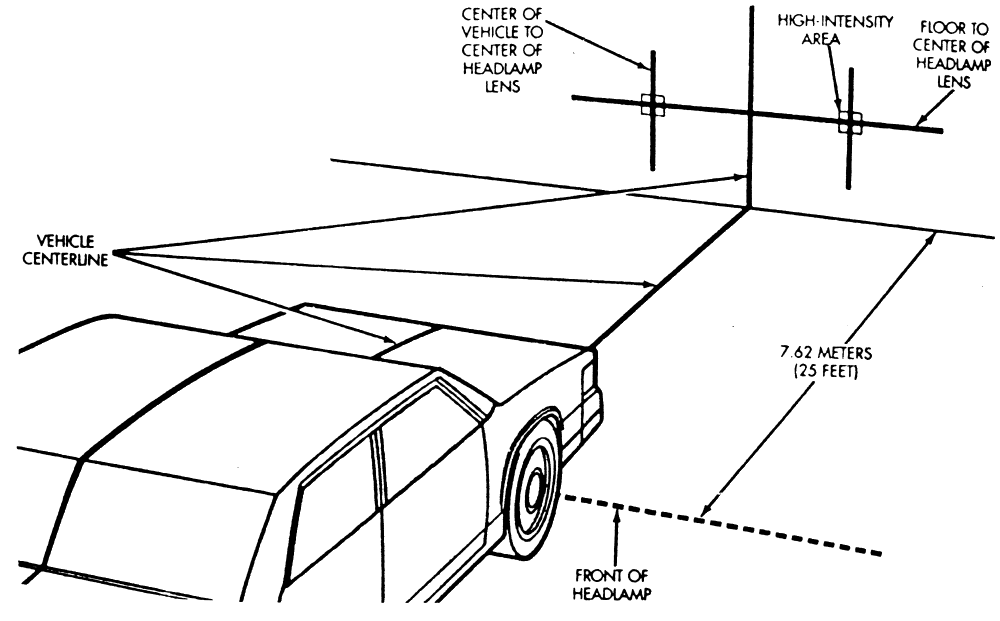
Park the vehicle on a level surface, with the fuel tank about
1
/
2
full and with the vehicle empty of all extra cargo (unless normally
carried). The vehicle should be facing a wall which is no less than 6
feet (1.8m) high and 12 feet (3.7m) wide. The front of the vehicle
should be about 25 feet from the wall.
See Figure 6
 Fig. 6: Example of headlight adjustment screw location for composite headlamps
-
If aiming is to be performed outdoors, it is advisable to wait
until dusk in order to properly see the headlight beams on the wall. If
done in a garage, darken the area around the wall as much as possible
by closing shades or hanging cloth over the windows.
-
Turn the headlights
ON and
mark the wall at the center of each light's low beam, then switch on
the brights and mark the center of each light's high beam. A short
length of masking tape which is visible from the front of the vehicle
may be used. Although marking all four positions is advisable, marking
one position from each light should be sufficient.
See Figures 7 and 8
 Fig. 7: Low-beam headlight pattern alignment
 Fig. 8: High-beam headlight pattern alignment
-
If neither beam on one side is working, and if another like-sized
vehicle is available, park the second one in the exact spot where the
vehicle was and mark the beams using the same-side light. Then switch
the vehicles so the one to be aimed is back in the original spot. It
must be parked no closer to or farther away from the wall than the
second vehicle.
-
Perform any necessary repairs, but make sure the vehicle is not
moved, or is returned to the exact spot from which the lights were
marked. Turn the headlights ON
and adjust the beams to match the marks on the wall.
-
Have the headlight adjustment checked as soon as possible by a reputable repair shop.
Hope thats helped (remember rated this) Good luck.


×