
Before trying to take the drum off, you could have used a rubber hammer give it a few licks around. On the back side of backing plate should be a cavity where you can use a break tool or screwdriver to release brakes from drum.
Put the drum back on and see if it will come off the right side, first.
My biggest problem is I can't see anything from here.
SOURCE: remove rear brake drums
1.
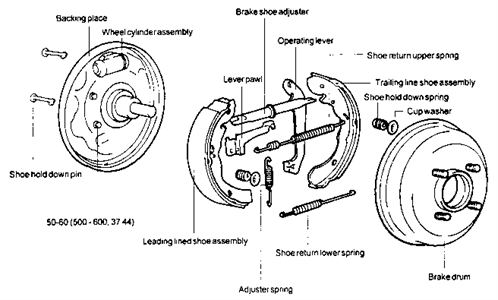
After removing the wheel, remove the brake drum.
2.
Remove the shoe hold down spring, the automatic adjuster spring and adjuster lever.

3.
Spread the shoes and remove the shoe adjuster.
4.
Remove the shoe to shoe spring and shoe hold down spring.

SOURCE: 05 Equinox not able to remove right rear brake drum
Hiya...
Most rear brake-shoe design take some time to adjust than disc brakes...
If you have a special brake adjustment tool that your local automotive store sells, get this tool and pull out the rubber grommet plug, insert the brake adjustment tool until you 'feel' or hear the sound of 'skipping' on the brake self-adjuster spool inside as you wiggle /adjust the tool inside....(push it inside to get a firm feel that you can 'spin' it)
Try to push the tool downward or upward to check if that'll spin the brake self-adjuster part smaller to allow the brake shoes to 'shrink' which should allow you easy removal of the rear brake drum as you wiggle it out.
Be sure not to breathe in toxic brake dust upon successful brake drum removal.
SOURCE: passenger side rear brake locked up.
It's probably the emergency brake cable that is stuck. Check that first. When I get a drum brake that is totally frozen up (like been sitting for 40 yrs) I often use 2 or 3 pry bars, WD40 and short handle sledge hammer to pry a little on both sides, liberally keep penetrating oil squirted on the shoes and tap on all sides. Eventually drum will come off, but sometimes it takes like maybe 1/2 hour. Shoes will have to be replaced, but they are probably shot anyway. The drums for the caravans are cheap, so I would not only get them, but the spring kit from the parts house as well.
SOURCE: how to change rear brake shoes on a 2004 chevy venture
The rear brake shoes use a U clip to hold the shoes together. A simple solution to this change job is to change one side at a time.
Slowly unclip the U clip from the top of the shoe and remove the left shoe and spring. Replace the left shoe and reconnect the U clip, then do the same for the other shoe. Clean, adjust,and grease the self adjuster and you're done. Do the same for the other side of the van. If you take both sides of the clip off you're in for some heavy duty stretching with pliers unless you have the right tool.
SOURCE: how to change rear brake shoe pads of 2005 mitsubishi lancer
Hello, this do it yourself project is very manageable if it is brake pads that you are replacing on your car; if they are disc shoes it may be a little bit harder. In essence a brake job can be done straight out of a auto manual for your car and is not to diffucult as long as you follow good safety procedures while jacking up your vehicle and removing your wheels. First, I would park your car and setting your parking break will make your rear brakes impossible to get off so do not set it. I would however keep this in mind and be very careful working on your car then. I would chaulk your front wheel with a chaulk block or a brick. I would loosen your lug nuts just to break the intial torque I would then jack up the rear of your vehicle and set jack stands under your car in the proper locations. Then systematically, remover your wheel and then the two bolts holding your caliper to the spindle. Carefully, remove the caliper and do not let it hang becuase you will bend your brake line. Remove old shoes, then compress the caliper with a caliper compression tool from your local auto parts store or a c-clamp and a small block of wood. Inspect the rotor for deep gouges, a blue tint, or if you know you have gotten them really hot before I would replace the rotor. Next, install the new brake pads, put rotor back onto spindle and insert bolts back into caliper housing. Repeat for the next side and put the wheel back on and remember to torque your lug nuts to the proper specification. I hope this fixes your problem for you!
262 views
Usually answered in minutes!


×