2003 Hyundai Tiburon Logo

Related Topics:

Posted on Jul 10, 2009
Answered by a Fixya Expert

Trustworthy Expert Solutions

At Fixya.com, our trusted experts are meticulously vetted and possess extensive experience in their respective fields. Backed by a community of knowledgeable professionals, our platform ensures that the solutions provided are thoroughly researched and validated.

View Our Top Experts

What is the proper torque for the crankshaft pulley bolt on a 03 Tiburon GT 2.7?

1 Answer

Anonymous

Level 3:

An expert who has achieved level 3 by getting 1000 points

All-Star:

An expert that got 10 achievements.

MVP:

An expert that got 5 achievements.

Vice President:

An expert whose answer got voted for 100 times.

  • Master 521 Answers
  • Posted on Jul 10, 2009
Anonymous
Master
Level 3:

An expert who has achieved level 3 by getting 1000 points

All-Star:

An expert that got 10 achievements.

MVP:

An expert that got 5 achievements.

Vice President:

An expert whose answer got voted for 100 times.

Joined: Dec 15, 2008
Answers
521
Questions
1
Helped
286463
Points
1767

Crankshaft pulley bolt torque is:
Min: 130 ft lbs
Max: 138 ft lbs

Add Your Answer

×

Uploading: 0%

my-video-file.mp4

Complete. Click "Add" to insert your video. Add

×

Loading...
Loading...

Related Questions:

0helpful
1answer

GT. How can I set the timing?

Go to YouTube, and enter "2005 Hyundai Tiburon GT valve timing" in the search box. You will find several videos that deal with changing the timing belt and water pump. Toward the end of each video, when they are reassembling the components, they will show the correct way to set the crankshaft pulley and cam pulleys to properly time the engine.
0helpful
1answer

Torque specs

B: INSTALLATION
1) Install the crankshaft pulley.
2) Install the pulley bolt.
To lock the crankshaft, use ST.
ST 499977400 CRANKSHAFT PULLEY
WRENCH
(1) Clean the crankshaft pulley thread using an
air gun.
(2) Apply engine oil to the crankshaft pulley bolt
seat and thread.
(3) Tighten the bolts temporarily with tightening
torque of 44 N·m (4.5 kgf-m, 33 ft-lb).
(4) Tighten the crankshaft pulley bolts.
Tightening torque:
127 N·m (13 kgf-m, 94.0 ft-lb)
0helpful
1answer

How many foot pounds of torque should i tighten the bolt that holds on the harmonic balance on a 1996 subaru legacy outback

From FSM:

B: INSTALLATION
1) Install the crankshaft pulley.
2) Install the pulley bolt.
To lock the crankshaft, use ST.
ST 499977400 CRANKSHAFT PULLEY
WRENCH
(1) Clean the crankshaft pulley thread using an
air gun.
(2) Apply engine oil to the crankshaft pulley bolt
seat and thread.
(3) Tighten the bolts temporarily with tightening
torque of 44 N·m (4.5 kgf-m, 33 ft-lb).
(4) Tighten the crankshaft pulley bolts.
Tightening torque:
127 N·m (13 kgf-m, 94.0 ft-lb)
0helpful
1answer

I have this 89 acura legend 2.7l v6 timing belt removed and the water pump removed, the old pump failed which caused the belt to fail, i have new parts and the pump installed only i dont understand to...

Hi, here is what you need to do. Get all of the timing marks lined up as indicated in the picture below. Put the belt on. Without moving the gears off their marks, make the belt tight across the cam gears and then down the right side to the crank gear. All of the slack must be on the left side to be taken up by the tensioner. Release the tensioner to tighten the belt and then verify the marks are still aligned. If the marks are not aligned, loosen the tensioner just enough to turn the gear that needs to be realigned. After tensioning the belt, rotate the crankshaft clockwise 720 degrees and recheck the timing marks. I have pasted the book procedure below. Please let me know if you still have questions. You must get this right.

jturcotte_2242.gif

jturcotte_2243.gif


jturcotte_2244.gif


jturcotte_2241.gif

  1. If the crankshaft or camshafts have been turned with the timing belt removed, remove the spark plugs and advance the crankshaft about 15 degrees beyond TDC of No. 1 cylinder. Make sure the camshaft sprockets are properly aligned with the marks and return the crankshaft to the TDC mark.
  2. Install the belt in sequence on the crankshaft, the front camshaft, water pump and tensioner pulleys, then the rear camshaft.
  3. To adjust the tension, loosen the tensioner pulley bolt about 1 / 2 turn. The spring will automatically set the proper tension. Torque the bolt to 31 ft. lbs. (43 Nm).
  4. Rotate the crankshaft 6 turns clockwise and check that the timing marks on the crankshaft and camshafts align properly. Adjust the timing belt tension again by rotating the crankshaft to the align the blue mark on the pulley with the pointer. Loosen and retorque the tensioner pulley bolt.
  5. Install the remaining parts in reverse order. Torque the crankshaft pulley bolt to 83 ft. lbs. (115 Nm). When installing the side mount bracket, torque the bolts to 40 ft. lbs. (55 Nm).
4helpful
1answer

Need timing belt diagram for a 2003 tiburon gt v6 2.7 liter

The timing belt diagrams are listed in detail with figures and procedure to remove them.

REPLACING TIMING BELT ON A 2003 HYUNDAI TIBURON 2.7L V6

1. Remove passenger side headlight via the 3 10mm screws holding it in place and disconnect the turn signal and main harness

2. Remove passenger side tire

3. Remove the splash guard via 2 10mm screws at the top of the guard

4. Remove the 2 17mm bolts and 2 17mm nuts from motor mount bar

5. You may have to separate the mount bar from the motor via either a chisel or flathead screwdriver and a hammer ( support engine via a jack and a piece of plywood under oil pan )

6. Use a 3/8 ratchet ( or a long breaker bar would work better ) to remove the serpentine belt ( remember the route ). Disconnect the power steering hose from the pump and secure back with a zip tie. Remove the power steering pulley with a pry bar and 19mm socket.

tinualbinale_2.gif
7. Hand turn the crankshaft via a 22mm socket to TDC ( top dead center, marked on lower timing belt cover )

8. Remove the serpentine belt tensioner via 2 12mm bolts on each side

9. Remove the upper timing belt cover via 7 10mm screws

10. Remove crankshaft pulley ( 22mm ) with an air impact gun ( an electric one will work too )

11. Remove lower timing belt cover via 4 more 10mm screws


tinualbinale_3.gif

12. Remove the motor mount from the block via 3 14mm bolts and 2 12mm bolts ( there is a 12mm holding the oil dipstick bracket towards the front of the car )

13. Remove the auto tensioner via 2 12mm bolts

tinualbinale_4.gif

14. Remove the timing belt
tinualbinale_5.gif

15. Make sure your timing markings are correct...

There is one marking on each cam gear and on the heads ( head markings are small, look closely...try wiping the edge of the head down with a rag and some brake cleaner to bring it out more ) They are also pictured in last pic.

When the crankshaft is in the TDC position, the cam gear markings should both line up at the same time with the head markings

Adjust if necessary, use a 17mm socket to turn cam gears to correct position

16. Install new timing belt ( as you install it, make sure to keep a little tension on the belt as you route it )

17. Install new auto tensioner and pull pin

18. Install just the lower timing belt cover

19. Install the crankshaft pulley

20. Hand turn the crankshaft atleast 5 times to verify the timing markings are lining up properly ( all should line up at the same time when the crankshaft pulley mark is in the TDC position )

21. Remove crankshaft pulley

22. Remove lower timing belt cover

23. Reverse steps 12 - 1

You can refer the videos below for further assistance.Your valuable feedback would be appreciated.Thanks for choosing Fixya.


1helpful
1answer

Fix timing belt and reset cam mark front and rear

Welcome to FIxYa.com


YOU WANT TO KNOW HOW TO REPLACE TIMING BELT?


Due to the amount of images FixYa can not handle them into one thread. Please e-mail me for the diagrams (PDF Format) at [email protected].
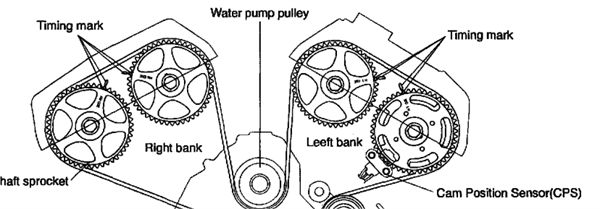
leedavidian_76.png


Timing Belt Service 2002 Kia Sedona 3.5 liter

Removal

1. Remove the engine cover

2. Remove the drive bell.

3. Remove the idler pulley, crankshaft pulley, power steering pulley and tensioner

pulley.

4. Remove the upper and lower timing belt cover.

5. Support the engine with garage jack or special tool, and then remove the engine

mounting insulator.

Caution: Take care not to deform the engine oil pan.

Image 1

6. Remove the auto tensioner.

Notice: Rotate the crankshaft clockwise and align the timing mark to get the No.1

cylinder's piston be in TðC position (compression stroke). At this time, the timing

marks of the camshaft sprocket and cylinder head cover should coincide with each

other.

Image 2

'. Remove the timing bell.

Notice: When re-using timing bell, make sure of marking the rotating direction on

the belt so as to install correctly.

Image 3

Installation

Method of installing timing bell and auto tensioner

Image 4

1. Install the idler pulley to the engine support lower bracket.

Image 5

2. Install the tensioner arm, shaft and plain washer to the cylinder block.

Tightening torque: 35 -55 Nm (350-550 kg-cm, 25.82 -40.57 ft. lbs.)

Image 6

3. Install the crankshaft sprocket.

Notice: Confirm if timing marks coincide with.

Image 7

Caution: Align the spacer with a pin, and assemble it exerting even force not to

deform the crankshaft sensing blade.

Image 8

4. Install the camshaft sprocket. Align it like initial state as shown.

Caution: When installing camshaft sprocket, tighten the bolt holding hexagonal

part of camshaft to prevent it from tuning.

5. Install the auto tensioner to the oil pump case.

Image 9

Caution: At this time the auto tensioner's set pin should be assembled completely.

Image 10

6. Align the timing marks of each sprocket and install the timing bell, maintaining the

proper belt tension between each shaft in this order. Crankshaft sprocket -> Idler

pulley -> Left bank exhaust camshaft sprocket -> Left bank intake camshaft sprocket

-> Water pump pulley -> Right bank intake camshaft sprocket -> Right bank exhaust

camshaft sprocket -> Tensioner pulley.

Caution:

1 As a result of this, position of No.1 cylinder comes to compression TDC.

2 As each camshaft sprocket tends to rotate by itself, pay attention not to injure

fingers or other bodily part. Especially be careful with the right bank.

3 In case the right bank camshaft sprocket rotates excessively, be cautious not to

rotate more than the initial stable position. Always align timing mark of rotating

sprocket by turning it reversely. In this case, pay attention not to rotate It

reversely from the initial position. (if. with one sprocket fixed at No.1

compression TDC position, the other sprocket is rotated one revolution

clockwise or counterclockwise, then the intake and exhaust valve might intetfere

each other)

7. After installing the timing bell, exert the reverse directed force to the right bank

exhaust camshaft sprocket to give tension on the belt. Holding this state, recheck it

each timing mark is correctly positioned.

S. With tensioner pulley slightly pushing the belt down, tighten the center bolt

slightly.

9. Pull out the auto tensioner set pin


How to adjust timing belt tension

1. Tension setting (While auto tensioner is not operating: And set pin being kept

installed.).

1) After rotating crankshaft 1/4 revolution reversely, rotate it clockwise to position

No.1 cylinder at TDC. Then, loosen the center bolt and give the belt 50 kg-cm of

tension with tensioner pulley socket (Two pins are attached) and torque wrench.

While maintaining this state, tighten the center bolt to the standard torque.

Center bolt standard torque 43 - 55 Nm (430 - 550 kg-cm, 31.72 - 40.57 ft. lbs.)

Image

2) Pull out the auto tensioner fixing pin.

2. How to check tension (While auto tensioner is operating: and fixing pin being

un-installed.)

1) After rotating crankshaft 2 revolutions clockwise to position No.1 cylinder at

TDC wait for about 5 minutes, and measure the amount of protruding of the auto

tensioner rod.

Caution: This is "leak down" time for the auto tensioner rod to protrude 1mm

when tension caused by rotation of the crankshaft has changed.

Image

2) Check if the amount of rod protruding is in the range of 3.8 -4.5 mm.

3. Recheck if each sprocket is within the specified range.

Notice: ¡fit is not within the specified range, repeat from procedure 6 as service

procedure of timing bell and auto tensioner installation method. Refer to Timing

Belt; Service and Repair.

leedavidian_75.png


Thank you for using FixYa.com

Regards, Lee Davidian

1helpful
1answer

Bolt on crankshaft to remove clockwise or counterclockwise?

prev.gif next.gif Crankshaft Damper/Pulley counterclockwise to remove pulley:
REMOVAL & INSTALLATION
  1. Remove the drive belts from the crankshaft damper.
  2. Remove the crankshaft damper-to-crankshaft bolt. Hold the crankshaft stationary by placing a suitable tool in the ring gear teeth on the flywheel. Fig. 1: Use a breaker bar to remove the crankshaft damper bolt 89613g41.gif
    Fig. 2: The crankshaft can be held stationary by using a suitable tool to place between the flywheel teeth 89613g42.gif
    Fig. 3: Be sure to lubricate the threads of the crankshaft damper bolt to obtain a proper torque reading 89613pi9.jpg

  3. Remove the crankshaft damper from the crankshaft by pulling it straight off the shaft. A puller may be required to remove the damper from the shaft. Be careful not to lose the woodruff key when removing the crankshaft damper. Fig. 4: The crankshaft damper can sometimes be pulled from the shaft by hand 89613pj1.jpg
    Fig. 5: A puller may be required to remove the crankshaft damper 89613g40.gif
    NOTE: If working on a VE30DE or VQ30DE engine, it would be a good idea to replace the crankshaft oil seal when the crankshaft damper is removed. Fig. 6: The timing chain cover oil seal should be replaced whenever the crankshaft damper is removed; this seal is leaking severely 89613pj2.jpg
    Fig. 7: This crankshaft damper may have a problem sealing properly due to the groove that was worn into it from the seal 89613pj4.jpg
    To install:
  4. Install the crankshaft damper onto the shaft, making sure the woodruff key is in place. Dip the damper bolt in fresh oil and torque the crankshaft damper-to-crankshaft bolt to the following specifications:
    • VG30E engine — 90–98 ft.lbs. (123–132 Nm.)
    • VE30DE engine — 123–130 ft.lbs. (167–177 Nm.)
    • VQ30DE engine — 29–36 ft.lbs. (39–49 Nm.) followed by 60–66°clockwise angle torque
  5. Install the drive belts to the crankshaft damper; be sure to properly set belt tension.
prev.gif next.gif
4helpful
2answers

Looking for timing mark's for a 1997 camry with a 2.2 4cyl motor?

Hi,


You find the timing marks on the picture below.

moz-screenshot-2.pngaab8238.jpg


Removal
Remove auxiliary 1. drive belts.
2. Support engine.
Remove:
Engine mounting and bracket.
Timing belt upper cover [1].
3.
4. Turn crankshaft clockwise to TDC on No.1 cylinder. Ensure timing marks aligned [2] & [3].
Remove:
Crankshaft pulley bolt [4].
Crankshaft pulley [5]. Use tool No.09213-60017.
5.
6. Ensure timing marks aligned [2] & [3].
7. Slacken tensioner bolt [6]. Move tensioner away from belt and lightly tighten bolt.
Remove:
Timing belt lower cover [7].
Crankshaft sprocket guide washer [9].
Timing belt.
Tensioner pulley.

Installation
Installation
1. Check tensioner pulley for smooth operation.
2. Check free length of tensioner spring is 46,0 mm [8]. Replace spring if necessary.
3. Fit tensioner and spring. Ensure spring is connected correctly.
4. tighten bolt [6].
5. Ensure timing marks aligned [2] & [3].
6. Fit timing belt. Ensure belt is taut between sprockets.
Install:
Crankshaft sprocket guide washer [9].
Timing belt lower cover [7].
Crankshaft pulley [5].
7.
8. Slacken tensioner bolt 1/2 turn [6].
9. Turn crankshaft two turns clockwise to TDC on No.1 cylinder. Ensure timing marks aligned [2] & [3].
Turn crankshaft slowly 1 7/8 turns clockwise until crankshaft pulley timing mark [3] aligned with 45° BTDC mark [10] on
timing belt lower cover [7].
10.
11. Tighten tensioner bolt [6]. Tightening torque: 42 Nm.
12. Install components in reverse order of removal.
13. Tighten crankshaft pulley bolt [4]. Tightening torque: 108 Nm.
Manufacturer: Toyota
2helpful
1answer

Ifailed to get on tdc before removing old timing belt how do I get back in time so Icanreplacebelt.

This is the complete procedure from the service manual on how to replace the timing belt start to finish, start over to assure u get it right, if u mess up the engine will be damaged

Removal for 1.6L engines : ONLY 2006 to 2009 CARS


Engine removal is not required for this procedure.

1.Remove the engine cover.

2.Remove the RH front wheel.

3.Remove the 2 bolts and RH side cover.

4.Temporarily loosen the water pump pulley bolts.

5.Remove the alternator drive belt

6.Remove the air conditioner compressor drive belt

7.Remove the power steering pump drive belt

8.Remove the 4 bolts and water pump pulley.

9.Remove the 4 bolts and
timing belt2_bing.gif upper cover

10.Turn the crankshaft pulley, and align its groove with timing mark "T" of the timing belt cover. Check that the timing mark of camshaft sprocket is aligned with the timing mark of cylinder head cover. (No.1 cylinder compression TDC position)

11.Remove the crankshaft pulley bolt and crankshaft pulley

12.Remove the crankshaft flange

13.Remove the 4 bolts and timing belt lower cover

14.Remove the timing belt tensioner and timing belt.

15.Remove the bolt and timing belt idler

16.Remove the crankshaft sprocket

17.Remove the cylinder head cover.

(1)Remove the wire harness bracket

(2)Remove the ignition coil.

(3)Remove the PCV (Positive Crankcase Ventilation) hose and the breather hose from the cylinder head cover

(4)Remove the engine cover bracket

(5)Loosen the cylinder head cover bolts and then remove the cover and gasket.

18.Remove the camshaft sprocket.

Hold the portion of the camshaft with a hexagonal wrench, and remove the bolt with a wrench and remove the camshaft sprocket.

INSTALLATION:

1.Install the camshaft sprocket and tighten the bolt to the specified torque.

(1)Temporarily install the camshaft sprocket bolt

(2)Hold the portion of the camshaft with a hexagonal wrench, and tighten the bolt with a wrench
Tightening torque :78.5 ~ 98.1N.m (8.0 ~ 10.0kgf.m, 57.9 ~ 72.3lb-ft)


2.Install the cylinder head cover.

(1)Install the cylinder head cover and bolts
Tightening torque :7.8 ~ 9.8N.m (0.8 ~ 1.0kgf.m, 5.8 ~ 7.2lb-ft)

(2)Install the engine cover bracket

(3)Install the PCV(Positive Crankcase Ventilation) hose and breather hose to the cylinder head cover.

(4)Install the ignition coil.

3.Install the crankshaft sprocket

4.Align the timing marks of the camshaft sprocket and crankshaft sprocket with the No.1 piston placed at top dead center and its compression stroke.

5.Install the idler pulley and tighten the bolt to the specified torque.

Tightening torque :42.2 ~ 53.9N.m (4.3 ~ 5.5kgf.m, 31.1 ~ 39.8lb-ft)

6.Temporarily install the timing belt tensioner

7.Install the belt so as not give slack at each center of shaft. Use the following order when installing timing belt.
Crankshaft sprocket →idler pulley →camshaft sprocket →timing belt tensioner

8.Adjust the timing belt tension.

(1)Loosen the tensioner pulley mounting bolt and apply tension to the timing belt.

(2)After checking the alignment between each sprocket and each timing belt tooth, tighten the mounting bolt and one by one.

Tightening torque :19.6 ~ 26.5N.m (2.0 ~ 2.7kgf.m, 14.5 ~ 19.5lb-ft)

(3)Then recheck the belt tension.
Verify that when the tensioner and the tension side of the timing belt are pushed in horizontally with a moderate force [approx. 49N (11lb)], the timing belt cog end is aprox. 1/2 of the tensioner mounting bolt head radius (across flats) away from the bolt head center.

4)Timing belt tension measuring procedure
(by a sonic tension guage)
Rotate crankshaft in clockwise direction to set 1st piston on top dead center (TDC) and rotate crankshaft in counterclockwise to 90° then measure the belt tension in the middle of tension side span (in arrow direction of above illustration) by free vibration method.


9.Turn the crankshaft two turns in the operating direction (clockwise) and realign crankshaft sprocket and camshaft sprocket timing mark.


10.Install the timing belt lower cover with 5bolts

Tightening torque :7.8 ~ 9.8N.m (0.8 ~ 1.0kgf.m, 5.8 ~ 7.2lb-ft)

11.Install the flange and crankshaft pulley, and then tighten crankshaft pulley bolt. Make sure that crankshaft sprocket pin fits the small hole in the pulley.

Tightening torque :137.3 ~ 147.1N.m (14.0 ~ 15.0kgf.m, 101.3 ~ 108.5lb-ft)

12.Install the timing belt upper cover with 4 bolts.

Tightening torque :7.8 ~ 9.8N.m (0.8 ~ 1.0kgf.m, 5.8 ~ 7.2lb-ft)

13.Install the water pump pulley and 4 bolts.

14.Install the power steering pump drive belt

15.Install the air conditioner compressor drive belt

16.Install the alternator drive belt

17.Install the RH side cover with 2 bolts

18.Install the RH front wheel.


Tightening torque :88.3 ~ 98.1N.m (9.0 ~ 10.0kgf.m, 65.1 ~ 72.3lb-ft)

19.Install the engine cover with bolts.


Tightening torque :3.9 ~ 5.9N.m (0.4 ~ 0.6kgf.m, 2.9 ~ 4.3lb-ft)
0helpful
1answer

Timing a 2.0L hyundai

RETAIN PUSHROD WITH SUITABLE PIN THROUGH HOLE IN TENSIONER BODY.
INSTALL AUTOMATIC TENSIONER UNIT TO TENSIONER BLOCK. TIGHTEN BOLTS TO 22-27.
FIT TIMING BELT IN ANTI-CLOCKWISE DIRECTION, STARTING AT TENSIONER PULLEY.
SLACKEN TENSIONER PULLY BOLT. TURN TENSIONER PULLEY CLOCKWISE TO TEMPORARILY TENSION BELT. TIGHTEN BOLT TO 43-45NM.
TURN CRANKSHAFT SLOWLY 1/4 TURN ANTI CLOCKWISE.
TURN CRANKSHAFT CLOCKWISE UNTIL TIMING MARKS ALIGNED.
SLACKEN TENSIONER PULLEY BOLT. FIT TOOL TO TENSIONER PULLEY.
APPLY CLOCKWISE TORQUE TO TENSIONER PULLEY. TIGHTEN BOLTS.
INSERT SPECIAL TOOL IN TIMING BELT REAR CASING.
SCREW IN TOOL UNTIL PIN CAN BE REMOVED FROM AUTOMATIC TENSIONER.
REMOVE SPECIAL TOOL.
TURN CRANCSHAFT TWO TURNS CLOCKWISE. WAIT 15 MINUTES.
ENSURE TIMING MARKS ALIGNED.
CHECK EXTENDED LENGTH OF PUSHROD IS 3.8 - 4.5MM
RE-ASSEMBLE
Not finding what you are looking for?

563 views

Ask a Question

Usually answered in minutes!

Top Hyundai Experts

ZJ Limited
ZJ Limited

Level 3 Expert

17989 Answers

Thomas Perkins
Thomas Perkins

Level 3 Expert

15088 Answers

Brad Brown

Level 3 Expert

19187 Answers

Are you a Hyundai Expert? Answer questions, earn points and help others

Answer questions

Manuals & User Guides

Loading...