1997 Dodge Dakota Logo
A
Anonymous Posted on May 31, 2014

HOW DO I ADJUST TORSION BAR?

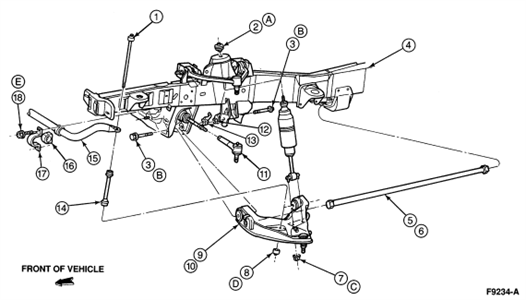
I RECENTLY CHANGED MY DRIVER AND PASSENGER SIDE UPPER AND LOWER CONTROL ARMS. I NEED INFO ON HOW TO ADJUST TORSION BAR. THE FRONT END IS VERY LOW COMPARED TO THE BACK OF MY TRUCK. PLEASE HELP ME.

1 Answer

derryk holmes

Level 1:

An expert who has achieved level 1.

New Friend:

An expert that has 1 follower.

Hot-Shot:

An expert who has answered 20 questions.

Corporal:

An expert that hasĀ over 10 points.

  • Contributor 32 Answers
  • Posted on Jun 13, 2014
derryk holmes
Contributor
Level 1:

An expert who has achieved level 1.

New Friend:

An expert that has 1 follower.

Hot-Shot:

An expert who has answered 20 questions.

Corporal:

An expert that hasĀ over 10 points.

Joined: Oct 30, 2009
Answers
32
Questions
1
Helped
6415
Points
52

It sounds like your front leaf springs need to be re arched or your coil springs are shot i dont believe you can adjust that bar

2 Related Answers

jakcars

  • 304 Answers
  • Posted on May 23, 2009

SOURCE: I want lower the truck about 2"

If you lower the front by using the torsion bars the front end camber is going to be to negative. They make kits to lower cars, lower spindles keeping the steering geometry ok. In the long run i believe it is better to buy a kit and do it right.

Ad
Autotroubles

Sam Akber

  • 1149 Answers
  • Posted on Feb 28, 2011

SOURCE: i just replaced both upper

Aligment.

Add Your Answer

×

Uploading: 0%

my-video-file.mp4

Complete. Click "Add" to insert your video. Add

×

Loading...
Loading...

Related Questions:

0helpful
1answer

HOW TO REMOVE A LOWER LEFT CONTROL ARM AND TORSION BAR

jack the vehicle right up so that the the wheels are clear of the floor . Place vehicle on jack stands
release the tension on the torsion bar by removing the adjuster in the arm. you may have to use Stiltons or pipe wrench to get the last bit of tension out of the bar . remove and retainers and tap the bar out of the splines.of the lower control arm. mark the bar so that you will know which spline to use for reassembly
remove the lower control arm.
0helpful
1answer

How to adjust torsion bar for Dodge Dakota

jack the front right up until both wheels are free of the ground
place on jack stands as you have to go under the vehicle and apply some force
loosen of the lh bar and twist it in an anti clockwise direction and install it with this tension ( use stilsons)
now do the rh bar the same but tension it in a clockwise direction
sufficient tension will be when you see the wheel start to lift as you turn the bar with the stilsons ( will require some effort so use a bar on the wrench)
lock them at that point
before attaching the lock plate to the spline end
loosen the adjuster bolt right off
Lower the front to the ground and the car will be close to correct height
levelling the front left to right or raising further is done by the adjusting bolts you loosened off
2helpful
1answer

What does the control arm on the front left driver side supposed to look like fully assembled

Hello! First diagram is the lower...Second is the upper..Guru...saailer

LOWER IDENTIFICATION:


Item
Part Number Description 1
5495 Stabilizer Bar Link Bolt and Bushing Assembly 2
18A192 Nut, Washer and Bushing Assembly 3
808264 Bolt 4
5005 Frame 5
5B326 Torsion Bar (LH) 6
5B327 Torsion Bar (RH) 7
620481 Nut 8
5C491 Nut and Washer 9
3079 Front Suspension Lower Arm (LH) 10
3078 Front Suspension Lower Arm (RH) 11
3A130 Tie Rod End 12
808166 Nut 13
808167 Nut 14
5K483 Front Stabilizer Bar Link 15
5482 Front Stabilizer Bar 16
5484 Front Stabilizer Bar Bushing 17
3B353 Front Stabilizer Retainer 18
N807396-S100 Bolt A
- Tighten to 40-55 Nm
(30-40 Lb-Ft) B
- Tighten to 150-200 Nm (111-148 Lb-Ft) C
- Tighten to 21-29 Nm
(15-21 Lb-Ft)


UPPER IDENTIFICATION:
Item Part Number Description 1 3C156 Damper Assembly (RH) 2 805348 Nut and Washer 3 - Shock Absorber Insulator
(Part of 18198) 4 3C157 Damper Assembly (LH) 5 3020 Front Suspension Bumper 6 3083 Front Suspension Upper Arm Assembly A - Tighten to 34-47 Nm
(25-35 Lb-Ft)


LOWER DIAGRAM FOLLOWED BY UPPER:

2_12_2012_9_47_51_pm.gif2_12_2012_9_54_26_pm.gif

Iā€™m happy to help further over the phone at https://www.6ya.com/expert/david_6df67de3b14de867

0helpful
1answer

Must the torsion bar be removed on my 1995 Ford explorer 4whdr.6cyl when changing out the lower ball joints? And what kind of puller would be needed to remove the spindle/rotors?

You do not need to remove the torsion bar. just jack up the vehicle under the lower control arm. The shock will also keep the lower control arm from traveling to far.

If it has a torsion bar running through the lower control arm than it must have independent front suspension. Remove the caliper and bracket. The rotor should knock off but it can be left on. remove the axle nut. The drive axle should push through the hub. Some tapping with a hammer may be needed. Separate the upper and lower ball joints from the knuckle and remove the knuckle (you will be able to push the drive axle all the way through once the knuckle is free of the ball joints).

remove the snap ring from the lower ball joint and hit it out with a hammer. You will need a ball joint press to install the new ball joint.

Let me know if you have any questions. Thank you for using FixYa.com!

Iā€™m happy to assist further over the phone at https://www.6ya.com/expert/jeremy_d728a59f986299fa

0helpful
1answer

My Front left tire is tilted inward and underneath the truck i found one of the support bars that run's across is broken off on the left side. I looked around the wheel and found that no metal was bent so...

General Description
The front suspension allows each wheel to compensate for changes in the road surface without affecting the opposite wheel. Each wheel independently connects to the frame with a steering knuckle, ball joint assemblies, and upper and lower control arms.
The control arms specifically allow the steering knuckles to move in a three-dimensional arc. Two tie rods connect to steering arms on the knuckles and an intermediate rod. These operate the front wheels.
The two-wheel drive vehicles have coil chassis springs. These springs are mounted between the spring housings on the frame and the lower control arms. Double, direct acting shock absorbers are inside the coil springs. The coil springs attach to the lower control arms and offer ride control.
The upper part of each shock absorber extends through the upper control arm frame bracket. This bracket has two grommets, two grommet retainers, and a nut.
A spring stabilizer shaft controls the side roll of the front suspension. This shaft is mounted in rubber bushings that are held by brackets to the frame side rails. The ends of the stabilizer shaft connect to the lower control arms with link bolts. Rubber grommets isolate these link bolts. Rubber bushings attach the upper control arm to a cross shaft. Frame brackets bolt the cross shaft.
A ball joint assembly is riveted to the outer end of the upper control arm. A rubber spring in the control arm assures that the ball seats properly in the socket. A castellated nut and a cotter pin join the steering knuckle to the upper ball joint.
The inner ends of the lower control arm have pressed-in bushings. The bolts pass through the bushings and join the arm to the frame. The lower ball joint assembly is a press fit in the lower control arm and attaches to the steering knuckle with a castellated nut and a cotter pin.
Ball socket assemblies have rubber grease seals. These seals prevent entry of moisture and dirt and damage to the bearing surfaces.
Four-wheel drive models have a front suspension that consists of the control arms, a stabilizer bar, a shock absorber, and right and left torsion bars. The torsion bars replace the conventional coil springs. The lower control arm attaches to the front end of the torsion bar. The rear end of the torsion bar mounts on an adjustable arm at the crossmember. This arm adjustment controls the vehicle trim height.
Two-wheel drive vehicles have tapered roller sheel bearings. These bearings are adjustible and need lubrication.
Four-wheel drive models and RWD Utilities have sealed front-wheel bearings. These bearings are pre-adjusted and need no lubrication.
Heat treatment may create darkened areas on the bearing assembly. This discoloration does not signal a need for replacement.
Hope this helps?
0helpful
2answers

What is the torson bar on jimmy and where can you get the part for it?

1995-2005 Models NOTE: The following procedure requires the use of the torsion bar unloader tool No. J-36202 or equivalent.
  1. Raise and safely support the vehicle.
  2. Remove the transmission shield, if equipped.
  3. Install a torsion bar unloader tool to relax the tension on the torsion bar adjusting arm screw; record the number of turns necessary to properly install the tool. Remove the adjusting screw and the unloader tool.
  4. Unfasten the lower link mount nut from one side, then disengage the torsion bars. NOTE: Note the direction of the forward end and side of the torsion bar being removed
  5. Remove the lower link nut from the opposite side.
  6. Remove the lower link mount, upper link mount nut, upper link mount and then unfasten the torsion bar from the frame.
To Install:
  1. Install the torsion bar and support.
  2. Install the upper link mount and mount nut.
    • Tighten the nut to 33 ft. lbs. (45 Nm) on 1995-96 models and 48 ft. lbs. (65 Nm) on 1997 and later models.
  3. Place a jack under the torsion bar to release tension, then install the lower link mount bushing and nut.
    • Tighten the nut to 13 ft. lbs. (18 Nm) on 1995 models, 50 ft. lbs. (68 Nm) on 1996-98 models and 37 ft. lbs. (50 Nm) on 1999 and later models.
  4. Install the torsion bar unloader tool and tighten the tool against the adjusting arm the same number turns recorded earlier, then remove the tool. This loads the torsion bars.
  5. Install the transmission shield, if removed.
  6. Remove the jackstands and lower the vehicle.
  7. Check and adjust the Z height as outlined in the wheel alignment portion of this section.
prev.gif next.gif
0helpful
1answer

Upper control arm.Do i need to remove the shock first

I believe the shock goes through the control arm, you shouldn't have to remove it at all.Unbolt the brake hose from the control arm, remove the upper ball joint nut and pop it loose, then just remove the two pivot bolts. If you do remove the shocks be sure to have the lower control arm supported or the torsion bar will swing the control arm down with a lot of force. Be sure to get an alignment after reinstalling the upper control arm. The pivot bolts are the adjustments for camber and caster.
1helpful
1answer

Right front is down and has a rattle could it be a strut

The Jimmy has no strut, they run on torsion bars. The torsion bar mount bushings may have gone bad or broke and needs to be replaced, you can pick up the torsion bar mount bushing at most large auto parts store like Auto Zone and i believe there around $40.00 each and the will have the step by step instructions to get the job done with common tools. The torsion bar mounts are about mid way down the jimmy just about where the drivers and passenger door is under the frame and they are adjustable.

To properly adjust your torsion bars, you need to find your "Z" height.First, park the truck on a level surface and measure the height betweenthe ground and the bottom of the knuckle (next to where the lower balljoint's nut is). This is measurement "A". Then, measure between levelground and the center of the rear most lower control arm bolt. This ismeasurement "B". "B" - "A" = "Z" and "Z" should be between 4.6 inchesand 5.2 inches. We just lifted a 2001 2 dr. blazer 6" with a super-liftkit. All angles and measurements stay in factory specifications andwhen you are done you set the torsion bars to factory specifications. Ihad to adjust my "Z" height last week to factory specifications andfollowed the directions and picture on page 21 and 22 here:http://www.superlift.com/instructions/3146.pdf .
1helpful
1answer

95 explorer lower control arm replace

No the torsion bar if you look at it where it goes to the under carriage it will have a bolt for tension on each side. Are you tring to replace the bushings for the torsion bar? If so answer back.
0helpful
1answer

Torsion bars

I'm going to use the torsion bar crossmember as the reference point.Laying behind the torsion bar crossmember on your stomach,looking squarely at and across the crossmember,the adjusters that the torsion bars slip into,want to as level as possible from left to right,or right to left in relation to the crossmember.Insert the torsion bar in the front anchor point,on the lower control arm,take it on through so that you can raise the rear up,and bring it on back to the rear anchor,now,look at where it should slip through with the rear adjusters about level.bring the torsion bar on back and engage the rear adjuster/anchor point.Should be it.
Not finding what you are looking for?

247 views

Ask a Question

Usually answered in minutes!

Top Dodge Experts

ZJ Limited
ZJ Limited

Level 3 Expert

17989 Answers

Ronny Bennett Sr.
Ronny Bennett Sr.

Level 3 Expert

6988 Answers

Thomas Perkins
Thomas Perkins

Level 3 Expert

15088 Answers

Are you a Dodge Expert? Answer questions, earn points and help others

Answer questions

Manuals & User Guides

Loading...