1985 Mazda RX-7 Logo
Gregory Callahan Posted on Mar 29, 2014

Plug wire configuration

I removed plug wires from coil distributor and plugs and lost paper i wrote it down on, this is a 1985 12a motor

1 Answer

jay rotary

Level 1:

An expert who has achieved level 1.

MVP:

An expert that got 5 achievements.

New Friend:

An expert that has 1 follower.

Hot-Shot:

An expert who has answered 20 questions.

  • Contributor 46 Answers
  • Posted on May 04, 2014
jay rotary
Contributor
Level 1:

An expert who has achieved level 1.

MVP:

An expert that got 5 achievements.

New Friend:

An expert that has 1 follower.

Hot-Shot:

An expert who has answered 20 questions.

Joined: May 04, 2014
Answers
46
Questions
0
Helped
10338
Points
72

Quite easy actually. There are two rotors 1 - front and 2 - rear. there are two plugs per rotor Trailing - top and Leading - lower.
The distributor cap has letters and combination letters/numbers on it (if it does not you need to get a good quality cap) L and T and L1 T1 L2 T2
L is leading coil, T trail coil, pretty self explanatory from there
My recommendation from nearly 40 experience with rotary's is to use Mazda Mitsubishi Cap Rotor and NGK wires and plugs. Has been good enough for factory race teams also.
An issue with most aftermarket rotors is that they do not fit properly and can cause changes in timing and worse case, damage both cap and rotor.

5 Related Answers

johnychel

isaac johny

  • 796 Answers
  • Posted on Jun 18, 2008

SOURCE: Wont Start

did you try jumk starting??

Ad

Jonah Oneal

  • 14092 Answers
  • Posted on Apr 20, 2009

SOURCE: 1997 Mazda Millenia, Changed Almost Everything, Still No Spark..

check the pcm .get it scan make sure your pcm is working.also check ignition coils.

daveleeyates

  • 65 Answers
  • Posted on Apr 29, 2009

SOURCE: No spark?

Hi, common thing with the mazda was the coil or the ignition amplifier going faulty, both of which are located within the distributor, the coil ususally gives the symptoms you describe, a weak spark. The coil is the most common failure aswell for your vehicle i would recommend a new one, also make sure distributor is spinning as it could just be a case of a broken timing belt.

Good luck Davelee

Anonymous

  • 111 Answers
  • Posted on Feb 01, 2010

SOURCE: No spark in '05 Mazda 6

any wires not plugged into there respective places, any sensors the old engine had that this one don't, did you use the old distributor for your coil setup,I think it might be, luck

tuyen bui

  • 1025 Answers
  • Posted on May 27, 2010

SOURCE: A friend and I are replacing plug wires on a 2001

here it is
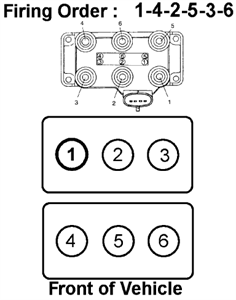
cf9399e.gif

Testimonial: "Thank you for the quick reply! Thank you so much. This allowed me to get it up and running in no-time!"

Ad

Add Your Answer

×

Uploading: 0%

my-video-file.mp4

Complete. Click "Add" to insert your video. Add

×

Loading...
Loading...

Related Questions:

0helpful
1answer

I need the diagram for plug wiring for 1992 ford tempo

Firing order is 1-3-4-2 Please rate if this helps

Installation of wires
  1. Whenever a high tension wire is removed for any reason from a spark plug, coil or distributor cap, or a new high tension wire is installed, Silicone Dielectric Compound WA-10, D7AZ-19A331-A (ESE-M1C171-A) or equivalent must be applied to boot before it is reconnected. Using a small clean tool, coat entire interior surface of boot with Silicone Dielectric Compound WA-10, D7AZ-19A331-A (ESE-M1C171-A) or equivalent.
  1. Insert each wire on proper terminal of distributor cap. Ensure wires are all the way down over their terminals. The No. 1 terminal is identified on cap. Install wires starting with No. 1 terminal.
  1. Remove wire retaining brackets from old high tension wire set and install them on new set in same relative position. Install wires in brackets on valve rocker arm covers.
  1. Connect wires to proper spark plugs.
  1. Install coil wire.


Installation of distributor
Before installing distributor, visually inspect distributor. Inspect O-ring. It should fit tightly and be free of cuts. The drive gear should be free of nicks, cracks and excessive wear. Rotate distributor drive shaft. It should move freely, without binding.
  1. To install distributor correctly, No. 1 piston must be at Top Dead Center (TDC) of compression stroke. Remove No. 1 cylinder spark plug and rotate engine clockwise until No. 1 piston is on the compression stroke.
  1. With No. 1 piston on compression stroke, align timing pointer with TDC on the crankshaft damper.
  1. Align locating boss on rotor with hole on armature. Fully seat rotor on distributor shaft.
  1. Rotate distributor shaft so blade on rotor is pointing toward mark on distributor base, that was previously made in Step 2 of the Removal procedure.
  1. While installing distributor, continue rotating rotor slightly so leading edge of the vane is centered in vane switch stator assembly.
  1. Rotate distributor in block to align leading edge of vane and vane switch stator assembly. Verify rotor is pointing at No. 1 mark on distributor base. If vane and vane switch stator cannot be aligned by rotating distributor in cylinder block, remove distributor enough to just disengage distributor gear from camshaft gear. Rotate rotor enough to engage distributor gear on another tooth of camshaft gear. Repeat Step 1 if necessary.
  1. Install distributor hold-down clamp and bolt. Tighten bolt, but leave it loose enough to rotate distributor.
  1. Install distributor cap, No. 1 spark plug and ignition wires. Check that ignition wires are securely connected to the cap and spark plugs. Tighten distributor cap hold-down screws to 2.0-2.6 Nm (18-23 lb-in).
  1. Reconnect distributor to wiring harness.
  1. Set initial timing according to procedures found in Section 13A of the Powertrain Control/Emissions Diagnosis Manual .
  1. After timing is set, tighten distributor hold-down bolts to 23-34 Nm (17-25 lb-ft).
  1. Recheck initial timing. Adjust if necessary.
1helpful
1answer

REMOVE DISTRIBUTOR FOR A 1996 GMC JIMMY

Check this procedure...
  1. Disconnect the negative battery cable.
  2. If necessary, remove the air cleaner.
  3. Tag and remove the spark plug wires and the coil leads from the distributor.
  4. Unplug the electrical connector at the base of the distributor.
  5. Loosen the distributor cap fasteners and remove the cap.
  6. Using a marker, matchmark the rotor-to-housing and housing-to-engine block positions so that they can be matched during installation.
  7. Loosen and remove the distributor hold-down bolt.
  8. Remove the distributor from the engine.

INSTALLATION
Engine Not Disturbed
  1. Install the distributor in the engine making sure that the matchmarks are properly aligned.
  2. Install the hold-down bolt and tighten the bolt to 20 ft. lbs. (27 Nm).
  3. Install the distributor cap and attach the electrical connector at the base of the distributor.
  4. Install the spark plug wires and coil leads.
  5. If removed, install the air cleaner assembly.
  6. Connect the negative battery cable.
Engine Disturbed
(see Figure)
  1. Remove the No. 1 cylinder spark plug. Turn the engine using a socket wrench on the large bolt on the front of the crankshaft pulley. Place a finger near the No. 1 spark plug hole and turn the crankshaft until the piston reaches Top Dead Center (TDC). As the engine approaches TDC, you will feel air being expelled by the No. 1 cylinder. If the position is not being met, turn the engine another full turn (360 degree). Once the engine's position is correct, install the spark plug.
  2. Using a long screwdriver, align the oil pump drive shaft in the engine in the mating drive tab in the distributor.
  3. Install the distributor in the engine.
  4. Install the distributor in the engine making sure that the matchmarks are properly aligned.
  5. Install the hold-down bolt and tighten the bolt to 20 ft. lbs. (27 Nm).
  6. Install the distributor cap and attach the electrical connector at the base of the distributor.
  7. Install the spark plug wires and coil leads.
  8. If removed, install the air cleaner assembly.
  9. Connect the negative battery cable.
zjlimited_765.gif

Fig. : The rotor segment should be aligned with the pointer cast in the distributor base, when the distributor is fully seated


Hope this helps (remember to rating this free asnwer).

1helpful
2answers

Spark plug in cyl. # 4 is wet and saturated with gasoline . does not seem to be firing . engine is running extremely rough . I cannot see under intake manifold to get to spark plug wire . is removal of...

i`m assuming this is a 4 cylinder motor.no you don`t take the intake off to get to the coils.you can get to the coils from under neath the car.have you checked to see if the plug wire is allowing spark to the plug itself.if its only #4 getting wet then the plug could be defective as the coil that fires #4 also fires #1 cylinder.its rare that the coil will fire one side and not both.(it does happen though).there are 2 coils at the back of the motor that sit on the ignition module.you could have a bad ignition module also.the crank sensor is attached to the ignition module on the motor side and the sensor sits in the motor and if you have to remove the module be careful that you don`t brake the crank sensor when removing the unit a the sensor gets brittle from the heating and cooling of the motor over time,also the sensor seal gets stuck in the bore.
0helpful
1answer

What is the rigth way to connect the spark plug cables into a distributor of a cadillac catera 1997?

STANDING IN FRONT OF ENGINE FACING CRANKSHAFT.CYLINDERS ON LEFT SIDE ENGINE 1 3 5 AND CYLINDERS ON THE RIGHT SIDE OF THE ENGINE ON DRIVER SIDE IS 2 4 6 GET PIECE PAPER WRITE NUMBER 5 3 1 AND UNDER THAT NUMBER WRITE NUMBER 2 6 4 THATS COIL PLUGS WIRES LOCATION HOLDING THAT PIECE OF PAPER FACING FRONT OF ENGINE IS PLUG WIRES LOCATION ON IGNITION COILS TO ENGINE SPARK PLUGS. NUMBERS ON PAPER HAS TO LINE UP LIKE 5 OVER 2 AND 3 OVER 6 AND 1 OVER 4 NUMBERS I GIVE YOU WHEN YOU LINE THEM UP HOLD PAPER STANDING FRONT ENGINE.THAT IS CORRECT PLUG WIRES LOCATION ON SPARK PLUG COILS.
0helpful
2answers

How do you check the firing order on a chevy small block engine ?

Firing order for small block chevy is 1-8-4-3-6-5-7-2. The cylinders are numbered 1-3-5-7 on the driver's side of the engine counting front to back. Passenger side is 2-4-6-8, front to back. You will need to get #1 cylinder at top dead center on the compression stroke. To do this, remove the #1 spark plug and remove the coil wire from the distributor cap. You will need a helper for the next step. Place your index finger in the empty spark plug hole, Have your helper bump the starter with the ignition key, When #1 cylinder comes up on the compression stroke, the pressure will push your finger away from the spark plug hole. Don't worry, this doesn't hurt. Turn the key off. Check the timing mark on the harmonic balancer behind the crankshaft pulley. It should be pretty close to lining up with the "0" timing mark on the pointer attached to the engine block. Now pull the distributor cap and see where the rotor cap is pointing. This will be #1 on the distributor cap. The spark plug wire from the #1 plug will occupy that position. The next position on the distributor cap will be for the plug wire coming off the #8 cylinder. The rest of the plug wires will attach to the distributor cap in the above mentioned firing order counting clockwise. If you do not wish to place your finger in the #1 spark plug hole, you can use a piece of paper towel roll up and stuck in the hole just enough to form a seal. When the piston comes up on the compression stroke it will force the paper towel out. Any questions, just let me know.
1helpful
1answer

96 dodge dakota,with a 318 motor will not start,not getting spark. could it be a pick up coil, and how do you test a pick up coil?

Hi, Hope I can help you.
I do not know how you have checked for spark, but lets start from the beginning.
Lets start with an ignition systems check.
1. I want you to remove the high voltage coil wire. ( That's the wire in the center of the distributor cap.) Using a good pair of insulated pliers. I want you to hold it about 1/4 inch from a good engine ground. Now you will need a bit of help from a partner. Get them to turn the key and crank the engine. You should see a bright blue and well defined spark. Ok, If you have spark I want you to slowly move the coil wire away from the engine ground. As you do this I want you to pay attention to the coil tower. (The coil tower is where the other end of the coil wire is attached.) What your looking for is arcing and sparking at the coil tower. If this happens then you need to replace the coil with a new one. If this does not happen then your coil is working fine, and we will have to move on.
Note if you do not get spark from the coil wire replace the coil.

2. Ok if you have spark now we have find out if the spark is making it to the spark plugs. How are we going to do this? By checking the rotor, distributor cap, spark plug wires and spark plugs.First lets remove the distributor cap. This will allow use to inspected the rotor and the distributor cap. What your looking for is, cracks, carbon tracks and wear at the tip of the rotor. On the distributor ,look inside the cap for cracks, carbon tracks and wear on the terminals. If you find any of this replace the distributor cap and rotor. ( Note if you have any doubt of the condition of the rotor or the cap replace them.) Next lets check your spark plug wires. Lets pull off one of the spark plug wires from the spark plug side. Now inspect the wire connection for a white crusty powder. If you find crust replace your wires. Now you should check all of them the same way, but if even one has corrosion replace them all. You are going to have to inspect the wire its self . Going down the whole length of the wire. Holes cracks burn Marks and other damage. Once again if you find any damage replace them all.
I hope this will help you and good luck to all the read this FixYa
2helpful
2answers

Removin the plug wires form the spark plugs

HI. This engine was designed with a coil on plug assembly. This means that your power source for the plugs are local(mounted directly on top of the actual plug). This engine dose not have traditional spark plug wires. Each coil has a connector that has two wires running to the connector that is connected to each coil on the engine. Release the coil connector by pushing down on the release clip on the top of the coil and sliding the connector out of the coil female connector. Once the wire connector has been removed from the coil, you can remove the coil from the cylinder port. There is a 10mm bolt that secures the coil to the respective cylinder plug port. Once this bolt is release, you can remove the coil and boot assembly. The actual wires do not need to be replaced.
1helpful
3answers

93 jeep cherokee , iv got spark at the coil but not at the plug just replced cap, roter, wires, but still notheing got any ides ?

Coil may be producing low voltage (KVs) to where it makes enough energy to snap out of the coil tower but then supressed as it travels down the high tension leads finally to the plug. Incidentally spark plug leads should have about 10k ohms of resistance per foot.I good coil will jump spark at least a half inch if you pull the wire off the cap and produce this much air gap
Not finding what you are looking for?

161 views

Ask a Question

Usually answered in minutes!

Top Mazda Experts

ZJ Limited
ZJ Limited

Level 3 Expert

17989 Answers

Thomas Perkins
Thomas Perkins

Level 3 Expert

15088 Answers

Arnie Burke
Arnie Burke

Level 3 Expert

7339 Answers

Are you a Mazda Expert? Answer questions, earn points and help others

Answer questions

Manuals & User Guides

Loading...