At Fixya.com, our trusted experts are meticulously vetted and possess extensive experience in their respective fields. Backed by a community of knowledgeable professionals, our platform ensures that the solutions provided are thoroughly researched and validated.
- If you need clarification, ask it in the comment box above.
- Better answers use proper spelling and grammar.
- Provide details, support with references or personal experience.
Tell us some more! Your answer needs to include more details to help people.You can't post answers that contain an email address.Please enter a valid email address.The email address entered is already associated to an account.Login to postPlease use English characters only.
Tip: The max point reward for answering a question is 15.
Light bulbIf your
microwave light bulb is not working, perhaps it has blown. The first
step is to replace the bulb and power on the microwave. If this does not
correct the issue, the next step is to check the socket and wiring to
verify if that is the problem.
Light bulb socket & main control boardIf
your microwave light bulb is not working after the installation of a
new bulb, check the light socket as well as the wiring to ensure they
are properly operating. If these sources are functioning properly, the
next step is to check for a faulty control board as a possible root
cause to your microwave light bulb malfunction.
2)
Exhaust fan motorIf
your exhaust fan motor is not running, there are a couple of things that
you can check involving the motor to locate the problem. After removing
the fan motor, you can manually attempt to turn the fan blades with
your hand. If the fan motor is working properly, the blades should spin
effortlessly. If this does not occur and the blades are taught, the
motor will need to be replaced. Secondly, the fan motor itself can burn
out due to time and usage. Using an ohm meter, the exhaust fan motor
should read open for continuity. If it does not, then the fan motor has
expired and will need to be replaced.
ThermostatAnother part
that could cause the microwave exhaust fan to not work is a faulty
thermostat. A thermostat gauges the air temperature, which activates the
exhaust fan when required. If this part becomes flawed, the exhaust fan
will not energize and the thermostat will need to be replaced.
Main control boardIf
your exhaust fan is still not working and the microwave fan motor,
wiring, and thermostat are operating accurately, the root cause could be
with the main control board. Replace the main control board.
see this test . God bless youThis microwave oven repair is only for over the range(OTR) models. First, with microwave still installed, gain access to the control board and check for voltage from the fan relay. If you are not getting voltage from the fan relay on the control board, and your display says fan is on, then you need a new control board. Again, this microwave oven repair is for OTR models. If you know your light bulbs are good and your display is telling you that they should be on, check the light relay on your control board. If no voltage is found at that relay, then replace the control board. Otherwise your problem is in the light socket, wiring, or wire connectors. You can get to all of that by unscrewing 6-8 screws under the unit and taking the bottom panel off.If voltage is present and the wiring that you can see looks good, then you will have to take the unit down and test for voltage at the fan itself. If the voltage is present there, then test the motor itself and/or start capacitor for the motor. The fan motor assembly will slide out of the top of the unit after you take it down and unscrew 2 screws. Below, in the list of component testing, you will see how to test the motor and start capacitor. get the part from www.repairclinic.com
follow thes steps and fix it.God bless you Exhaust Fan Motor
If the exhaust fan does not run the fan motor might be bad. Remove the fan motor from the microwave oven and see if the blades can be turned by hand. They should turn very freely, if they're stiff the fan motor will need to be replaced. The fan motor can also burn out. To test this use an Ohm meter. The motor should have continuity. If it doesn't, replace it. Thermostat
If the microwave exhaust fan is not working the thermostat might be defective. The thermostat senses the air temperature and turns on the fan as needed, if it's defective it won't turn on the fan. Watch our video on testing thermostats. Main Control Board
If the microwave exhaust fan is not working check the exhaust fan motor and wiring. If they are good the main control board might be defective.
see this causes and fix it .God bless you Exhaust Fan Motor
If the exhaust fan does not run the fan motor
might be bad. Remove the fan motor from the microwave oven and see if
the blades can be turned by hand. They should turn very freely, if
they're stiff the fan motor will need to be replaced. The fan motor can
also burn out. To test this use an Ohm meter. The motor should have
continuity. If it does Thermostat
If the microwave exhaust fan is not working
the thermostat might be defective. The thermostat senses the air
temperature and turns on the fan as needed, if it's defective it won't
turn on the fan. Watch our video on testing thermostats.
Main Control Board
If the microwave exhaust fan is not working
check the exhaust fan motor and wiring. If they are good the main
control board might be defective.
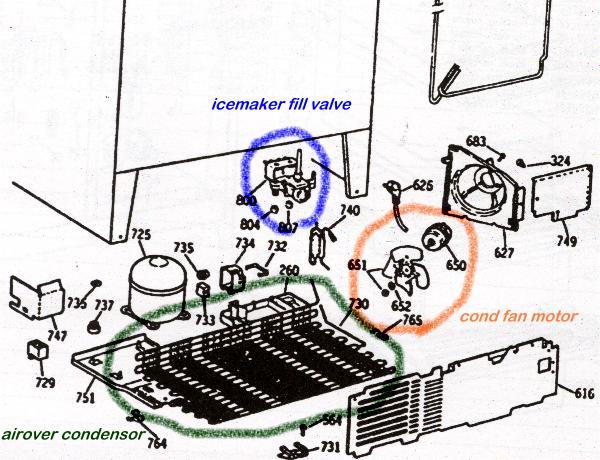
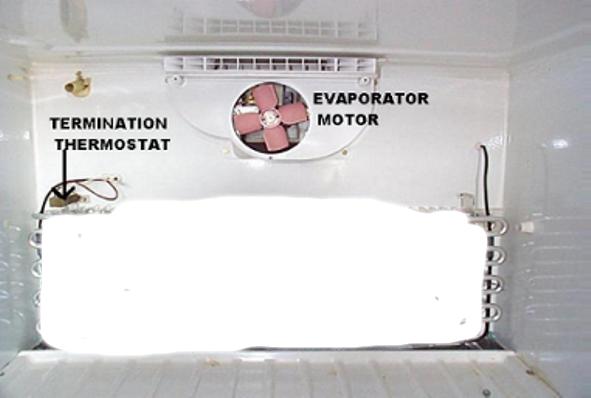
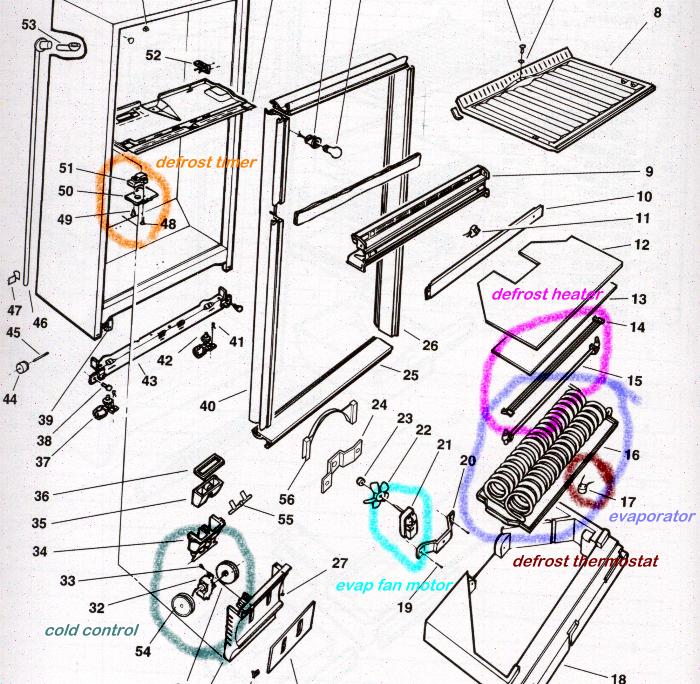
Start out with the easy stuff first...make sure the lights go out when you close the door(s), make sure the doors are closing properly and the gaskets are closing fully and not torn. Check to make sure the evaporator fan in the freezer is working, this fan blows the cold air around. If the fan is not working, possible bad fan motor - check for power to the fan motor and also check the fan switches around the door openings, ( if your fridge has these switches, not all do ). A common problem cropping up in the last several years has been the air damper not opening up and allowing the cold air from the freezer to be blown into the fresh food section ( mostly on SxS refrigerators ). For many years the air damper was manually operated and now we have motorized controlled or temperature controlled or thermistor and electronic boards controlling air dampers, and if this device sticks closed the FF section will normally warm up. An example picture of "one" style and an air damper ( called a diffuser by Whirlpool ). Next would be to check the condenser tubing, a good place to start is to make sure the condenser coils are not built up with dust!! Make sure the condenser fan motor is also working properly. Check for any "clicking on and off" noises from the compressor, is the compressor running. The most common fridge "not cooling" problem is a frost free failure. Remove the access panel in the freezer section to expose the evaporator coils. If the coils in the freezer section get plugged up with frost, this frost will block the evaporator fan motor from blowing the cold air around. The fan blade can also hit this frost and either become noisy or stop altogether. Locating the defrost timer can be tricky....they are often hidden behind the back bottom corners of the fridge at the bottom, in the last few years the timers have been located in the ceiling of the fresh food section, and some behind the cold control cover. Once you locate the defrost timer, slowly turn the screw like wheel in the middle of the defrost timer with a straight screwdriver until the fridge shuts off. You are now in defrost. If the defrost heater(s) comes on now, replace the defrost timer and defrost thermostat. If the heater(s) does not come on, you can ohm test the defrost heater for continuity or volt test for 120 volts to the heater(s). If you have no power to the defrost heater(s) you can also bypass the defrost thermostat to see if the defrost heater will come on, join the 2 wires together to bypass the defrost thermostat. If the heater now comes on, replace the defrost timer and defrost thermostat. If the heater itself is bad, defrost the fridge with a hair dryer, replace the defrost heater* and defrost thermostat. If the defrost timer seems "hot" to the touch or is noisy ( like a ticking or screeching noise )...replace it. Then make sure all the vents are clear and not being blocked by food cartons. One new safety device added to refrigerators in the last few years has been a in-line fuse added to both sides of the defrost heater. If one of these fuses let's go, you must replace the whole defrost heater, as it comes as an assembly. If the defrost heater does not work, you should check for one of these fuses being open. Check it with a volt meter or ohm meter. New link from Appliance Repair Aid on how the wiring circuit works for a frost free fridge, the link is here. On a frost free refrigerator, the cooling coils should be in the freezer section. On a SxS style refrigerator the coils will be behind a cover on the back wall. On a freezer on top style the coils could be behind the back wall or under the freezer floor. Removing the cover and exposing the evaporator coils could be a valuable tool. Seeing what the cooling coils looks like may help split your not cooling problem. Totally covered coils with white snow is a frost free problem. and the rest are bare is an indication of a system problem If you find this helpful, a vote with the thumbs up would be appreciated for the free advice
Have you checked the cooling coils to make sure they are clean and air can flow through them? Are the coils in the freezer frozen up? full of ice?? Must have air from from freezer to cool refrigerator.
When the refrigerator side is getting too cold this is because the control of the compressor has gone bad in some way...
There a few different things that could cause the unit to lose control over the temperature of the fridge side.
If
your refrigerator has a damper door that opens and closes to allow cold
air to move to the fridge side the damper linkage or the damper motor
may have broken or gone bad.
The coils in your fridge may have
frozen over and now the air does not move at all so then the ice builds
up and can freeze parts of the fridge side.
The thermostat has
gone bad and so now the compressor runs continually. This will not be
noticed readily on the freezer side but will show up quickly on the
fridge side.
Many newer model refrigerators use an electronic
sensor or thermistor to read the temperature and supply the info for
the circuit board and often a digital readout.
So, here is how I would go about troubleshooting this problem.
Check
the coils for ice, defrost the coils with a heat gun or hairdryer, then
check for the reason why they iced over. Defrost control or defrost
timer bad? Evaporator fan bad?
Check the damper door to see if it is stuck in the open position. If it is then check the motor and the linkage.
Check
to see if the refrigeration unit will shut down if the thermostat or
digital setting is turned up to a higher temperature. If it continues
to run then find the cause and fix it. It may be a bad thermostat,
sensor, or control board.
Sometimes
with a change is weather to a cooler climate this will be enough to
also affect the inside temperatures. Make sure that a bit of adjustment
in the thermostat or setting of the temperature will not solve your
problem very simply.
Its tripping a high limit most likely. Be careful there is 2100 to 4000 volt high side with a capacitor if its not an inverter. The standard components consist of noise board, fuse, touch panel and power controller, high limits, door switches, whipper motor, fan, transformer, capacitor, transformer, magnetron, diode, plate rotator.
Discharge cap (for safety and further testing)..
Test fuse; if fuse tests blown test door switches first.
Test limits.
Check amp draw with slow blow fuse; open door to stop unit and again discharge capacitor.
Test resistance to ground on whipper, fan, magnetron, light.
Test resistance lead to lead (measurable on motors/coils/magnetron).
Test capacitor in ferrads, compare to spec on print.
Check diode forward and reverse.
Test output voltage from power control board to transformer.
Test transformer coils.
Best of luck and play safe; dont test voltage output from the transformer, voltage at capacitor or magnetron.


×