Office Equipment & Supplies Logo

Related Topics:

A
Anonymous Posted on Mar 18, 2014

How to clean ink cartridge - PhotoSmart HP Office Equipment & Supplies

Add Your Answer

×

Uploading: 0%

my-video-file.mp4

Complete. Click "Add" to insert your video. Add

×

Loading...
Loading...

Related Questions:

0helpful
2answers

Clean the print head for an HP F380

If the cartridges are new, make sure you removed the, (sometimes clear), tape that the manufacturer places over the shinny metallic ink distribution slots, (shinny objects on the underside of the cartridges, like the previous answers have described). Otherwise, make sure the cartridges are the correct model for your printer, and I use a dab of alcohol on my q-tips to clean off old dried ink from the contacts. The contacts are very obvious once the cartridges are removed. Make sure to unplug the printer once you have removed the cartridges to access the contacts, before cleaning. And be gentle with the contacts, rub gently. And clean the cartridge contacts and ink dispensing slots as well, and gently as well. As previously mentioned, you should get ink on the q-tip when cleaning the ink distribution slots. Three colors, yellow blue and red from the color cartridge and black from the black cartridge. So clean the contacts first, then do the ink dispensers last to avoid adding ink to the contacts with a ink soggy q-tip. Good luck and be gentle.
0helpful
1answer

My epson R280 doesn't recognize ink cartridges

The Epson printer won't recognize ink cartridge when you have dried or empty ink, outdated printer drivers, ink cartridge not installed properly and more. Follow the troubleshooting steps to fix Epson printer not recognize ink cartridge:


·Check your printer ink cartridge
·Remove and reinstall ink cartridge
·Clean the printer cartridge chip

Follow more steps to fix the Epson printer won't recognize ink cartridge issue.

0helpful
3answers

Can not recognize ink cartridges

remove all cartridges and unplug printer for 5min.place cartridges back and plug in printer.good luck
1helpful
1answer

When printing from my hp 7150 photosmart printer the words are not printing straight, they are lopsided

Cleaning the ink cartridges with the HP Printer Toolbox
  1. Click Start .
  2. Click Settings .
  3. Click Printers .
  4. Right-click the icon of the printer in use.
  5. Click Properties .
  6. Click the Services tab.
  7. Click Open the HP Photosmart Toolbox or Service this device.
  8. Click the Device Services tab. This tab does not display in Windows XP; proceed to the next step.
  9. Click Clean the Print Cartridges .
  10. Follow the onscreen prompts.
Manually cleaning the ink cartridges
  1. Turn the printer on and lift the top cover.
  2. After the ink cartridges have moved to the center of the printer, unplug the power cord from the back of the printer.
  3. Remove the ink cartridges and place them wide side down on a piece of paper.
  4. Prepare a clean, foam-rubber swab or a lint-free cloth slightly dampened with water.
  5. Locate the copper-colored circuitry strip on the back of each cartridge.
  6. Clean the copper-colored strip with the dampened swab or cloth. Do not wipe the nozzle end of the cartridge or touch the nozzle plate.
  7. Clean the carriage contacts on the back wall of the ink cartridge carriage with a damp foam-rubber swab or lint-free cloth. Use a dry foam-rubber swab or a lint-free cloth to remove moisture from the contacts.
Cleaning the ink cartridge cradle
  1. Assume an eye level position with the HP Photosmart printer.
  2. Locate the ink cartridge cradle.
  3. Using clean, moistened swabs, wipe the underside of each wall of the carriage where fibers may collect and come in contact with the paper. Repeat until no ink residue is seen on a clean swab.
  4. Reconnect power cord when finished cleaning.
  5. When finished cleaning the ink cartridges and the cradle, print a test page.
10helpful
2answers

How to reset ink level canon iP 2772??

Download and run the ipTool to reset your ink level :


http://www.mediafire.com/?nmj5nnzzjaw


Features IP Tool software:

  • Showing all info on the printer such as ink level, ink counter number of cleaning, cartridge replacement and more.
  • Print test feature to test nozzle on the cartridge.
  • Cleaning and deep cleaning feature to clean head cartridge and cleaning the rollers.
  • Changing the delay value for drying.
  • Set the printer model manually.
  • Reading and reset EEPROM printer.
  • Reset counter and reset ink level on the color and black cartridges.
Ink Level - shows the level ink:
  • BK - black cartridge.
  • CY - Cyan cartridge.
  • MG - Magenta cartridge.
  • YL - Yellow cartridge.
  • WM - Waste ink counter status.
  • WP - "additional" waste ink counter status.
Port Name - displays the port where the printer installed.
Port S / N - shows the serial number of the printer port.
Power - shows the number of:
  • ON - inclusions printer.
  • OFF - to turn off the printer.
Cartridge Info - Displays information status of:
  • BK - black cartridge.
  • CL - colored cartridge.
Head Parking - displays the number of parking.
Head Cleaning - shows the number how many time the cartridge cleaned.
Head Deep Cleaning - displays the number of deep cleaning Printer cartridge.
Cartridge Replacement - shows the number of cartridge replacements:
BK - black cartridge.
CL - colored cartridge.


Click on this link or copy and paste the complete link into your browser.

If I could be of further assistance, let me know. If this helps or solves the issue, please rate it and give a testimonial for my response. Happy Holidays!

Thanks, Joe


I’m happy to assist further over the phone at https://www.6ya.com/expert/joe_8b8c2cd6ce148309

0helpful
1answer

WHILE TEST PRINT CYAN INK NOT SHOWING WHAT SHOULD I DO SIR

This issue will only occur if an ink cartridge(s) is or was installed inthe wrong position (slot) in the machine. When a cartridge is installed, the ink tube system is filled with the ink from the cartridges, to prepare the machine for printing. If the cartridge is inthe wrong position the tube will fill with the wrong color.


NOTE: If you just installed or replaced the ink cartridges and your printed documents are missing colors please refer to the solution - I just installed or replaced my ink cartridge and my printed documents aremissing colors. What can I do? Blank


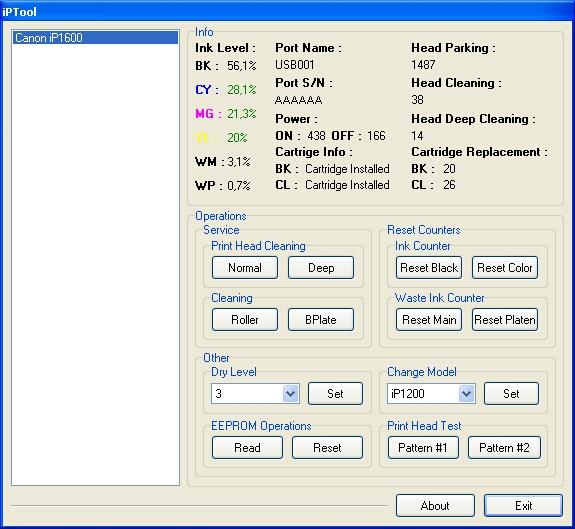
To resolve this issue you will need to clean the print head.


NOTE: It may require 10 to 15 cleanings to clean the ink tubes and print head. During the cleaning process, the ink in the cartridge(s) will be consumed. Additional ink cartridges may be required to completethe cleaning process.


1. First verify the position of the ink cartridges:


a. Open the ink cartridge cover and check to make sure the ink cartridges are in the correct order.


b. Starting from the left side, the correct order is Black, Yellow, Cyan(blue), and Magenta (red).


- If the ink cartridges are installed in the correct order, close the ink cartridge cover and continue to STEP 2.


- If the ink cartridges are not in the correct order, remove the ink cartridges that are installed in the wrong position by pressing down on the release lever(s), located above the ink cartridge and remove the cartridge(s) from the machine.


Next, reinstall the ink cartridge(s) in the correct position in the machine by gently pushing the cartridge in until it clicks.


When all the cartridges are installed, close the ink cartridge cover.


2. After closing the ink cartridge cover, the LCD will prompt - Did youchange XXXX (XXXX = the color) This message will be displayed for ink cartridge that was removed. Press the - (Minus Key for No). This willkeep accurate data of how much ink is left in the cartridge.


1. Press the INK key.


2. Press OK to select Test Print.


3. Press OK to select Print Quality.


4. Press the COLOR START key.


5. Review the Check Sheet. The colors on the Check Sheet should be in a specific order: Black, yellow, Cyan (Blue) and Magenta (red).


a If the colors on the Check Sheet are in the correct order and are notmissing any dashes, press + (Plus Key for Yes) on the key pad and continue to STEP 7.


b If the colors on the Check Sheet are not in the correct order, are missing dashes or blank or a color other than Black, Yellow, Cyan or Magenta printed press - (Minus Key for No) on the key panel and continueto STEP 6.


6. The machine will need to perform cleanings to flush out the incorrectcolor or dried ink from the ink tubes and print head.


a. The LCD will ask you BLACK OK. If black is fully printed and is the correct color, press + (Plus Key for Yes). If it#s blank, missing dashes or is the incorrect color, press - (Minus Key for No).


b. The LCD will ask you COLOR OK. If any of the 3 colors (yellow, cyan (blue), and magenta (red) are fully printed and are the correct color, press + (Plus Key for Yes). If it#s blank, missing dashes or is the incorrect color, press - (Minus Key for No).


c. The LCD will say START CLEANING + for YES and - for NO. Press + for YES to start cleaning. The machine will go through a cleaning cycle that will take approximately one to two minutes.


d. After the cleaning is completed, the LCD will say PRESS START. Pressthe BLACK START key. This will print out the print quality check sheet again for you to check and see if your print quality issue has been resolved or not


NOTE: If you wait 1 minute after the cleaning cycle is completed, the display will return to date and time. You will need to go back to STEP 3 to print the Print Quality Check Sheet again.


e. If the ink color order is correct and all of the dashes are present, press + on the key pad to select YES and continue to STEP 7.


If the colors on the Check Sheet are not in the correct order, are missing dashes or blank or a color other than Black, Yellow, Cyan or Magenta printed press - key to select NO. Repeat the cleaning process byfollowing STEPS 6a through 6d. You may have to perform this procedure up to 15 times in order to clean the ink tubes and print head


NOTE: During the cleaning process, the ink in the cartridge(s) will be consumed. Additional ink cartridges may be required to complete the cleaning process.


7. Test by printing the document that had the reported problem (wrong color printing).

1helpful
2answers

Ink cartridge problem( s) appear to be missing or damaged

hi there,

Ink cartridge Problem
Cause : The indicated ink cartridge(s) are missing or are damaged.

Solution : Replace the indicated ink cartridge(s) immediately so that you can resume printing. If there are no ink cartridges missing from the HP All-in-one, the ink cartridge contacts might need to be cleaned.

IF there is no ink cartridge missing from the HP All-in-One, and you still receive this message after cleaning the ink cartridge contacts, you might have a damaged ink cartridge. Replace the ink cartridge.

Hope this helps. Please rate my response.
Thanks.
Have a good day.
0helpful
1answer

Black Horizontal lines

hi!


Horizontal white lines usually indicate the ink cartridge is running out of ink or has some clogged ink nozzles. Try the following steps:
  1. Some of the ink cartridge ink nozzles may be clogged with dry ink. Use the ink cartridge cleaning service to try to clear them. Follow the steps below:
    1. check if there is plain white paper in the Input tray.
    2. Press Setup .
    3. Press < or >to select Tools and then press OK .
    4. Press < or > to select Clean Print Cartridge and then press OK . The unit prints a test page.
    5. Examine the test page. If the print quality of the page is good, stop here. If the print quality appears to be getting better, run the Clean Print Cartridge utility again
  2. If the self test appears better, Increase the copy quality setting (Normal or Best) and try copying again. If the quality is still poor, continue to the next step.
  3. If the quality is still poor, one or more of the cartridges may be low on ink or empty. Follow the steps below to check the ink levels.
    1. Open HP Solution Center .
    2. Click Settings .
    3. Click Print Settings .
    4. Click Printer Toolbox .
    5. Click the Estimated Ink Levels tab.
    6. Replace any ink cartridge that is low on ink.
  4. If the ink levels are not low, clean the cartridge face and electrical contacts at the back of the print carriage.
    1. Open the front of the unit to access the ink cartridges.
    2. After the ink cartridges are at the center, unplug the power cord from the back of the unit, and remove the ink cartridges. The power cord must be removed to ensure that the unit is not damaged during the cleaning process.
    3. Clean the cross-hatched area of the ink cartridge with a soft clean cloth that is slightly dampened with clean water to remove any build up. Avoid cleaning the ink cartridge nozzle plate. Cleaning this area can force foreign matter into the ink nozzles and plug them
    4. With a soft lint free cloth slightly dampened with clean water, clean the copper-colored contacts on the back of the ink cartridges.
    5. Allow the cartridges to dry before reinserting them.
    6. Close the unit, and plug the power cord back in.
    7. Print a self-test page to check the results. Follow the steps below to print a self-test page.
      1. Press Setup .
      2. Press <or > until Print Report displays and then press OK .
      3. Press < or > until Self-Test Report displays and then press OK . The self-test report prints.
    8. If the problem is not corrected by cleaning the ink cartridges, replace the ink cartridge(s).
- hope it will help to resolve you problem...
1helpful
1answer

Hp 7550 ink jet printer printing uneven

My first guess is that it is a cartridge issue, due to these printers having the print head as part of the cartridge, there is nothing else, it makes the whole cartridge the only printing item. Ensure the carts are not old (exp date) and that they are HP, With that all understood as I now see that you must due to owning it for 6 years, then you could try to clean the contacts on machine's "cartridge holder" and give that a clean too while your at it cause it may be the problem here (see below)

If a inkjet printer lasts 3 years you would be doing well, and you've had 6. Exceptional!

HP Photosmart printers may print images with white lines or single color streaks. This issue can be caused by ink that has dried in the ink nozzles or by debris that is blocking the ink nozzles. The ink cartridges and the and printer cradle should be cleaned. Clean the ink cartridges with the ink cartridge cleaning utility in the HP Printer Toolbox. Also, clean the ink cartridges and the print cradle manually.
Cleaning the ink cartridge cradle
  1. Assume an eye level position with the HP Photosmart printer.
  2. Locate the ink cartridge cradle.
  3. Using clean, moistened swabs, wipe the underside of each wall of the carriage where fibers may collect and come in contact with the paper. Repeat until no ink residue is seen on a clean swab.
  4. Reconnect power cord when finished cleaning.


Manually cleaning the ink cartridges
  1. Turn the printer on and lift the top cover.
  2. After the ink cartridges have moved to the center of the printer, unplug the power cord from the back of the printer.
  3. Remove the ink cartridges and place them wide side down on a piece of paper.
  4. Prepare a clean, foam-rubber swab or a lint-free cloth slightly dampened with water.
  5. Locate the copper-colored circuitry strip on the back of each cartridge.
  6. Clean the copper-colored strip with the dampened swab or cloth. Do not wipe the nozzle end of the cartridge or touch the nozzle plate.
  7. Clean the carriage contacts on the back wall of the ink cartridge carriage with a damp foam-rubber swab or lint-free cloth. Use a dry foam-rubber swab or a lint-free cloth to remove moisture from the contacts.

Cleaning the ink cartridges with the HP Printer Toolbox
  1. Click Start .
  2. Click Settings .
  3. Click Printers .
  4. Right-click the icon of the printer in use.
  5. Click Properties .
  6. Click the Services tab.
  7. Click Open the HP Photosmart Toolbox or Service this device.
  8. Click the Device Services tab. This tab does not display in Windows XP; proceed to the next step.
  9. Click Clean the Print Cartridges .
  10. Follow the onscreen prompts.
If you've got this far then I should tell you that these days, Printers aren't worth fixing, one just replaces them with new
0helpful
2answers

My printed and copied pictures have horozontal lines

White lines through copies White lines can appear on a copy in either a horizontal or vertical direction. How the white line appears on the copy will determine the cause and solution. Horizontal lines Horizontal white lines usually indicate the ink cartridge is running out of ink or has some clogged ink nozzles. Try the following steps: 1. Some of the ink cartridge ink nozzles may be clogged with dry ink. Use the ink cartridge cleaning service to try to clear them. Follow the steps below: 1. Verify that there is plain white paper in the Input tray. 2. Press Setup. 3. Press or to select Tools and then press OK. 4. Press or to select Clean Print Cartridge and then press OK. The unit prints a test page. 5. Examine the test page. If the print quality of the page is good, stop here. If the print quality appears to be getting better, run the Clean Print Cartridge utility again 2. If the self test appears better, Increase the copy quality setting (Normal or Best) and try copying again. If the quality is still poor, continue to the next step. 3. If the quality is still poor, one or more of the cartridges may be low on ink or empty. Follow the steps below to check the ink levels. 1. Open HP Solution Center. 2. Click Settings. 3. Click Print Settings. 4. Click Printer Toolbox. 5. Click the Estimated Ink Levels tab. Figure 1: Estimated ink levels - both cartridges low NOTE: You can also open the Printer Toolbox from the Print Properties dialog box. In the Print Properties dialog box, click the Features tab and then click Printer Services button then click the Estimated Ink Levels tab. 6. Replace any ink cartridge that is low on ink. 4. If the ink levels are not low, clean the cartridge face and electrical contacts at the back of the print carriage. 1. Open the front of the unit to access the ink cartridges. 2. After the ink cartridges are at the center, unplug the power cord from the back of the unit, and remove the ink cartridges. The power cord must be removed to ensure that the unit is not damaged during the cleaning process. 3. Clean the cross-hatched area of the ink cartridge with a soft clean cloth that is slightly dampened with clean water to remove any build up. Avoid cleaning the ink cartridge nozzle plate. Cleaning this area can force foreign matter into the ink nozzles and plug them. Figure 2: Cleaning the ink cartridge 1 - Clean in the cross-hatched area only 2 - Do not touch the nozzle plate 3 - Clean the copper-colored contacts 4. With a soft lint free cloth slightly dampened with clean water, clean the copper-colored contacts on the back of the ink cartridges. 5. Allow the cartridges to dry before reinserting them. 6. Close the unit, and plug the power cord back in. 7. Print a self-test page to check the results. Follow the steps below to print a self-test page. 1. Press Setup. 2. Press or until Print Report displays and then press OK. 3. Press or until Self-Test Report displays and then press OK. The self-test report prints. 5. If the problem is not corrected by cleaning the ink cartridges, replace the ink cartridge(s). Vertical lines Vertical white lines usually indicate the scanner did not calibrate correctly. This can be caused by debris on the scanner glass or white reference pad. Try the following steps: 1. Turn off the HP all-in-one product and unplug the power cord. 2. Open the document cover to access the scanner glass. 3. Using a non abrasive glass cleaner, thoroughly clean the scanner/copier glass, and white lid backing on the inside of the top cover. CAUTION: Spray the cleaner onto the cloth. Never spray fluids directly onto the HP all-in-one product. 4. Plug in the power cord and turn on the HP all-in-one. Let me know what happens, Good Luck, Tim
Not finding what you are looking for?

22 views

Ask a Question

Usually answered in minutes!

Top HP Office Equipment & Supplies Experts

Cindy Wells

Level 3 Expert

6688 Answers

k24674

Level 3 Expert

8093 Answers

Grand Canyon Tech
Grand Canyon Tech

Level 3 Expert

3867 Answers

Are you a HP Office Equipment and Supply Expert? Answer questions, earn points and help others

Answer questions

Manuals & User Guides

Loading...