Cars & Trucks Logo
Posted on May 16, 2009
Answered by a Fixya Expert

Trustworthy Expert Solutions

At Fixya.com, our trusted experts are meticulously vetted and possess extensive experience in their respective fields. Backed by a community of knowledgeable professionals, our platform ensures that the solutions provided are thoroughly researched and validated.

View Our Top Experts

Play in the steering wheel column after position adjustment

A lever on the left side of my steering column allows you to position the steering wheel at different angles. I took my car in for an alignment and new tires. They had adjusted my steering wheel in a very low position. I moved the lever to adjust my steering wheel where I normally have it. I went to leave the repair shop and when I turned the wheel the entire steering column moved and it now moves about a quarter of an inch all the time. This was in Tires Plus parking lot. The manager came out and said they could not have done anything because the steering column is a sealed unit and it can't be tampered with. My steering wheel does not lock into a position and stay fixed. Please help. I think the alignment person who took the car for a test drive forced the steering wheel to his liking and broke something so that it does't lock into a position, there is play.

  • dalangsford May 27, 2009

    Well, I took my car to the dealership to find out if my steering wheel tilt lock was damaged during my all wheel alignment. They found the problem and it took only 5 mins. to fix!! I have owned the car for 2 yrs. and I had never adjusted my tilt for the steering wheel for about 2 yrs. because it was exactly where I wanted it. When they took my car for a test drive, they adjusted the steering wheel to their liking. The gears had dirt and debris. The dealership cleaned the gears and sprayed with a white grease. I was told to every once in a while to adjust the steering wheel tilt. It now locks into place. Thought I would share this solution with others. Thanks!

×

1 Answer

Anonymous

Level 2:

An expert who has achieved level 2 by getting 100 points

MVP:

An expert that got 5 achievements.

Vice President:

An expert whose answer got voted for 100 times.

Governor:

An expert whose answer got voted for 20 times.

  • Expert 186 Answers
  • Posted on May 16, 2009
Anonymous
Expert
Level 2:

An expert who has achieved level 2 by getting 100 points

MVP:

An expert that got 5 achievements.

Vice President:

An expert whose answer got voted for 100 times.

Governor:

An expert whose answer got voted for 20 times.

Joined: May 01, 2009
Answers
186
Questions
1
Helped
116362
Points
502

When they did the alignment it's possible that they used a tool that locks the steering wheel straight while it's on the alignment rack.If they put too much pressure on the wheel when they used the steering wheel seat lock tool it may have stressed you tilt lock mech causing it not to lock where you want it.Hope this helps

Add Your Answer

×

Uploading: 0%

my-video-file.mp4

Complete. Click "Add" to insert your video. Add

×

Loading...
Loading...

Related Questions:

0helpful
1answer

How do i tilt the 2007 chevrolet aveo lt steering wheel for my own comfort

Steering Wheel Adjustment .The lever is located under the steering column, slightly to the left. To adjust the steering wheel: 1. Pull the lever down. 2. Move the steering wheel up or down into a comfortable position. 3. Pull the lever up to lock the wheel in place. Do not adjust the tilt lever while driving.
0helpful
1answer

How do i adjust the tilt steering

There should be a small lever, usually on the left of the steering column, under the steering wheel. If you pull or lift on the lever, it allows the steering wheel to be tilted up or down. When you release the lever or push it down, it will lock the steering wheel at that height.
Cheers.
1helpful
1answer

Adjust height of Prizm steering wheel

Some Geo Prism's (and sister car Toyota Corolla) have adjustable steering columns, and some do not. The adjustment lever is on the left side of the steering column, underneath the turn signal arm. Pull this lever out...away from the steering column, and you will feel the entire column loosen for up and down positioning. To re-secure after fine tuning the desired height...push this lever firmly back into position beside the steering column. If your Prism does not have this lever...your car is not equipped with the adjustable optional column. Hope this helps.
0helpful
1answer

What does the small lever on left side of steering column do? Does it adjust steering wheel? If so, how do you use it?

Pull that small lever and you will be able to move the entire column up and down, stopping where you want.
0helpful
1answer

How to remove a heator core from a 2001 dodge caravan? do you have to take the dash out? or just the bottom pannel.

The 2001 Dodge caravan has 2 heater cores - front (the main one), and the rear. Removal of the
rear heater core is a whole different procedure than the front.

Front Heater Core - Removal and Installation
  1. Before servicing the vehicle, refer to the Precautions Section.
  2. Align the wheels in the straight-ahead position.
  3. Disconnect the negative battery cable.
    CAUTION Before working around the steering wheel or the instrument panel all 2 minutes to pass to allow the air bag module to discharge.
  4. Drain the cooling system into a clean container for reuse.
  5. Remove the steering column, by removing or disconnect the following:

    Lower left side steering column cover Parking brake release cable from the parking brake lever 10 steering column cover liner-to-instrument panel bolts and the cover liner
  6. Rotate the key to the LOCK position; then, rotate the steering wheel to the LOCKED position.

    Gear selector cable and its mounting bracket as an assembly from the upper steering column mounting bracket 2 instrument cluster trim bezel-to-instrument panel screws, retaining clips and bezel 2 steering column shroud-to-steering column screws and the shroud Steering column-to-intermediate steering shaft coupler
  7. Loosen but do not remove the 2 lower steering column mounting bracket nuts/washers.

    2 upper steering column mounting bracket nuts/washers Steering column assembly from the vehicle
  8. Remove or disconnect the following:

    Instrument panel-to-chassis harness interconnect and bracket Lower silencer boot, at the base of the steering shaft
  9. Working in the engine compartment, pinch off the heater hoses.

    Heater core cover. Position some towels under the heater core hoses. Heater core plate and the hoses
  10. Depress the heater core retaining clips.
  11. Lift the accelerator pedal and slide the heater core past it.
  12. Depress the brake pedal and remove the heater core from the heater/air conditioning housing assembly.

    0996b43f8022fa83.jpg enlarge_icon.gifenlarge_tooltip.gif

    Fig. View of the steering column assembly


    0996b43f8022fa84.jpg enlarge_icon.gifenlarge_tooltip.gif

    Fig. View of the interconnect and bracket


    0996b43f8022fa85.jpg enlarge_icon.gifenlarge_tooltip.gif

    Fig. View of the front heater core assembly


To install:
  1. Depress the brake pedal and install the heater core into the heater/air conditioning housing assembly.
  2. Lift the accelerator pedal and slide the heater core past it.
  3. Install or connect the following:

    Heater hoses (using new O-rings) and the heater core plate Heater core cover Heater hoses clamps, working in the engine compartment Lower silencer boot at the base of the steering shaft Instrument panel-to-chassis harness interconnect and bracket
  4. Install the steering column assembly by installing or connect the following:

    Steering column assembly, carefully into the vehicle. 2 upper and 2 lower steering column mounting bracket nuts/washers. Torque the nuts to 105 inch lbs. (12 Nm). Steering column-to-intermediate steering shaft coupler and tighten the pinch bolt to 21 ft. lbs. (28 Nm) 2 steering column shroud and the shroud-to-steering column screws Bezel, the retaining clips and the 2 instrument cluster trim bezel-to-instrument panel screws Gear selector cable and its mounting bracket as an assembly to the upper steering column mounting bracket 10 steering column cover liner and the cover liner-to-instrument panel bolts Parking brake release cable to the parking brake lever Lower left side steering column cover. Lower left side steering column cover
  5. Refill the cooling system.
  6. Connect the negative battery cable.
  7. Run the engine to normal operating temperatures; then, check the climate control operation and check for leaks.
2helpful
2answers

How to adjust clutch pedal on 86 mustang lx

clutch is supposed to be self adjusting. Here are instructions for replacing the adjuster:


REMOVAL & INSTALLATION


See Figure 1

  1. Disconnect the battery cable from the negative terminal of the battery.
  2. Remove the steering wheel using a steering wheel puller, Tool T67L-3600-A or equivalent.
  3. Remove the lower dash panel section to the left of the steering column.
  4. Remove the shrouds from the steering column.
  5. Disconnect the brake lamp switch and the master cylinder pushrod from the brake pedal.
  6. Rotate the clutch quadrant forward and unhook the clutch cable from the quadrant. Allow the quadrant to slowly swing rearward.
  7. Remove the bolt holding the brake pedal support bracket lateral brace to the left side of the vehicle.
  8. Disconnect all electrical connectors from the steering column.
  9. Remove the 4 nuts that hold the steering column to the brake pedal support bracket and lower the steering column to the floor.
  10. Remove the 4 booster nuts that hold the brake pedal support bracket to the dash panel.
  11. Remove the bolt that holds the brake pedal support bracket to the underside of the instrument panel, and remove the brake pedal support bracket assembly from the vehicle.
  12. Remove the clutch pedal shaft nut and the clutch pedal, as outlined above.
  13. Slide the self-adjusting mechanism out of the brake pedal support bracket.
  14. Examine the self-adjusting mechanism shaft bushings on either side of the brake pedal support bracket, and replace if worn.

To install:
  1. Lubricate the self-adjusting mechanism shaft with motor oil and install the mechanism into the brake pedal support bracket.
  2. Position the quadrant towards the top of the vehicle. Align the flats on the shaft with the flats in the clutch pedal assembly, and install the retaining nuts. Tighten to 32-50 ft. lbs. (43-67 Nm).
  3. Position the brake pedal support bracket assembly beneath the instrument panel, aligning the four holes with the studs in the dash panel. Install the four nuts loosely.
  4. Install the bolt through the support bracket and into the instrument panel. Tighten to 13-25 ft. lbs. (18-34 Nm).
  5. Tighten the four booster nuts that hold the brake pedal support bracket to the dash panel to 13-25 ft. lbs. (18-34 Nm).
  6. Connect the brake lamp switch and the master cylinder pushrod to the brake pedal.
  7. Attach the clutch cable to the quadrant.
  8. Position the steering column onto the four studs in the support bracket and start the four nuts.
  9. Connect the steering column electrical connectors.
  10. Install the steering column shrouds.
  11. Install the brake pedal support lateral brace.
  12. Tighten the steering column attaching nuts to 20-37 ft. lbs. (27-50 Nm).
  13. Install the lower dash panel section.
  14. Install the steering wheel.
  15. Connect the battery cable to the negative terminal on the battery.
  16. Check the steering column for proper operation.
  17. Depress the clutch pedal several times to adjust the cable.
  18. 714c4a4.gif
0helpful
1answer

I turned ignition off and lifted wheel concurrently, it slipped to a locked position which I can not undo, it is stuck in that position, and it is an uncomfortable driving position.

on the left side of steering column theres a lever. it located behind the singal light lever, if you pull back on lever you should be able to tilt wheel into postion you need, good luck hope this helps.
5helpful
2answers

Tilt Steering Wheel lever appears broken - locked in up position - what is involved in repair or replacement? 97 T&C

This is a simple mechanical issue (no electronics involved).

Remove the plastic housing from around the steering column and ignition area. It is held with screws from under the column area. There are two screws from the top that you may need a short screwdriver to reach. Some are phillips and some are hex head. Just take your time it will come.

Once open you will see interlocking teeth or "gears" on the top of the column. One in mounted to the column the other engages into the tilt release teeth. This is the tilt mechanism. The top lever is lifted up by the adjusting lever. When the teeth are disengaged the wheel can be moved up and down.

Look to see the linkage is intact from the lever to the top gear. Pull the adjusting lever to see it is working and trying to lift the top gear up.

It can stick. Use WD40 if struck. Try shaking the steering wheel up and down while operating the adjusting lever (right side of column behind the turn signal lever).

Still struck? Use a screwdriver to lift the gears apart. The wheel will tilt easily now. Move to the desired position and engage the gears again. It will now be locked in the position you want.

It sounds complex but it is not. Just take your time and it will be obvious.

Note that while working you should have the negative cable removed from the battery. You do not want to trigger the air bag or damage the electronics. With the negative cable removed you will not have a problem.


4helpful
1answer

2000 Mercury Villager: Is there a shift lever adjustment? When placing foot on brake pedal and pulling shift lever rearward it doesn't feel like the transmission is completely disengaging and it is...

You may have a loose shift linkage in the steering column. Remove the upper and lower plastic covers behind the steerong wheel (5 or 6 philips head) and see if you have any loose torx head or allen head screws. Ea
rlier models had this isue.

Also, go to this site for Villager Quest help.

http://autos.groups.yahoo.com/group/villagerquest/
Here's adjustment procedure too

SECTION 307-05: Automatic Transaxle/Transmission External Controls 2000 Villager Workshop Manual
GENERAL PROCEDURES Cable Adjustment —Shift Control
  1. Place the gearshift lever in PARK (P) position.
  1. Raise and support the vehicle. Refer to Section 100-02 .
  1. Remove the splash shield.
  1. Loosen the shift cable nut.
  1. Position the shift linkage in PARK (P) position.
  1. Tighten the shift cable nut.
b45630b.gif
  1. Move the gearshift lever through the entire shifting range.
  1. Verify that the engine will crank with the gearshift lever in PARK (P) or NEUTRAL (N) position.
  1. Adjust the transmission range (TR) switch as necessary, refer to Section 307-01 .
-------------------------------------------------
8d76d60.gif
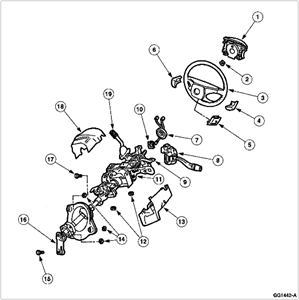
Item Part Number Description 1 043B13 Driver side air bag module 2 — Steering wheel nut 3 3600 Steering wheel 4 — Radio volume control cover 5 — Air bag sliding contact electrical connector access panel 6 — Cruise control cover 7 14A664 Air bag sliding contact 8 13K359 Multifunction switch 9 — Tilt wheel lever 10 13318 Turn indicator cancel cam 11 — Steering column assembly 12 — Steering column mounting bracket nuts (4 Req'd) 13 3C695 Lower column shroud 14 — Steering column opening cover nuts (3 Req'd) 15 — Steering column lower yoke bolt 16 3N725 Steering column lower yoke 17 — Steering column clamp bolt 18 3C695 Upper column shroud 19 7210 Gearshift lever
0helpful
2answers

Lever under the steering column

push it in and it might be a key release???? idk all hondas have some kind of weird thing in them....like my civic, it has a barrel key thing under the dash on the side of where the stereo goes on the driver side and i still to this day have no idea what it does, lol.
Not finding what you are looking for?

1,087 views

Ask a Question

Usually answered in minutes!

Top Hyundai Experts

ZJ Limited
ZJ Limited

Level 3 Expert

17989 Answers

Ronny Bennett Sr.
Ronny Bennett Sr.

Level 3 Expert

6988 Answers

Thomas Perkins
Thomas Perkins

Level 3 Expert

15088 Answers

Are you a Hyundai Expert? Answer questions, earn points and help others

Answer questions

Manuals & User Guides

Loading...