Motorcycles Logo

Related Topics:

Posted on Oct 01, 2009
Answered by a Fixya Expert

Trustworthy Expert Solutions

At Fixya.com, our trusted experts are meticulously vetted and possess extensive experience in their respective fields. Backed by a community of knowledgeable professionals, our platform ensures that the solutions provided are thoroughly researched and validated.

View Our Top Experts

Fuel tank getting wires reconnected after changing tanks

1 Answer

Anonymous

Level 3:

An expert who has achieved level 3 by getting 1000 points

All-Star:

An expert that got 10 achievements.

MVP:

An expert that got 5 achievements.

Brigadier General:

An expert that has over 10,000 points.

  • Master 4,565 Answers
  • Posted on Oct 01, 2009
Anonymous
Master
Level 3:

An expert who has achieved level 3 by getting 1000 points

All-Star:

An expert that got 10 achievements.

MVP:

An expert that got 5 achievements.

Brigadier General:

An expert that has over 10,000 points.

Joined: Sep 22, 2009
Answers
4565
Questions
0
Helped
2156168
Points
14358

You didn't mention what year model your bike was but usually on most late models built after 1990 or so, the wires have plugs. These plugs are not interchangable and will only plug into the proper mating plug. If this doesn't answer your question, please be more specific.

Add Your Answer

×

Uploading: 0%

my-video-file.mp4

Complete. Click "Add" to insert your video. Add

×

Loading...
Loading...

Related Questions:

1helpful
1answer

How do you remove the fuel tank of a 2003 Suzuki XL7 4 wheel Drive

RTM ,. read the shop manual first.? its all there to read 24/7.
Is this car A USA CAR?

generic.
  1. drain tank fully, or you will get a flood of fuel on YOU.
  2. remove all hoses to tank/vents and wires, to pump rack top,.
  3. remove filler neck hose to tank.
  4. with a floor jack under tank, and wood protector to it, try to raise tank just a tad. (1/2?") (I have car at rear on jack stands first)
  5. remove tank straps. now.
  6. lower jack, done.

now out of shop manual quoted SX4 , near.

1) Relieve fuel pressure in fuel feed line according to
"Fuel Pressure Relief Procedure".
2) Disconnect negative cable at battery.
3) Remove fuel filler cap.
4) Insert hose of a hand operated pump into fuel filler
hose (1) and drain fuel in space "A" as shown in
figure.(this car has check valve at tank inlet)
Hoist vehicle, and remove clamp (2), fuel filler hose
(1) and breather hose (3) from fuel filler neck.
6) Remove exhaust center pipe referring to "Exhaust
Pipe and Muffler Removal and Installation in Section
1K".
7) Remove propeller shaft (For 4WD model) referring to
"Propeller Shaft Assembly Removal and Installation
in Section 3D".
8) Due to absence of fuel tank drain plug, drain fuel
tank by pumping fuel out through fuel tank filler.
Use hand operated pump device to drain fuel tank.
Disconnect quick joint (fuel pipe) (1) from fuel pipes
(2) referring to "Fuel Hose Disconnecting and
Reconnecting".
10) Support fuel tank (1) with jack (2) and remove its
mounting bolts (3)
Lower fuel tank a little as to disconnect wire harness
at connector (1)and ground wire (2), then remove
fuel tank
0helpful
1answer

Fuel gauge does not work on my ram 1500 do I need to change the whole file pump

ALWAYS check the ground connection on the tank before doing anything else. Said ground connection could be loose or dirty. Remove and clean then reconnect. This happens to a lot of vehicles. You can test the gage itself by disconnecting the connectors from the fuel tank and holding the wire ends touching together with the switch on. the gage will go up because connection is good and gage is good. Reconnect the wires to the tank connection and it should work properly. IF the in-tank unit is not working and the pump is good, you do not need to replace the pump. I've gotten the unit to work again on vehicles by removing the unit and cleaning it, and test it by just hooking the wires back to it before re-installing it into the tank. It works well to do this.
0helpful
1answer

Evap system

The FSM is clear on this. each hose and fitting must be air tight.
or the the car vents gas fumes full time, and the EVAP ECU tests
(monitor) make sure this all works.
you can just look at the left and right side above rear tires. and see
if your hands are small enough to fit here. Id bet not.
some mech, report, the tank can be tilted down at front (drained fuel)
and gain access.
keep in mind, you get fuel siphoning at any time. do not open the system, with fuel in the tank, and then drive to autozone,
i loosen the gas cap so that pressure can not build in tank.
expanding fuel can push fuel out , during a filter change. very
dangerous in a garage, and you gone.
it's just a vent hose, you can see, it and what needs to be done is really obvious. given you arms sides and lenght.
my fsm states, " TANK pull"

Removal & Installation

  1. Relieve the fuel system pressure and disconnect the negative battery cable.
  2. Remove the fuel filler cap from the fuel tank.
  3. Have a Class B fire extinguisher near the work area. Use a hand operated pump device to drain as much fuel through the fuel filler neck as possible.
  4. Use a siphon to remove the remainder of the fuel in the tank by connecting the siphon to the fuel pump outlet fitting.
    CAUTION Never drain or store fuel in an open container because there is the possibility of a fire or an explosion.
  5. Reinstall the fuel filler cap.
  6. Remove the rear seat cushion from vehicle (if so equipped).
  7. Disconnect the fuel pump motor connector and sending unit electrical connectors.
  8. Disconnect the wire harness grommet and harness through the vehicle floor pan.
  9. Raise and safely support the vehicle.
  10. Remove the fuel filler hose clamp from the filler neck assembly.
  11. Remove the fuel breather hose clamp from the filler neck assembly.
  12. Remove the fuel filter inlet hose clamp and hose from the filter.
    NOTE A small amount of fuel may be released after the fuel hose is disconnected. In order to reduce the chance of personal injury, cover the fitting to be disconnected with a shop towel.
  13. Remove the fuel vapor clamp and hose, and fuel return hose clamps and hose from the respective fuel lines.
  14. Using a suitable transaxle jack, support the fuel tank.
  15. Remove the fuel tank retaining bolts and lower the tank.
To install:
  1. Reconnect all fuel hoses, lines and the fuel breather hose to the fuel tank.
  2. Place the fuel tank in its proper space using the transaxle jack, Install the fuel tank retaining bolts.
  3. Remove the transaxle jack.
  4. Reconnect all fuel hoses, lines and the fuel breather hose to the fuel tank.
  5. Install the fuel breather hose and hose clamp to the filler neck assembly.
  6. Install the fuel vapor hose and hose clamps. Install the fuel return hose and hose clamp to the respective fuel lines.
  7. Install the fuel filter inlet hose and hose clamp to the filter.
  8. Lower the vehicle. Install the wire harness and grommet through the vehicle floor pan.
  9. Connect the fuel pump motor and the sending unit connectors.
  10. Install the rear seat cushion. Reconnect the negative battery cable.
"
1helpful
1answer

Fuel line in tank dry rotted how do you replace

Hi classic11369...

Remove the old fuel line and filter from the tank...
You will insert a wire a little smaller than the diameter of the inside of the fuel line, and you will bend a small hook on the end of the line to fit over the fuel line (be sure to use a small wire) .
Lubricate the first 1 inch of fuel line with vasoline lightly...using your fingers or neednose pliers collapse the fuel line and insert it into the fuel tank, entend the fuel line long enought to go out of the fuel tank so you can reconnect the fuel filter...then pull some of the fuel line back into the fuel tank...
Please take time to rate me thumbs up
0helpful
1answer

Where is the fuel filter for 4.0 v6 cherokee located

  • Disconnect the negative battery cable and then remove the fuel tank cap to release fuel tank pressure. Remove the fuel pump relay from the PDC. Start the engine and allow it to run until it stops. Select any injector and unplug its connector.

  • 2

    Connect a jumper wire from an injector terminal to the positive battery terminal. Then, connect the other jumper wire to the other battery terminal. Briefly touch the end to the negative battery terminal.

  • 3

    Locate the fuel filter/pressure regulator near the front of the fuel tank, mounted to the body above the rear axle. Disconnect the fuel supply, fuel return and fuel pressure lines. Remove the mounting bolts and then the fuel filter/pressure regulator.

  • 4

    Attach the new fuel filter/pressure regulator to the body and tighten the bolts to 30 in-lbs. Reconnect the fuel supply, fuel return and fuel pressure lines. Reconnect the negative battery cable. Start the engine of your Jeep and check for leaks


  • good luck hope this helps
    3helpful
    1answer

    How to change a fuel pump on a 2002 crystler sebring

    Pump is in the tank.....
    1. Locate the fuel filter, which is mounted on the frame above the back of the fuel tank. Remove the fuel pump relay from the power distribution center, then start the engine. Allow it to run until it stalls. Try to start it again and let it run until it stalls. Repeat this procedure until it no longer will start, then turn the ignition off.
    2. Step 2 Loosen and lower the fuel tank assembly to get to the fuel filter. Disconnect the negative battery cable. Open the trunk and find the 4-pin connector under the trunk mat on the left side near the base of the shock tower. Disconnect the fuel pump wiring jumper from the body harness.
    3. Step 3 Push the body grommet out and feed the jumper completely through the hole in the body. Relieve the fuel system pressure by slowly removing the fuel filter cap. Raise and support the vehicle.
    4. Step 4 Put a fuel container under the drain plug, which is on the bottom-left of the fuel tank. Remove the plug and let the fuel drain out. Reinstall the plug and tighten it to 32 inch pounds.
    5. Step 5 Disconnect the driver's side fuel tank strap and loosen the passenger's side fuel tank strap. Squeeze the fuel filter hose connector to release the tabs and disconnect the fuel lines. Then, take out the fuel filter.
    6. Step 6 Put a bit of engine oil on the ends of the new fuel filter. Connect it to the fuel tubes. Reposition the fuel tank and put the fuel tank straps back on, tightening the bolts to the bolts to 17 foot pounds. Reconnect the fuel pump module connector.
    7. Step 7 Connect the negative battery cable. Refill the fuel tank and wipe up any fuel that may have spilled during the filter replacement. Check for fuel leaks when you start your Chrysler Sebring
    1helpful
    1answer

    CHANGE FUEL PUMP ON 1999 BLAZER

    Check your fuel pressure.
    Hopefully this tank is not full, as you need to pull the tank to change fuel pump, this is mounted onto the tank through the top. There are several plastic fitting and hose connecitons on the tank as well as the fuel level connector. There may also be a Vapor pressure sensor on the tank. After unbolting the tank lower the tank just far enough to remove the wireing and hoses. Make sure top of tank is clean. If you have to move tank out from under Blazer cover hose aconnectionss and wash off top of tank and flange area. Unlock flange and R and R pump assembly. Reconnect hoses and wires, reinstall tank. Connect hose to fuel test port on engine, purge air from fuel system. Check the fuel pressure. InMrFixIt
    25helpful
    3answers

    Fuel pump removal 96 nissan quest

    Replace Fuel Pump for 1997 Nissan Quest

    (1) If the fuel tank has more than one third full, you need to get the gasoline out. If it has one third or less full, you can leave it in the tank. However be very careful around the working area. Make sure you have read fire precautions in a general repair book. Take the fuel pump fuse out from the fuse box near the battery. Run starter for a few seconds. This will remove the fuel pressure in the gas lines. Disconnect battery at negative terminal. Jack up the rear of the van.

    (2) Remove the fuel tank protector.
    19add47.jpg

    (3) Disconnect fuel pipes at the front end of the fuel tank. Use short pencils and extra rubber hoses to block disconnected pipes and hoses.
    59aa089.jpg There are two pipes connected to the gasoline filler at the side of the van. Disconnect only the smaller one. The larger one is flex enough for the tank to be lowered.

    (4) Disconnect the electrical from this connector. Jack the rear end of the fuel tank with a car jack and a piece of 2x4. Put the wood between the jack point and the tank. Then unbolt the two bolts showing in the picture.
    128654f.jpg
    (5) Lower the jack after the bolts are removed. The rear end of the tank should be lowered.
    667f695.jpg

    de57889.jpg

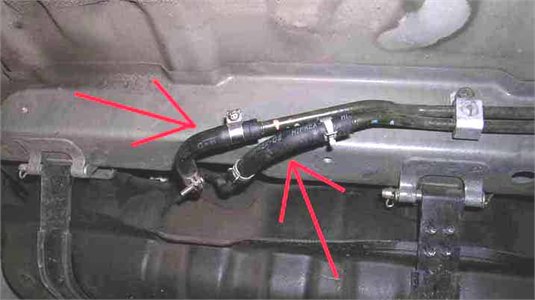
    (6) Disconnect fuel lines on top of the fuel pump. Reconnect each short hose back to different pipes as shown in picture to block the pipes.
    585888a.jpg
    (7) Loose the six mounting bolts on the fuel pump assembly. The bolts should be loosen a little at a time in multiple turns. Also detach the electrical wire holders. After all bolts are removed, carefully take the assembly out of the tank.
    dceea20.jpg

    (8) Remove the fuel pump from the assembly as shown in picture. Then unplug the electrical wires. Note that two connectors are in different sizes, so that you will not be able to reconnect to a wrong terminal.
    1310aad.jpg
    (9) Put the new pump and new filter in. Reconnect the electrical wires. If necessary use a pair of pliers to make the connectors tighter. Make sure they are not loose. Reconnect gas inlet to the pressure regulator.
    08db176.jpg
    (10) Use a new O ring, put back the assembly to the fuel tank. Make sure the float of the fuel level senser is free, and the assembly is at the right orientation (as shown in picture). Screw back the 6 bolts after making sure the O ring is in right place. The bolts should be tightened in turns. Do not over tighten them. Then reconnect the fuel lines and make sure every fastener is tight. Put the electrical wire into holders.
    90c2053.jpg
    (11) Jack up the tank and put the two mounting bolt in. (see picture in step 4). Make sure they are tightened with specific torque. Reconnect the electrical connector.

    (12) Reconnect two fuel lines at the front side of the tank. Refer to the picture in step 2. Reconnect the hose to the gasoline filler. Before you have a try start, double check if all fuel lines are securely connected and tightened.

    (13) Start the engine. You need to crank more than a normal start because the lines were empty. The pressure is built up in some time.

    (14) If engine starts ok, turn it off. Then check under the van if there is any leakage. If everything is fine put back the tank protector. (picture in step 2).
    0helpful
    1answer

    I put a new gas tank in but know gas wont flow thru it

    make sure you reconnected the wires and ground wire. did you also change fuel filter? might be clogged.
    0helpful
    2answers

    94 blazer s-10 seperate fuel pump from fuel tank

    Dropped the fuel and put in the new pump. It took
    about three hours. Thanks for showing interest.
    Not finding what you are looking for?

    88 views

    Ask a Question

    Usually answered in minutes!

    Top Harley Davidson Experts

    Arnie Burke
    Arnie Burke

    Level 3 Expert

    7339 Answers

    Sean Wright
    Sean Wright

    Level 3 Expert

    2045 Answers

    ZJ Limited
    ZJ Limited

    Level 3 Expert

    17989 Answers

    Are you a Harley Davidson Expert? Answer questions, earn points and help others

    Answer questions

    Manuals & User Guides

    Loading...