Cars & Trucks Logo

Related Topics:

C
Cornelius Roosevelt Watson Posted on Apr 29, 2017
Answered by a Fixya Expert

Trustworthy Expert Solutions

At Fixya.com, our trusted experts are meticulously vetted and possess extensive experience in their respective fields. Backed by a community of knowledgeable professionals, our platform ensures that the solutions provided are thoroughly researched and validated.

View Our Top Experts

Replaced main drive belt. there is a tension spring hanging down don't know where it attaches to keep tension on belt

1 Answer

Kevin K.

Level 2:

An expert who has achieved level 2 by getting 100 points

All-Star:

An expert that got 10 achievements.

MVP:

An expert that got 5 achievements.

Sergeant:

An expert that has over 500 points.

  • Expert 251 Answers
  • Posted on Apr 29, 2017
Kevin K.
Expert
Level 2:

An expert who has achieved level 2 by getting 100 points

All-Star:

An expert that got 10 achievements.

MVP:

An expert that got 5 achievements.

Sergeant:

An expert that has over 500 points.

Joined: Aug 04, 2012
Answers
251
Questions
0
Helped
104586
Points
865

Year, make, model??

Add Your Answer

×

Uploading: 0%

my-video-file.mp4

Complete. Click "Add" to insert your video. Add

×

Loading...
Loading...

Related Questions:

0helpful
1answer

How to check the drive belt tensioner on a 1993 Oldsmobile Cutlass Ciera 3300 engine

Put a long 1/2" drive ratchet into the hole & pull the
tension off it

If it returns & the belt has tension & works with no
problems, it's good

Your more likely to have a worn crank damper on an
older car & that will cause the belt to not track properly
& wear on one sides

Could the tensioner be loosing spring tension,maybe & need
to be replaced, maybe,but doubt it

Corrosion could be hanging it up also,try some WD-40 where
it moves,just on the aluminum parts

0helpful
1answer

How do i remove the drive belt on a 2006 Toyota Solara?

Serpentine belt replacement is not complicated and requires only one tool. Find the tension pulley located at the bottom of the motor. This pulley is attached to a very strong spring and holds the belt tight against the pulleys through its serpentine route around the engine. Use a socket wrench with a matching socket the same size as the hex head bolt in the center of the tension pulley. Attach the socket and set the direction to tighten the same direction the spring action allows the pulley to move. Turn the wrench handle, the pulley moves and the tension on the belt slackens. Take the belt off the pulley and let it hang. 
To install the new belt Once the belt is around the pulleys allow it to hang freely at the bottom of the engine. Again, use the socket wrench to turn the tension pulley far enough so the belt can be wrapped around the pulley. Once the belt is around the tension pulley, release the socket wrench and allow the tension pulley to take up the slack. 
Good Luck!!
11_23_2013_6_18_10_pm.jpg
0helpful
3answers

My belt on a 1989 suburban is scretching. how do i tighten it?

The drive belt has an automatic tensioner pulley. It will be a pulley on it's own attached to an arm. It'll be the top left pulley under the drive belt if there are only 2 at the top, or it'll be on the top righton top of the drive belt if there are 3 or 4 pulleys across the top.

Check to make sure it is moving freely. You can do this by attaching a wrench to it and moving it down if it is under the belt, or up if it is ontop of the belt. It should require a bit of force. If it doesn't move or is easy to move then it needs to be replaced. If it feels like it's moving freely and the spring seems strong then your belt is stretched past it's limit and needs to be replaced.

Alternatively it may be screeching due to a pulley seizing up. Check to make sure things like the idler pulleys or the A/C and Alternator pulleys move freely.
7helpful
1answer

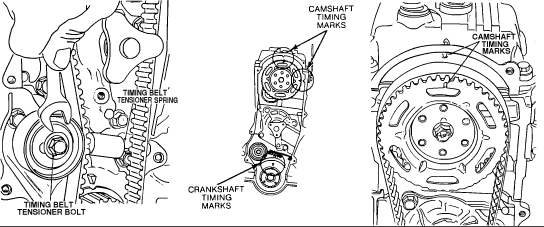
Can you tell me where I can print instructions for free to help me change my timing belt in a 93 ford festiva

Here are the instructions for removing the timing cover, and for replacing the timing belt. If this is helpful, please click my accept button! Thanks!
Remove accessory drive belts.
  1. Remove water pump pulley to pump hub attaching bolts, then the pulley.
  2. Remove right inner fender panel to gain access to crankshaft pulley.
  3. Remove outer crankshaft pulley attaching bolts, then the outer stiffener/spacer and outer pulley
  4. Remove inner stiffener/spacer, attaching screws, inner pulley and baffle plate.
  5. Remove attaching bolts, then the upper and lower timing covers.
  6. Reverse procedure to install. When installing crankshaft pulley, ensure curved lip on baffle plate and deep recess of inner pulley face outward

8fb9fc4.gif
  1. Remove timing belt covers as outlined previously.
  2. Remove timing belt tensioner pulley attaching bolt, then the tensioner pulley, spring and spring cover
  3. If reusing old belt, mark direction of rotation on belt to aid installation.
  4. Remove timing belt from crankshaft and camshaft sprockets.
  5. Check crankshaft and camshaft sprockets, tensioner pulley and timing belt for wear or damage. Replace components as necessary.
  6. Align camshaft and crankshaft sprocket timing marks with marks on cylinder head and oil pump housing
  7. Install timing belt. If reusing old belt, ensure belt is installed so that direction of rotation mark made during removal is positioned correctly.
  8. Install spring and spring cover onto tensioner pulley, then install pulley and attaching bolt. Do not tighten bolt at this time.
  9. Install tensioner spring onto anchor, then tighten pulley attaching bolt to torque listed at the end of this section.
  10. Reinstall timing belt covers.

spacer.gif 2006-05-25_081817_fest2.thumb.gif
This photo shows timing marks.


59f76eb.gif
0helpful
1answer

One of the three drive belts on my 1986 corolla (4a-c engine) is frayed and needs replacing. The belt loops around the idler pulley, air conditioner? and crank. Can I just cut this belt out and not use...

to replace the belt you need to see what size socket the tensioner has on the inside. with a ratchet attached put the socket on the inside bolt and push in the rotation to move the spring down taking the tension off of the belt. Pull the belt off and be sure to replace it with one of the same lenght. to install the belt, push the tensioner down and pull the belt over it. the tensioner will adjust itself to the correct tension.
1helpful
1answer

Serpintine belt replacepent

Installation > 5.9L Diesel Engine 5.9L Diesel Engine
WARNING Do not attempt to check belt tension with a belt tension gauge on vehicles equipped with an automatic belt tensioner.

Drive belts on diesel engines are equipped with a spring loaded automatic belt tensioner. This belt tensioner will be used on all belt configurations, such as with or without air conditioning.
  1. Depending on the year of the vehicle, a 3/8 inch or 1/2 inch square hole is provided in the automatic belt tensioner. Attach a 3/8 inch or 1/2 inch drive-long handle ratchet to this hole.
  2. Rotate ratchet and tensioner assembly clockwise (as viewed from front) until tension has been relieved from belt.
  3. Remove belt from water pump pulley first.
  4. Remove belt from vehicle.

49aef87.gif

To install:

WARNING When installing the accessory drive belt, the belt must be routed correctly. If not, engine may overheat due to water pump rotating in wrong direction. The correct belt with correct length must be used. Position drive belt over all pulleys except water pump pulley.


  1. Attach a 1/2 inch ratchet to tensioner.
  2. Rotate ratchet and belt tensioner clockwise. Place belt over water pump pulley. Let tensioner rotate back into place. Remove ratchet. Be sure belt is properly seated on all pulleys.
0helpful
2answers

HOw do you losen the tensioner for the drive belt?

The center bolt is a left-threaded screw. Turn it clockwise to loosen.
Generally, you don't loosen it to adjust the tension. The tension spring is set for your vehicle. In other words, it is not adjustable. Replace it.
Be careful, it has a loaded spring!
There is a 1/2 inch slot on the "arm". Attach a 1/2 inch ratchet wrench or breaker bar to gently un-tension it.

Hope this helps!


0helpful
1answer

How do i take of belt on a 1998 nissan 200sx?

There should be a tensioned idler pulley which has an internal spring to take up the slack. It will have a nut or a drive socket so you can attach a spanner and rotate it to relieve the tension. You will need an extension as the tension is quite high. Putting the belt back is easier with an extra person to hold the idler pulley back while you manipulate the belt.
0helpful
1answer

Which component is it that I remove to take the drive belt off ?

usually you do not need to remove anything, but you do need to loosen the tension on the belt to remove it. Look for a pulley that is attached to a small arm and the pulley is touching the belt. In the middle of the pulley is a square recessed hole which is where you would insert a ratchet/breaker bar and push the pulley and arm down(usually). It is spring loaded so that it keeps tension on the belt, whne you remove that tension the belt will slip off.
2helpful
1answer

Cant find 97 ford taurus serpentine belt diagram

Drive Belt Replacement ani_caut.gif WARNING: IF EQUIPPED, DO NOT ALLOW DRIVE BELT TENSIONER (6B209) TO SNAP BACK AS DAMAGE TO DRIVE BELT TENSIONER OR PERSONAL INJURY COULD RESULT.
NOTE: Minor cracks in the V-grooved portion of the serpentine drive belt (8620) are considered normal and acceptable. If the drive belt has chunks missing from the ribs, the drive belt should be replaced.

NOTE: Conditions requiring drive belt replacement are excessive wear, rib chunk-out, severe glazing, frayed cords or other conditions. Replace any drive belt exhibiting any of these conditions.

NOTE: When installing drive belt on pulley, make sure that all V-grooves make proper contact with pulleys.


q1834c.gif

Drive Belt, Serpentine—Except SHO
Removal
  1. ani_caut.gif WARNING: USE CAUTION WHEN REMOVING OR INSTALLING DRIVE BELT TO MAKE SURE THAT TOOL DOES NOT SLIP FROM DRIVE BELT TENSIONER OR PERSONAL INJURY AND/OR DAMAGE TO DRIVE BELT TENSIONER AND DRIVE BELT MAY OCCUR.
    Using a 15 mm socket or wrench on bolt attaching drive belt tensioner pulley, rotate drive belt tensioner clockwise on 3.0L (2V) and 3.0L (2V) FF, rotate the drive belt tensioner counter clockwise on 3.0L (4V) to remove drive belt from pulleys. Make sure spring keeper engages into slot.


    Drive Belt Tensioner—3.0L (4V)


    q3759a.gif

Installation
  1. Install drive belt over all pulleys (except drive belt tensioner).
  1. Rotate drive belt tensioner as described under the removal procedure and install drive belt over drive belt tensioner pulley. Make sure that all V-grooves make proper contact with pulleys. Make sure spring keeper releases or improper belt tension will occur.


    Pulley, Routing—Accessory Drive Belt 3.0L (2V)/3.0L (2V) FF Engine


    q3244d.gif


    Item Part Number Description 1 10300 Generator 2 6C348 Idler Pulley 3 3A674 Power Steering Pump 4 19703 A/C Compressor 5 6312 Crankshaft Pulley 6 6B209 Drive Belt Tensioner 7 8501 Water Pump 8 8620 Drive Belt

    Pulley, Routing—Accessory Drive Belt 3.0L (4V)


    q3735a.gif


    Item Part Number Description 1 3A674 Power Steering Pump 2 8501 Water Pump 3 19703 A/C Compressor 4 8620 Drive Belt 5 6312 Crankshaft Pulley 6 6B209 Drive Belt Tensioner 7 10300 Generator
3.4L SHO Engine
Removal
  1. Remove the right front wheel and tire assembly. For additional information, refer to Section 04-04.
  1. Remove the inner fender splash shield.
  1. Remove the alternator shield.
  1. ani_caut.gif WARNING: USE CAUTION WHEN REMOVING OR INSTALLING DRIVE BELT TO MAKE SURE WRENCH DOES NOT SLIP FROMDRIVE BELT TENSIONER OR POSSIBLE PERSONAL INJURY AND/OR DAMAGE TO DRIVE BELT TENSIONER AND DRIVE BELT MAY OCCUR.
    Using a 3/8 inch ratchet on the lifting lug, rotate drive belt tensioner counterclockwise (upward) and engage spring keeper. Remove drive belt from drive belt tensioner.
  1. Lower vehicle.
  1. Remove drive belt.
Installation
  1. Install drive belt over all pulleys (except drive belt tensioner ).
  1. Raise vehicle on hoist.
  1. Rotate drive belt tensioner , as described under Removal procedure and install drive belt over drive belt tensioner pulley. Make sure all V-grooves make proper contact with pulleys. Make sure the spring keeper is released or improper belt tension will occur.
  1. Install the alternator shield.
  1. Install the inner fender splash shield.
  1. Install the wheel and tire assembly. For additional information, refer to Section 04-04.


    Pulley Routing—Accessory Drive Belt, 3.4L SHO


    q3736a.gif


    Item Part Number Description 1 3A733 Power Steering Pump Pulley 2 6B217 (RH) Idler Pulley 3 19703 A/C Compressor 4 8620 Drive Belt 5 6312 Crankshaft Pulley 6 6B209 Drive Belt Tensioner 7 10346 Generator 8 6B217 (LH) Idler Pulley 9 6B217 (Center) Idler Pulley
Drive Belt, Water Pump
Removal
  1. NOTE: If removal of the water pump drive pulley is required, refer to Section 03-03.

    Rotate drive belt tensioner clockwise by hand and remove drive belt from drive belt tensioner .
  1. Remove drive belt from water pump drive pulley and water pump pulley.
Installation
  1. Position drive belt onto water pump drive pulley and water pump pulley.
  1. Rotate drive belt tensioner clockwise by hand and install drive belt over top of drive belt tensioner pulley. Make sure all V-grooves make proper contact with pulleys.


    Pulley Routing—Water Pump Drive Belt


    q3737a.gif


    Item Part Number Description 1 6B209 Drive Belt Tensioner 2 6A312 Crankshaft Pulley 3 8501 Water Pump 4 8620 Drive Belt
Not finding what you are looking for?

29 views

Ask a Question

Usually answered in minutes!

Top Cars & Trucks Experts

ZJ Limited
ZJ Limited

Level 3 Expert

17989 Answers

john h

Level 3 Expert

29494 Answers

Arnie Burke
Arnie Burke

Level 3 Expert

7339 Answers

Are you a Car and Truck Expert? Answer questions, earn points and help others

Answer questions

Manuals & User Guides

Loading...