Cars & Trucks Logo

Related Topics:

solomon potsdam Posted on Apr 09, 2014
Answered by a Fixya Expert

Trustworthy Expert Solutions

At Fixya.com, our trusted experts are meticulously vetted and possess extensive experience in their respective fields. Backed by a community of knowledgeable professionals, our platform ensures that the solutions provided are thoroughly researched and validated.

View Our Top Experts

Does a 1988 chevy g20 radiator interchange with a 1994 chevy surburban radiator?

1 Answer

sbarneski

Level 2:

An expert who has achieved level 2 by getting 100 points

MVP:

An expert that got 5 achievements.

New Friend:

An expert that has 1 follower.

Night Owl:

An expert who has answered 10 or more questions between 12 midnight and 6am on the same day.

  • Expert 74 Answers
  • Posted on Apr 09, 2014
sbarneski
Expert
Level 2:

An expert who has achieved level 2 by getting 100 points

MVP:

An expert that got 5 achievements.

New Friend:

An expert that has 1 follower.

Night Owl:

An expert who has answered 10 or more questions between 12 midnight and 6am on the same day.

Joined: Apr 03, 2011
Answers
74
Questions
1
Helped
14100
Points
173

Try it, as long as the hoses (inlet & outlet) are the same, and your automatic tranny lines hook up. Also see if yours has a thermo sensor on the radiator.

5 Related Answers

Anonymous

  • 44 Answers
  • Posted on Nov 28, 2008

SOURCE: replace heater core 1994 chevy g20 conversion van

Here a are the instuctions to remove it. I did not know if you have A/C or not so I included both for you.

REMOVAL & INSTALLATION
Without Air Conditioning
ALL MODELS
See Figure 1

  1. Disconnect the negative battery cable.
  2. Remove the coolant recovery bottle.
  3. Place a pan under the van and disconnect the heater intake and outlet hoses. Quickly remove and plug the hoses and support them in an upright position. Drain the coolant from the heater core into the pan.
CAUTION When draining engine coolant, keep in mind that cats and dogs are attracted to ethylene glycol antifreeze and could drink any that is left in an uncovered container or in puddles on the ground. This will prove fatal in sufficient quantity. Always drain coolant into a sealable container. Coolant should be reused unless it is contaminated or is several years old.
  1. Remove the heater distributor duct-to-case attaching screws and the duct-to-engine cover screw. Remove the duct.
  2. Remove the engine cover.
  3. Remove all the instrument panel attaching screws.
  4. Carefully lower the steering column. Raise and support the right side of the instrument panel. Refer to for further details.
  5. Remove the defroster duct-to-case attaching screws and the two screws attaching the distributor to the heater case.
  6. Disconnect the temperature door cable. Carefully fold the cable back and out of the way.
  7. Remove the three nuts from the engine compartment side of the distributor case and the screw from the passenger compartment side.
  8. Remove the heater case and core assembly.
  9. Remove the core retaining straps and remove the core.
To install:
  1. Install the core.
  2. Install the core retaining straps.
  3. Install the heater case and core assembly.
  4. Fasten the three nuts on the engine compartment side of the distributor case and the screw on the passenger compartment side.
  5. Connect the temperature door cable.
  6. Install the defroster duct-to-case attaching screws and the two screws attaching the distributor to the heater case.
  7. Install the steering column.
  8. Fasten all the instrument panel attaching screws.
  9. Install the engine cover.
  10. Install the duct. Install the heater distributor duct-to-case attaching screws and the duct-to-engine cover screw.
  11. Connect the heater intake and outlet hoses.
  12. Fill the cooling system.
  13. Install the coolant recovery bottle.
  14. Connect the negative battery cable.
1990-95 MODELS With A/C

  1. Disconnect the battery ground cable.
  2. Remove the engine cover.
  3. Remove the steering column-to-instrument panel bolts. Lower the column carefully.
  4. Remove the upper and lower instrument panel attaching screws. Remove the radio support bracket screw.
  5. Raise and support the right side of the instrument panel.
  6. Remove the lower right instrument panel bracket.
  7. Remove the vacuum actuator from the kick panel.
  8. Disconnect the temperature cable and vacuum hoses at the case. Remove the heater distributor duct from over the engine hump.
  9. Remove the two defroster duct-to-firewall attaching screws below the windshield.
  10. Under the hood, disconnect and plug the heater hoses at the firewall.
  11. Remove the three nuts and one screw (inside) holding the heater case to the firewall.
  12. Remove the case from the van. Remove the gasket for access to the screws holding the case together. Remove the temperature cable support bracket. Remove the screws and separate the case. Remove the heater core.
To install:
  1. Install the heater core.
  2. Assemble the case and fasten the screws.
  3. Install the temperature cable support bracket.
  4. Position the gasket, then install the case in the van.
  5. Fasten the three nuts and one screw (inside) holding the heater case to the firewall.
  6. Connect and plug the heater hoses at the firewall.
  7. Fasten the two defroster duct-to-firewall attaching screws below the windshield.
  8. Install the heater distributor duct.
  9. Connect the temperature cable and vacuum hoses at the case.
  10. Install the vacuum actuator at the kick panel.
  11. Install the lower right instrument panel bracket.
  12. Fasten the radio support bracket screw.
  13. Fasten the upper and lower instrument panel attaching screws.
  14. Fasten the steering column-to-instrument panel bolts.
  15. Install the engine cover.
  16. Connect the battery ground cable.
  17. Refill the cooling system as necessary.

Ad

Anonymous

  • 1 Answer
  • Posted on Apr 09, 2009

SOURCE: Electronic Control Module Installation 1994 G20 Chevy Van

I just had the same problem. If it is a regular van try under the driver seat in a plastic box. If it is a conversion van try in a pannel just behind driver seat on side of van wall behind a pannel that looks like a vent.

Anonymous

  • 148 Answers
  • Posted on Jul 14, 2009

SOURCE: 1994 Chevy van brakes grabbing

try replacing the brake hoses they may have a restriction causing

Anonymous

  • 3 Answers
  • Posted on Aug 29, 2009

SOURCE: 1994 Chevy G20 Van - Van (auto trans) only has high (D) gear

Sound like you're going to need to drop the transmission pan so you can replace the filter along with fresh transmission fluid. I had a problem like that many years ago, this correct the problem... I also know that the throttle positioning sensor will also cause transmission shifting problems. I would start with the filter change then go from there... Good luck.

joecoolvette

joecoolvette

  • 5660 Answers
  • Posted on Dec 06, 2009

SOURCE: I need a wiring diagram for a 1994 Chevy G20.

You can go to Autozone.com, and obtain a wiring diagram.
If they have the Repair Guide for the vehicle, they'll have the wiring diagram also.
[I checked, they have the wiring diagram for 1994 Chevrolet G20 3/4 ton Van's]

To view their Repair Guides you have to become a member. It's free to join, and you receive no spam mail.
I have suggested using AutoZone's Repair Guides on here, to those who need access to a free online repair guide. I joined to check it out before recommending, and have never received any spam mail, or have had any problems.

On the home page for AutoZone, go up to the right, and click on -Become a member.
You'll be directed to another page, where you are asked some personal information.
I gave my real email address of course, but that was it.
Write down the user name, and password you have chosen.
After you have filled it out go to the bottom, and click on Submit.
You are instantly a member, and do not have to wait for an email.

Go to the home page again, and this time click on Log In.
After you have logged in go to the upper Left, and click on - Manage My Vehicles
Now go down to the bottom right, and click on - Add a vehicle, in the orange rectangular button.

Click on the Year (1994), then you'll be directed to another page.
Click on the Model (Chevrolet)
Now scroll down, and click on - G20 3/4 ton Van
Click on the Engine size used.

You will now be on the main page.
To the left you will see the heading -
Select a Category

Scroll to the bottom, and click on - Vehicle Repair Guides

Go to the right, and click on - Chassis Electrical - in blue.
Under the white - Select a Chapter - heading to the left, scroll down, and click on - Wiring Diagrams

If you are not familiar with reading wiring diagrams, you may want to view the first two instructional diagrams,
How to read and interpret wiring, and Common wiring diagram symbols.

If your van has a gasoline engine, the wiring diagrams for the 1994 G20's start at the 27th diagram down.
(If I have counted correctly. It is the weekend)

To enlarge the diagram you can either click on Enlarge, or simply Left-click on the diagram itself.

Use the bars on the right side, and bottom to move the diagram around, so you view it fully.

Testimonial: "Awesome solution. Just what I needed. Thanks!"

Ad

Add Your Answer

×

Uploading: 0%

my-video-file.mp4

Complete. Click "Add" to insert your video. Add

×

Loading...
Loading...

Related Questions:

0helpful
1answer

1992 Chevy G20 Van. How to Change the radiator in it please?

Question edited for clarity.
Question moved to model category.

Newbie!! G20 radiator replacement - Chevy Message Forum

Chevy Talk https://www.chevytalk.org > fusionbb > showtopic > tid
Mar 10, 2015 - Resist the temptation to add anything to the radiator. Working on a van is challenging enough without having nuisances like this. Be patient as ...

V8 350 Temp gauge sending unit
3 posts
Jun 27, 2008
Coolant leak? '91 van again.
12 posts
Apr 18, 2014
More results from www.chevytalk.org

..
0helpful
1answer

How to change out the radiator on a 1994 g20 Chevy Van v 5.7l

Try this you tube address: https://www.youtube.com/watch?v=m-9kxXMdxAs
0helpful
1answer

Will a 2003 chevy s10 4.3 transmission interchange with 1994 s10 4.3 trans

This 4.3 V6 is just a 350 V8 with 2 cylinders missing and even a V8 trans will fit/interchange physically being the same bolt pattern and size. If it's the same shift pattern and both transmissions are overdrive transmissions, yes, it will interchange. If it's GM, it'll swap. From 1988 the automatic transmissions have a multi bolt pattern and Pontiac, Caddy, Olds and Chevy, all will bolt up.
0helpful
1answer

1990 Chevy van fusebox location

Donald, You did not state the model, so I posted the link for the models I found for chevy van fuse box. Check the attached links,instruction and guides, Good luck
"I hope this helped you out, if so let me know by pressing the helpful button. Check out some of my other posts if you need more tips and info."
Interior Fuse Box Location 1990 1996 Chevrolet G20 1994 Chevrolet G20...
Blown Fuse Check 1990 1996 Chevrolet G20 1994 Chevrolet G20 Chevy Van 4 3L...
fuse box diagram 1990 chevy astro van pdf 1 Docs Engine com
1990 Chevy van fusebox location Google Search
0helpful
1answer

Where can I find a fuse block diagram for a 1994 chevy g20 van?

google fuse block diagram for a 1994 chevy g20 van, should pop right up
0helpful
1answer

How do you remove the back seat from a 1994 chevy g20 van?

I believe the seats are bolted to the floor of the van. Make sure you unplug all electrical connections before removing the seats.
1helpful
1answer

Oxygen Sensor Replacement 1988 Chevy G20 Van 5.7 350

You'll need to crawl under the van and look at the exhaust pipes before the catalytic converter. You will see it once you take a peek.

I’m happy to assist further over the phone at https://www.6ya.com/expert/jeremy_d728a59f986299fa

7helpful
1answer

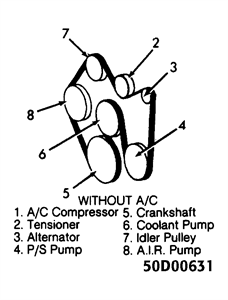
Routing diagram for a Chevy G20 serpentine belt?

Okay, there are a few engines that come in this van, lucky there the same except,they come with or without ac or airpump, so i will give you all of them and you choose the right one.a613984.gif492790a.giffd1ae03.gif47b4a5f.gif
Not finding what you are looking for?

87 views

Ask a Question

Usually answered in minutes!

Top Cars & Trucks Experts

ZJ Limited
ZJ Limited

Level 3 Expert

17989 Answers

john h

Level 3 Expert

29494 Answers

Arnie Burke
Arnie Burke

Level 3 Expert

7339 Answers

Are you a Car and Truck Expert? Answer questions, earn points and help others

Answer questions

Manuals & User Guides

Loading...