1991 Geo Storm Logo

Related Topics:

Posted on Jun 02, 2012

Heater stays on in 1991 geo storm

Hot air comes from heater all the time

1 Answer

Manuel Mejia

Level 1:

An expert who has achieved level 1.

MVP:

An expert that got 5 achievements.

Night Owl:

An expert who has answered 10 or more questions between 12 midnight and 6am on the same day.

Hot-Shot:

An expert who has answered 20 questions.

  • Contributor 21 Answers
  • Posted on Aug 10, 2014
Manuel Mejia
Contributor
Level 1:

An expert who has achieved level 1.

MVP:

An expert that got 5 achievements.

Night Owl:

An expert who has answered 10 or more questions between 12 midnight and 6am on the same day.

Hot-Shot:

An expert who has answered 20 questions.

Joined: Jun 10, 2011
Answers
21
Questions
1
Helped
5093
Points
26

Heating and A/C Module may need to be replaced.

5 Related Answers

Carlos Rojas

  • 119 Answers
  • Posted on Jun 01, 2008

SOURCE: How to set a timing belt for a 1992 GEO Storm

Here you are:

137fd9e.png

Ad

Anonymous

  • 9 Answers
  • Posted on Mar 18, 2009

SOURCE: I cannot figure out what the timing marks are.

there is a small mark on the cam pully that must point strait down to the mark on the crank shaft timing pully. the mark on the crank pully is a bit hard to see but it is a low spot on the inside area. also lines up with the keyway grove in the pully.

Anonymous

  • 10 Answers
  • Posted on May 12, 2009

SOURCE: how to set the timeing on 91 geo storm

The timing marks are located near the top of the crankshaft pulley on the plastic timing belt cover. There is a notch in the pulley to mark TDC (Top Dead Center)
Align the notch with the 0 mark on the plastic cover to set your base timing.
Ground the proper circuit on the ALDL connecter located under the dashboard somewhere under the steering wheel. Check the manual for the proper circuit to ground.
With the engine warm and the circuit grounded. Set the proper timing. Un-ground the circuit and you are done.

Anonymous

  • 2004 Answers
  • Posted on Jun 07, 2009

SOURCE: 93 Geo Storm wont start

Check your starter.

Cheers.

ZJLimited

ZJ Limited

  • 17989 Answers
  • Posted on Nov 05, 2009

SOURCE: need to know how to set the timing gears for a geo

GM Storm/Spectrum 1985-1993 Repair Guide


Timing Belt - REMOVAL & INSTALLATION

Although timing belts may last for thousands of miles past the recommended replacement interval, they should be replaced every 60,000 miles to prevent trouble or damage should they snap. Timing belts do not usually give an indication that they are worn or aging without removing the cover(s) and inspecting the belt. A worn or damaged belt could give out at any time. In some cases, should a timing belt snap while the engine is running, damage could be done to the valve trains or pistons requiring a partial or full engine disassembly. Also, should the belt go when the vehicle is far from home, a costly tow or even more costly repair job and considerable inconvenience may be suffered.
Timing belts must always be handled carefully and kept completely free of dirt, grease, fluids and lubricants. This includes any accidental contact from spillage, fingerprints, rags, etc.. These same precautions apply to the pulleys and contact surfaces on which the belt rides.The belt must never be crimped, twisted or bent. Never use tools to pry or wedge the belt into place. Such actions will damage the structure of the belt and possibly cause breakage.


Spectrum
(see Figures 1, 2 and 3)
The engine must be removed from the vehicle for this procedure to be performed.

  1. Remove the engine and mount it to an engine stand.
  2. Remove the accessory drive belts.
  3. Remove the engine mounting bracket from the timing cover.
  4. Rotate the crankshaft until the notch on the crankshaft pulley aligns with the 0 degree mark on the timing cover and the No. 4 cylinder is on TDC of the compression stroke.
  5. Remove the starter and install the flywheel holding tool No. J-35271 or equivalent.
  6. Remove the crankshaft bolt, boss and pulley.
  7. Remove the timing cover bolts and the timing cover.
  8. Loosen the tension pulley bolt.
  9. Insert an Allen wrench into the tension pulley hexagonal hole and loosen the timing belt by turning the tension pulley clockwise.
  10. Remove the timing belt.
  11. Remove the head cover.
Inspect the timing belt for signs of cracking, abnormal wear and hardening. Never expose the belt to oil, sunlight or heat. Avoid excessive bending, twisting or stretching.
To install:
  1. Position the Woodruff key in the crankshaft followed by the crankshaft timing gear. Align the groove on the timing gear with the mark on the oil pump.
  2. Align the camshaft timing gear mark with the upper surface of the cylinder head and the dowel pin in its uppermost position.
  3. Place the timing belt arrow in the direction of the engine rotation and install the timing belt, first to the crankshaft pulley, next to the camshaft pulley, then to the water pump pulley and finally to the tension pulley. Tighten the tension pulley bolt.
Once installed, there must be not slack in the timing belt. The belt teeth must be in perfect alignment with the gears.
  1. Turn the crankshaft 2 complete revolutions and realign the crankshaft timing gear groove with the mark on the oil pump.
  2. Loosen the tension pulley bolt and apply tension to the belt using an Allen wrench in the hexagonal pulley hole. Torque the pulley bolt to 37 ft. lbs. (50 Nm) while holding the pulley stationary.
  3. Check the timing belt tension using a belt tension gauge, it should be 40-48 lbs. (18-22 Kg).
  4. Adjust the valve clearances.
  5. To complete the installation, reverse the removal procedures. Torque the crankshaft pulley-to-crankshaft bolt to 108 ft. lbs. (147 Nm).
2befeb0.jpg

Fig. 1: Timing belt routing - SOHC engines

716bbfc.jpg
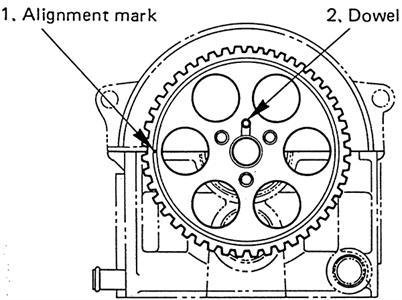
Fig. 2: Align the crankshaft timing gear keyway with the mark in the oil pump - SOHC engines

2f82d49.jpg
Fig. 3: Check the timing belt tension at the center of the longest point between pulleys - SOHC engines


Storm - SOHC ENGINE
(see Figures 1, 2 and 3)
  1. Disconnect the battery negative cable.
  2. Remove the timing belt cover. If necessary, raise and support the vehicle, then remove the right under cover to access the lower timing cover bolts.
  3. If not done already, rotate the crankshaft so that the No. 4 cylinder is at TDC on its compression stroke by aligning the camshaft pulley timing mark to the 9 o'clock position.
  4. Raise and support the vehicle safely.
  5. Remove the crankshaft pulley center bolt, the 4 crankshaft pulley side bolts and the crankshaft pulley from the vehicle.
  6. Loosen the belt tension pulley bolt, then remove the timing belt from around the tensioner and other pulleys. Remove the timing belt from the vehicle.
To install:
  1. Make sure the crankshaft pulley keyway and groove is aligned with the oil pump timing mark and the camshaft pulley timing mark is in the 9 o'clock position. Install the timing belt around the crankshaft timing pulley, followed by the tensioner pulley, water pump pulley and the camshaft timing pulley.
  2. Tighten the belt tensioner retaining bolt. Make sure that the belt is properly tightened and is aligned evenly around all the pulleys:
    1. Turn the crankshaft 2 complete revolutions and realign the crankshaft timing gear groove with the mark on the oil pump.
    2. Loosen the tension pulley bolt and apply tension to the belt using an Allen wrench in the hexagonal pulley hole. Torque the pulley bolt to 37 ft. lbs. (50 Nm) while holding the pulley stationary.
    3. Check the timing belt tension/deflection using a belt tension gauge. The belt should deflect 0.63-0.79 in. (16-20mm) when 22 lbs. (98 N) of pressure is applied to the center of the longest belt stretch.
  3. Check that the camshaft is still aligned to the 9 o'clock position.
  4. Install the timing belt cover, secure it with the 2 lower mounting bolts, then torque the bolts to 89 in. lbs. (10 Nm).
  5. Install the crankshaft pulley to the crankshaft dampener, secure the center bolt and the 4 side bolts. Torque the center bolt to 87 ft. lbs. (118 Nm) and the 4 side bolts to 17 ft. lbs. (23 Nm).
  6. If removed, install the right side under cover.
  7. Lower the vehicle. Install the 4 upper timing belt cover retaining bolts and tighten to 89 inch lbs. (10 Nm).
  8. Install the right engine mount.
  9. Install the power steering pump drive belt and alternator drive belt. Adjust them to the proper belt tension.
  10. Remove engine support fixture and reconnect the negative battery cable.

For DOCH Engine, can visit autozone.com (free register) for more details.

Hope helped with this (remember rated this help) Good luck.

Ad

Add Your Answer

×

Uploading: 0%

my-video-file.mp4

Complete. Click "Add" to insert your video. Add

×

Loading...
Loading...

Related Questions:

0helpful
1answer

Oil capacity on a 1991 geo storm

1991 GEO STORM 1.6L 4-cyl Engine Code 5 DOHCCAPACITIES
Engine, with filter.......... 3.2 quarts
Cooling System, W/ MT Initial Fill.......... 7.4 quarts
Cooling System, W/ AT Initial Fill.......... 8.0 quarts
Automatic Transmission, Initial Fill........ 4.3 quarts [1]
Automatic Transmission, Total Fill......... 7.0 quarts
Manual Transmission, ..........4.0 pints[1] With ENG at operating temperature, shift through all gears.
Check fluid level in PARK and add fluid as needed.1991 GEO STORM 1.6L 4-cyl Engine Code 6 SOHC
1992 GEO STORM 1.8L 4-cyl Engine Code 8 DOHCCAPACITIES
Engine, with filter.......... 4.0 quarts
Cooling System, W/ AT Initial Fill.......... 8.0 quarts
Cooling System, W MT Initial Fill........... 7.4 quarts
Automatic Transmission, Initial Fill........ 4.3 quarts [1]
Automatic Transmission, Total Fill......... 7.0 quarts
Manual Transmission, .......... 4.0 pints[1] With ENG at operating temperature, shift through all gears.
Check fluid level in PARK and add fluid as needed.
0helpful
1answer

Where is the 1991 Geo storm Power Steering Pressure switch

I don't believe that power steering pressure switch is an actual part for 1991 Geo Storm.
0helpful
1answer

1991 Geo Storm: intermittent... alt. & brake lite come on (alt is NOT charging) heater blower stops... lites go out heater starts blowing (alt IS charging)

that will all happen from not charging eventuly car will shut off high energy ignition uses a lot ov power and runs the batt way down
0helpful
1answer

1991 Geo Storm overheated on my daughter, she stopped and called me. When I arrived 45 minutes later the engine was cooled, but I was only able to add about 1/2 gallon of water. Sent her on her way and...

Hello preachinit4u and thank you for asking your question, on Fixya.

Here is a simple process that will walk you through a few steps that will pinpoint the overheating problem on your 1991 Geo Storm, without even using any tools. It has helped millions of people, and I am certain that it will help you, because I wrote it for people like you. So here is the link:
How to diagnose your overheating 1991 Geo Storm
You might also want to pay close attention to the fans section of these instructions.

Get more great, money saving, tips and tricks about your vehicle from: twitter.com/acoates23234

Thanks for the vote, and good luck!
1helpful
1answer

91 geo storm overheats

Leaks water under the dash or antifreeze. Sounds like it needs a heater core. If you replaced the thermostat it might still have air trapped in it.
0helpful
1answer

1991 geo storm still overheats even after changing thermostat

Over heat at idle or on the road? How long can you drive it before it overheats? Does the heater work? Do the fans work?
0helpful
1answer

Severe lack of power 1991 Geo Storm,

When you say "fixed", do you mean that you put the new belt on it?
If so, you probably missed a tooth in the belt placement. This usually happens when you wrap the wrong way during the procedure and the marks don't end up lining up.
Also check for other things like pinched wires or something disconnected that didn't get put back in the right spot. (vacuum lines?)
0helpful
1answer

Removing gas tank on 1991 geo storm to replace fuel pump

I would suggest you get a Haynes repair manual for your Geo. They are GREAT manuals and cover just about everything from small repairs to even doing a full engine rebuild. I use them all the time .. full detailed explanations and pictures/diagrams. The whole process from beginning to end to remove your fuel tank is even in the manual.

Here is the link to the manual
0helpful
1answer

1991 geo storm stalling at idle

maybe try replaceing the ingnition modual. that part can do a lot of weird things to these cars. its located inside the distributor cap, really easy to do. about $40 and 10 mins or less. sometimes as they start to fail they do odd things sometimes but not always
0helpful
1answer

Geo storm

try uplugging throttle sensor see if any change
Not finding what you are looking for?

160 views

Ask a Question

Usually answered in minutes!

Top Geo Experts

ZJ Limited
ZJ Limited

Level 3 Expert

17989 Answers

Ronny Bennett Sr.
Ronny Bennett Sr.

Level 3 Expert

6988 Answers

Thomas Perkins
Thomas Perkins

Level 3 Expert

15088 Answers

Are you a Geo Expert? Answer questions, earn points and help others

Answer questions

Manuals & User Guides

Loading...