2004 Ford Freestar Logo

Related Topics:

A
Anonymous Posted on Mar 18, 2012

How do I remove the radiator from a ford freestar

I can disconnect the hoses but the problem is do I need to remove the grille, headlights and metal frames that are surrounding the radiator

5 Related Answers

Anonymous

  • 958 Answers
  • Posted on Sep 20, 2008

SOURCE: adjusting headlights on a 2005 ford freestar

hello wwhampton,

open the hood, take a close look at your headlights, if it is a headlight assembly, there are two screws with big plastic heads on the back of the assembly, these are the adjusting screws. one for horizontal adjustment and the other one is for vertical adjustment.

if the headlight is a round or square ordinary bulb, the adjusting screws are located near the bulb itself, these are philips screws. one on the top and one on the side.

a suggestion; when adjusting headlights, face the car to a wall about 5 ft away and adjust the headlight.

tnx 4 using fixya.

drcool

Ad

Anonymous

  • 235 Answers
  • Posted on Dec 26, 2008

SOURCE: Replace thermostat in 2000 ford ranger

the open pipe that you took the hose off of is the thermostat housing, you will need to remove this to reveal the thermostat, make sure you use a new gasket with sealant when reinstalling thermostat housing to prevent leaks and dont over tighten the bolts,run both bolts down as far as you can before final tightning

Anonymous

  • 319 Answers
  • Posted on Feb 01, 2009

SOURCE: headlight removal 1993 ford f150

http://www.autozone.com/shopping/repairGuide.htm?pageId=0900c152800c1846

enter your info pick the part and go to fix it your self.

tepfy

Anonymous

  • 667 Answers
  • Posted on May 20, 2009

SOURCE: how to replace the front bumper and grill on a 97 ford explorer

you need a repair manual, Haynes or Chilton, there are too many places to explain here in this format, if you can not find these book at your local parts store, then try your local library, then sometimes even have the dealer shop manuals for your use, hope this helps

Anonymous

  • 3600 Answers
  • Posted on Jun 17, 2009

SOURCE: lower radiator hose connecting tube to water pump.

remove the radiator hose remove the two bolts that hold the tube on and buy new tube and replace is in reverse order.

Ad

Add Your Answer

×

Uploading: 0%

my-video-file.mp4

Complete. Click "Add" to insert your video. Add

×

Loading...
Loading...

Related Questions:

0helpful
2answers

How do i drain radiator on 2005 ford freestar

I'm not familiar with that model of car, but if there's no drain hole with a removable cap at the bottom of the radiator, you may simply need to disconnect a radiator hose at the lowest point in the system.
0helpful
1answer

Removal of radiator on a 2007 ford edge

Removal & Installation
  1. Drain the cooling system.
  2. Remove the cooling fan motor and shroud, as outlined in this section.
  3. Remove the front bumper cover, as follows:
    • Raise and safely support the vehicle..
    • Remove the 2 bolts from the top of the radiator grille.
    • Remove the 4 scrivets from the top of the radiator grille.
    • Remove the 3 lower pin-type retainers.
    • Remove the 6 fender splash shield screws (3 each side).
    • Remove the 4 lower screws (2 each side).
    • Disconnect the side marker lamp electrical connectors, if equipped.
    • Disconnect the fog lamp electrical connectors, if equipped.
    • Remove the front bumper cover.
    • Pull the corner of the bumper cover from the bracket.
  4. Disconnect the upper radiator hose and lower degas bottle hose from the radiator.
  5. Disconnect the lower radiator hose from the radiator.
  6. Lift and remove the tabs from the radiator support and position the radiator towards the engine.
  7. Remove the 2 A/C condenser bolts from the radiator and separate the condenser from the radiator. To install, tighten to 10 Nm (89 inch lbs.).
  8. Remove the radiator.
To install:
  1. Installation is the reverse of the removal procedure, noting the following:
    • Tighten the A/C condenser-to-radiator bolts to 10 Nm (89 inch lbs.)
    • Fill and bleed the cooling system.
0helpful
1answer

Coolant system

you have to drain cooling system and disconnect cooling fan electrical connector and remove the cooling fan shroud assembly with radiator.you need quick disconnect coupling tool to detach the transmission cooler lines from the radiator.you can buy quick disconnect tool at any auto parts stores.
1helpful
1answer

How to change a 1999 Audi a6 alternator

Changing the alternator itself is the easiest of tasks on the A6. It's getting to it that is a problem.
Here is how.
Disconnect the headlight connections the remove the headlamps.
Disconnect the water hoses between engine and radiator.
Remove transmission cooler pipes from radiator. (You have to plug these somehow to prevent loss of ATF and dirt contamination)
Remove spot light covers from bumper. Look under there and you will see 2 alled bolts fixing the bumper to the chassis. Undo these.
Next remove the bumper bolts on the fenders whichn yo can only reach through the headlight holes.
Ease out the grille and disconnect any wiring that could be strained especially the one on the radiator lower hose.
Pull the right side of tf the bumper out more to see the alternator. You do not have to remove air con pipes, just un-hook any hangers.
You need a 17mm socket and power bar to remove the serpentine belt then you undo the 2 bolts attaching alternator to motor and the 2 elecric cables to the alternator.
0helpful
1answer

2004 ford taraus transmission burps fluid after turning off car

Hi, welcome to FixYa.com my name is Shawn and I will be answering your question.

FORD: 2000-2007 Taurus
2000-2003 Windstar
2004-2007 Freestar MERCURY: 2000-2005 Sable
2004-2007 Monterey
This article supersedes TSB 05-14-5 to update the Service Procedure and vehicle model years. ISSUE: Some 2000-2007 Taurus, 2000-2005 Sable, 2000-2003 Windstar, and 2004-2007 Freestar/Monterey vehicles, equipped with a 4F50N, AX4N, or AX4S transaxle, may exhibit an erratic fluid level reading on the transaxle dipstick and possible leaks around the filler tube and grommet. The condition may be due to a restricted transaxle vent.
ACTION: Repair the transaxle vent restriction by replacing the transaxle vent with a 90° vent stem, small hose clamp, two (2) tie raps, and 24" (61 cm) of 5/16" (8 mm) vacuum hose. The 5/16" (8 mm) vacuum hose will be routed from the 90° vent on the transaxle back to the cowl area, next to the brake master cylinder and tie rapped in place with the end of the hose facing down. Refer to the following Service Procedures.
NOTE: ON WINDSTAR, FREESTAR AND MONTEREY SEAL THE COWL PANEL GRILLE (COWL TOP VENT PANEL) AREA, SEE TSB 06-14-10. NOTE: LEAKS MAY BE MISDIAGNOSED AS COMING FROM THE PAN GASKET. ALWAYS FOLLOW WORKSHOP MANUAL, SECTION 307-01 TO LOCATE THE SOURCE OF A LEAK, AND LEAK CHECK WITH BLACK LIGHT AND DYE. SERVICE PROCEDURE
  1. Disconnect the mass air flow (MAF) sensor electrical connector.
  2. Disconnect the crankcase vent tube(s) from the air cleaner outlet pipe.
  3. Loosen the clamp and disconnect the air cleaner outlet pipe from the throttle body.
  4. Release the air cleaner housing clamp(s).
  5. Separate the air cleaner cover from the air cleaner tray.
  6. Windstar, Freestar and Monterey only: Remove cowl panel grille by following the procedure in TSB 06-14-10.
  7. Disconnect the shift cable if located over the top of the vent.
  8. Remove the vent, pull straight up on the vent with locking pliers, or carefully pry the vent from the transaxle case.
  9. Install the replacement 90° vent stem.
    • Windstar, Freestar, Monterey, Taurus, and Sable with column shifter - Must face to the right rear of the vehicle with the flat edge of vent base parallel to the chain cover boss (Figure 1)
    • Taurus and Sable with floor shifter - Must face to the rear of the vehicle with the flat edge of vent base parallel to the chain cover boss (Figure 2)


    tb8635a.gif
    Figure 1 - Article 06-18-13


    tb8636a.gif
    Figure 2 - Article 06-18-13

  10. Install one end of a 24" (61 cm) long piece of 5/16" (8 mm) vacuum hose to the 90° vent stem and secure with a small hose clamp.
  11. Route the vacuum hose back and up to the cowl area and down next to the brake master cylinder. Carefully tie rap the hose in place next to the brake master cylinder (do not tie rap to brake lines), be sure the end of the hose is facing down and not directly above anything hot.
    • Windstar, Freestar, and Monterey (Figure 3, 4, and 5)
    • Taurus and Sable with column shifter (Figure 6)
    • Taurus with floor shifter (Figure 7)


    tb8637a.gif
    Figure 3 - Article 06-18-13


    tb8638a.gif
    Figure 4 - Article 06-18-13


    tb8639a.gif
    Figure 5 - Article 06-18-13


    tb8640a.gif
    Figure 6 - Article 06-18-13


    tb8641a.gif
    Figure 7 - Article 06-18-13

  12. Connect the shift cable, if removed.
  13. Install the air cleaner cover and outlet pipe. NOTE: USE THE ALIGNMENT NOTCHES TO CORRECTLY ALIGN THE AIR CLEANER COVER TO THE AIR CLEANER TRAY.
  14. Install the air cleaner housing clamp(s).
  15. Connect the air cleaner outlet pipe to the throttle body and tighten to 35 lb-in (4 N-m).
  16. Connect the crankcase vent tube to the air cleaner outlet pipe.
  17. Connect the MAF sensor electrical connector.
  18. Windstar, Freestar, and Monterey only, follow TSB 06-14-10 to seal and install the cowl panel grille.

PART NUMBER PART NAME 1C3Z-7034-AA Vent

I hope my assistance helped you and resolved your concern, if you need further assistance please ask.
1helpful
1answer

How to change the headlights?

Hi there, here are some few tips to assist you:
  • Remove the center cover and the screws attached to the radiator grille. Pull the radiator grille out of the engine compartment and set it on the ground.
  • Use a T30 Torx screwdriver to remove the two primary retaining screws from the headlight assembly. Make a note of each screw's original location--they're not interchangeable, so you'll need to put them back in the right slot to reassemble the light.
  • Draw the headlamp assembly away from the car and then disconnect the electrical wiring connector.
  • Release the wire clip on the back of the headlight assembly and remove the cover.
  • Disconnect headlight electrical connector and turn the bulb socket counterclockwise to remove it from the assembly. Install the new bulb, replace the cover and reattach the electrical connector.
  • Reconnect the headlight assembly wiring connector. Test the new bulb to make sure it works before replacing the retaining screws and radiator grille.
Hope these help. Please rate me if they do.
2helpful
1answer

How to replace a radiator on a1994 toyota land cruiser

dak408_129.gif

  1. Disconnect battery ground cable.
  2. Drain engine coolant.
  3. Remove battery and tray,
  4. Remove radiator grille
  5. Disconnect No. 3 water bypass hose.
  6. Disconnect radiator inlet hose.
  7. Disconnect coolant reservoir hose.
  8. Loosen water pump pulley mounting bolts.
  9. Loosen lock, pivot and adjusting bolts of alternator and remove drive belts.
  10. Disconnect oil cooler hose from clamp on fan shroud, then remove shroud.
  11. Remove water pump pulley mounting nuts.
  12. Remove fan with fluid coupling, water pump pulley and fan shroud.
  13. Disconnect transmission oil cooler hoses.
  14. Disconnect radiator outlet hose.
  15. Remove radiator brackets, then the radiator.
  16. Reverse procedure to install.
0helpful
2answers

How to dain radiator 2006 ford greestar 3.9L

Position a Drain Pan and uncouple the Radiator Bottom hose clamp, pull of the Hose gently, as you may have to reuse it, and let the Coolant go, Cold engine only, obviously.
Regards,DT.
1helpful
2answers

Front Windsheild Wipers

I have 2007 only. please rate as solved if this is what you needed. good luck.

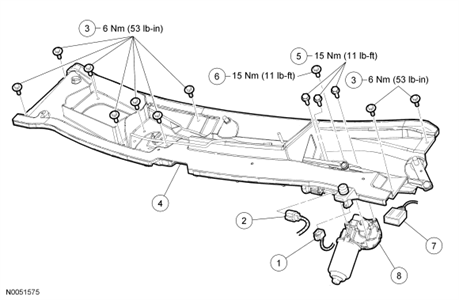
SECTION 501-16: Wipers and Washers 2007 Freestar/Monterey Workshop Manual REMOVAL AND INSTALLATION Procedure revision date: 04/27/2006
Wiper Motor — Windshield s7w~us~en~file=adobe.gif~gen~ref.gif Printable View (104 KB) Removal
  1. Remove the windshield wiper arms.
  1. NOTE: Disconnect the washer hose before removing the cowl panel grille.
    Remove the pushpin-type retainers and the cowl panel grille.
  1. Remove the washer hose grommet from the cowl panel and position aside the washer hose.
  1. If equipped, remove the A/C air inlet filter.
  1. Remove the 9 cowl panel bolts and position aside the cowl panel.
  1. Disconnect the windshield wiper motor electrical connector.
  1. Remove the cowl panel from the vehicle.
  1. Remove the 4 bolts and the windshield wiper motor.
    s7w~us~en~file=n0001518.gif~gen~ref.gif
Installation
  1. Position the wiper pivot arms on the windshield wiper motor and install the bolt.
    • Tighten to 15 Nm (11 lb-ft).
  1. Install the 3 windshield wiper-to-cowl panel bolts.
    • Tighten to 15 Nm (11 lb-ft).
  1. Position the cowl panel in the vehicle and connect the windshield wiper motor electrical connector.
  1. Install the washer hose and grommet in the cowl panel.
  1. Install the 9 cowl panel bolts.
    • Tighten to 6 Nm (53 lb-in).
  1. If equipped, install the A/C air inlet filter.
  1. Position the cowl panel grille in the vehicle and connect the washer hose.
  1. Install the pushpins.
  1. Install the windshield arms and nuts.
    • Tighten to 27 Nm (20 lb-ft).
  1. Cycle and park the windshield wipers to check for correct alignment.
3c6f4d5.gif
b8a2ebf.gif
61helpful
2answers

How to change headlight bulb on ford mondeo

Very easy, 2 or 3 minutes.
Remove radiator grille. 2 plastic fittings on top, quarter turn and lift out grille.
Remove complete headlight. Simply lift out 2 L shape retaining pins. Disconnect lead. Ease out complete headlamp unit.
Remove back of headlamp unit to access bulbs. Disconnect lead from bulb while bulb still held by clip. Then release clip to remove bulb.
Reverse process to fit.
Not finding what you are looking for?

2,837 views

Ask a Question

Usually answered in minutes!

Top Ford Experts

ZJ Limited
ZJ Limited

Level 3 Expert

17989 Answers

Thomas Perkins
Thomas Perkins

Level 3 Expert

15088 Answers

xxxxxx xxx

Level 3 Expert

5117 Answers

Are you a Ford Expert? Answer questions, earn points and help others

Answer questions

Manuals & User Guides

Loading...