Cars & Trucks Logo

Related Topics:

Posted on Mar 06, 2012
Answered by a Fixya Expert

Trustworthy Expert Solutions

At Fixya.com, our trusted experts are meticulously vetted and possess extensive experience in their respective fields. Backed by a community of knowledgeable professionals, our platform ensures that the solutions provided are thoroughly researched and validated.

View Our Top Experts

1991 primera how to replace upper suspension arms

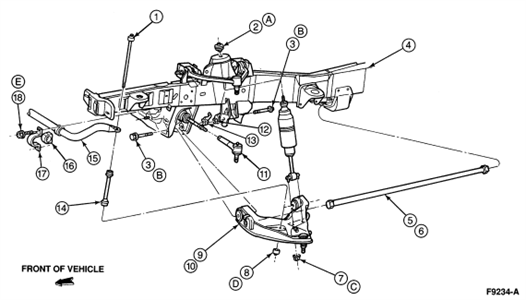
How to replace upper suspension arms

1 Answer

Anonymous

Level 3:

An expert who has achieved level 3 by getting 1000 points

Superstar:

An expert that got 20 achievements.

All-Star:

An expert that got 10 achievements.

MVP:

An expert that got 5 achievements.

  • Master 4,803 Answers
  • Posted on Mar 07, 2012
Anonymous
Master
Level 3:

An expert who has achieved level 3 by getting 1000 points

Superstar:

An expert that got 20 achievements.

All-Star:

An expert that got 10 achievements.

MVP:

An expert that got 5 achievements.

Joined: Oct 10, 2009
Answers
4803
Questions
0
Helped
2961166
Points
18833

It is pretty straightforward.

Raise and support the vehicle. Remove the tire and wheel assemblies. Remove the bolts from both ends of the upper suspension arm. Remove the suspension arm. Reverse procedure to install.

You may have to pry the thing with a pry bar to get the outer end of the suspension arm separated from the steering knuckle/strut lower end.

5 Related Answers

Anonymous

  • 161 Answers
  • Posted on Jun 15, 2009

SOURCE: Reply-SUSPENSION-03 pt cruiser touring

is it a nosie your talking about ? if so check the sway bar links make sure they are tight and not cracked or worn in anyway, then check upper control arms as well as tie rod ends. I have seen so many people try to replace everything for a noise and it was the tie rod end! they are very sneaky and can sound like a control arm. same with the sway bar links.you can take a jack put it under the control arm jack it up to where the tire is barely off the ground take a pry bar or strong long bar put under the tire and lift up & down while someone looks under at suspension parts you can also buy a automotive stethoscope for like 10$ to listen to each as you do that. most part stores sell them.

Ad

Anonymous

  • 1 Answer
  • Posted on Aug 06, 2008

SOURCE: nissan primera squeeky noise from front suspension

Hi
I had the same problem. It cast me lot money in changing few things but finally found. The side where the noise comes from look fro the supension arm it is connecting the main suspensionto the body. You have to change that or find silicon oil and spray around the bushes of the arm.

good luck

Anonymous

  • 4669 Answers
  • Posted on Mar 12, 2009

SOURCE: rear suspension problem

Google (Last Shot Auto Parts). They have an ebay store.

Anonymous

  • 5 Answers
  • Posted on Jul 20, 2009

SOURCE: How would I install an upper suspension arm to

nissan primera in the US is called an Infiniti G20. the grinding or knocking if its coming from the front, is gonna be the tension rod bushings are warn out. get new tension rods for real cheap. thats all i can help with, suspension is my thing, motor is not.

Anonymous

  • 6 Answers
  • Posted on Jul 16, 2010

SOURCE: rear suspension in a 98 ford expedition

Call Strutmasters they can find them for you. or go to the website www.strutmasters.com for all your suspension solutions.

Ad

Add Your Answer

×

Uploading: 0%

my-video-file.mp4

Complete. Click "Add" to insert your video. Add

×

Loading...
Loading...

Related Questions:

0helpful
1answer
0helpful
1answer

How do I take the rear upper control arm off

of what.
suspension parts.
the FSM covers all this, read it.
or login to alldata.com and read susp. page?
0helpful
1answer

How to replace lower ball joint on 1991 chevy 1500 4/4

The lower ball joint on a car is located between the steering knuckle and the lower control arm. It, along with the upper ball joint, allows the steering knuckle to pivot from left to right, turning the wheels while still allowing the front suspension to compress and absorb the impact of traveling over potholes and speed bumps.

Read more: Get a free diagnostic for your car
2helpful
1answer

What does the control arm on the front left driver side supposed to look like fully assembled

Hello! First diagram is the lower...Second is the upper..Guru...saailer

LOWER IDENTIFICATION:


Item
Part Number Description 1
5495 Stabilizer Bar Link Bolt and Bushing Assembly 2
18A192 Nut, Washer and Bushing Assembly 3
808264 Bolt 4
5005 Frame 5
5B326 Torsion Bar (LH) 6
5B327 Torsion Bar (RH) 7
620481 Nut 8
5C491 Nut and Washer 9
3079 Front Suspension Lower Arm (LH) 10
3078 Front Suspension Lower Arm (RH) 11
3A130 Tie Rod End 12
808166 Nut 13
808167 Nut 14
5K483 Front Stabilizer Bar Link 15
5482 Front Stabilizer Bar 16
5484 Front Stabilizer Bar Bushing 17
3B353 Front Stabilizer Retainer 18
N807396-S100 Bolt A
- Tighten to 40-55 Nm
(30-40 Lb-Ft) B
- Tighten to 150-200 Nm (111-148 Lb-Ft) C
- Tighten to 21-29 Nm
(15-21 Lb-Ft)


UPPER IDENTIFICATION:
Item Part Number Description 1 3C156 Damper Assembly (RH) 2 805348 Nut and Washer 3 - Shock Absorber Insulator
(Part of 18198) 4 3C157 Damper Assembly (LH) 5 3020 Front Suspension Bumper 6 3083 Front Suspension Upper Arm Assembly A - Tighten to 34-47 Nm
(25-35 Lb-Ft)


LOWER DIAGRAM FOLLOWED BY UPPER:

2_12_2012_9_47_51_pm.gif2_12_2012_9_54_26_pm.gif

I’m happy to help further over the phone at https://www.6ya.com/expert/david_6df67de3b14de867

3helpful
2answers

HOW TO REMOVE AND REPLACE MOUNTAINEER UPPER BALL JOINTS?

Upper Ball Joint Removal & Installation Ball joints on this vehicle are an integral part of the control arm. If the ball joint is defective, the entire control arm must be replaced.
---
Upper Control Arm Removal & Installation
  1. Before servicing the vehicle, refer to the precautions in the beginning of this section.
  2. Remove or disconnect the following:
    • Wheel and tire assembly
    • Brake disc shield
  3. Use a jack to support the front suspension lower arm.
  4. Mark the position of the front suspension upper arm adjustment cams.
  5. Remove the upper ball joint retaining nut and pinch bolt.
  6. Separate the ball joint from the front wheel spindle
  7. Remove the front suspension upper control arm.
To Install:
  1. Installation is the reverse of removal. Align the marks made during removal on the front suspension upper arm adjustment cam. The forward front suspension upper arm nut must be tightened first while the arm is held at the curb position ride height.
  2. Observe the following torques:
    1. Control arm attaching nuts: 98 ft. lbs. (133Nm)
    2. Pinch bolt: 46 ft. lbs. (63Nm)
prev.gif next.gif
0helpful
1answer

How do I replace the upper Control arms on My 1979 chevy 1/2 ton pickup. I saw a replacement control arm that has the bushings and ball joints already installed. I'm trying to save the high labor cost that...

Since the new arm comes with the bushings, there is no reason to get the tool to install them. Upper arms are relatively easy to install...just a bolt out, bolt in operation as the springs aren't involved. Support the suspension under the lower control arm to take any tension off the upper arm.
1helpful
1answer

How would I install an upper suspension arm to

nissan primera in the US is called an Infiniti G20. the grinding or knocking if its coming from the front, is gonna be the tension rod bushings are warn out. get new tension rods for real cheap. thats all i can help with, suspension is my thing, motor is not.
0helpful
1answer

Banging noises on front suspension of nissan primera SLX

take your to a suspension shop sound like you have either a ball joint worn and hitting on metal or one of your suspension arm is bad
0helpful
1answer

I need to know how to get to the rear suspension (tower)

i don't think you have to do any repairs from the top end. I will list most fromFord shop manual. Please rate as Fixya if this answers your questions. Please report back. Good luck.

Section 04-02: Suspension and Wheel Hubs, Rear 1994 Town Car, Crown Victoria/Grand Marquis. Workshop Manual
REMOVAL AND INSTALLATION Spring Rear
Removal
  1. Position a hoist under the rear axle housing, and raise the vehicle. Refer to Section 00-02 . Place jackstands under frame side rails.
  1. Remove rear stabilizer bar as outlined.
  1. Disconnect the lower studs of the two shock absorbers from the mounting brackets on the rear axle assembly .
  1. Unsnap the RH parking brake rear cable and conduit (2A635) from RH upper arm retainer before lowering the rear axle assembly .
  1. Lower the hoist and axle housing until the rear springs are released.
  1. Remove rear spring and rear spring center mounting insulators (5741) from vehicle.
    -----------------------------------------------------------------
Shock Absorber Removal
Raise the vehicle on a hoist. 1. To assist in removing the upper attachment on shock absorbers using a plastic dust tube, place an open end wrench on the hex stamped into the dust tube's metal cap. For shock absorbers with a steel dust tube, simply grasp the tube to prevent stud rotation when loosening the retaining nut.
  1. Remove the shock absorber retaining nut, washer, and insulator assembly from the stud on the upper side of the frame. Discard nut. Compress the shock absorber to clear the hole in the frame, and remove the inner insulator and washer from the upper retaining stud.
  2. Remove the self-locking retaining nut, and disconnect the shock absorber lower stud from the mounting bracket on the rear axle tube.
  3. Perform Shock Absorber Checks. Refer to Section 04-00 to determine shock absorbers performance.
Installation
  1. Properly prime the new shock absorber . Refer to Section 04-00 , Shock Absorber Checks.
  1. Place the inner washer and rear spring insulator (5536) on the upper retaining stud, and position the shock absorber so that the upper retaining stud enters the hole in the frame. While holding the shock absorber in this position, install a new rear spring insulator , washer and nut assembly on the upper side of the upper frame. Be sure to seat the rear spring insulator in the frame attaching hole. Tighten nut to 34-46 Nm (25-34 lb-ft).
  1. Extend the shock absorber , and place the lower stud in the mounting bracket hole on the rear axle assembly housing. Install a new self-locking retaining nut. Tighten nut to 76.5-103.5 Nm (56-76 lb-ft).
  1. Lower vehicle.
-----------------------------------------------------------------------------
Arm Lower
Removal
Refer to the illustration in Description and Operation. NOTE: To improve rear axle assembly noise and vibration concerns, the rear suspension should be fastened to the frame and rear axle assembly at the curb height position.
NOTE: If one rear suspension lower arm requires replacement, also replace the opposite rear suspension lower arm .
sra~us~en~file=ani_caut.gif~gen~ref.gif WARNING: TURN REAR SUSPENSION LEVELER COMPRESSOR SWITCH OFF (IF SO EQUIPPED).
NOTE: If both rear suspension arm and bushings and both rear suspension lower arms are to be removed at the same time, remove both rear springs as outlined under Rear Spring Removal. For air spring removal, refer to Section 04-05 .
  1. Mark rear suspension shock absorber relative to protective sleeve with the vehicle in a static, level ground condition.
  1. Remove rear stabilizer bar as outlined.
  1. Raise the vehicle on a hoist, and place jackstands under the rear axle assembly . Refer to Section 00-02 .
  1. Lower the hoist until the shock absorbers are fully extended to relieve rear spring pressure.
  1. Support rear axle assembly under differential pinion nose as well as under rear axle assembly .
  1. Remove and discard the lower arm pivot bolt and nut from the axle bracket. Then, disengage the rear suspension lower arm from the bracket.
  1. Remove and discard the pivot bolt and nut from the frame bracket, and remove the rear suspension lower arm .
-----------------------------------------------------------------
Upper
Removal
SPECIAL SERVICE TOOL(S) REQUIRED Description Tool Number Suspension Bushing Service Set T79P-5638-A1, A2 and A5 Rear Axle Control Arm Bushing Tools T86P-5638-AH
sra~us~en~file=ani_caut.gif~gen~ref.gif WARNING: TURN OFF REAR SUSPENSION LEVELER COMPRESSOR SWITCH (IF SO EQUIPPED).
  1. Raise the vehicle, and support the frame side rails with jackstands. Refer to Section 00-02 .
  2. Support the rear axle assembly .
  3. Lower the rear axle assembly , and support the rear axle assembly under differential pinion nose as well as under rear axle assembly .
  4. Unsnap parking brake rear cable and conduit from upper arm retainer.
  5. Remove and discard the nut and bolt retaining the rear suspension arm and bushing to the rear axle assembly housing. Disconnect the rear suspension arm and bushing from the housing.
  6. Remove and discard the nut and bolt that secures the rear suspension arm and bushing to the frame bracket, and remove the rear suspension arm and bushing . If upper arm rear bushing is to be replaced, use Suspension Bushing Service Set T79P-5638-A and Rear Axle Control Arm Bushing Tools T86P-5638-AH and the following procedure:
  7. Place the upper arm rear bushing remover tool in position, and pull bushing out. Using Suspension Bushing Service Set T79P-5638-A install bushing assembly into bushing ear of rear axle assembly.
------------------------------------------------
Stabilizer Bar
sra~us~en~file=ani_caut.gif~gen~ref.gif WARNING: TURN OFF REAR SUSPENSION LEVELER COMPRESSOR SWITCH (IF SO EQUIPPED).
Removal
  1. Raise vehicle on hoist, and place jackstands under the frame side rails. Refer to Section 00-02 .
  1. Lower the hoist and rear axle assembly housing until the shock absorbers are fully extended.
  1. Disconnect rear stabilizer bars from rear stabilizer bar link and bushing (5C488) . Remove bolts and stabilizer bar bracket (5486) retaining rear stabilizer bar to rear axle assembly .
0helpful
1answer

Nissan primera squeeky noise from front suspension

Hi
I had the same problem. It cast me lot money in changing few things but finally found. The side where the noise comes from look fro the supension arm it is connecting the main suspensionto the body. You have to change that or find silicon oil and spray around the bushes of the arm.

good luck
Not finding what you are looking for?

448 views

Ask a Question

Usually answered in minutes!

Top Nissan Experts

ZJ Limited
ZJ Limited

Level 3 Expert

17989 Answers

Thomas Perkins
Thomas Perkins

Level 3 Expert

15088 Answers

Ronny Bennett Sr.
Ronny Bennett Sr.

Level 3 Expert

6988 Answers

Are you a Nissan Expert? Answer questions, earn points and help others

Answer questions

Manuals & User Guides

Loading...