2007 Mercury Monterey Logo

Related Topics:

Ruth M Slator Posted on Dec 17, 2011

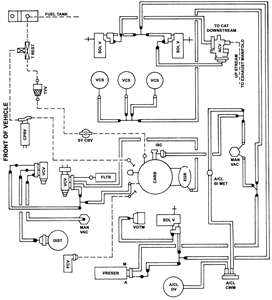
Vacuum hose diagram for 2007 mercury monterey

1 Answer

Larry Sublett

Level 1:

An expert who has achieved level 1.

  • Contributor 1 Answer
  • Posted on Dec 17, 2022
Larry Sublett
Contributor
Level 1:

An expert who has achieved level 1.

Joined: Dec 17, 2022
Answers
1
Questions
0
Helped
977
Points
2

Vacuum hose diagram for a 2007 Mercury Mountaineer

5 Related Answers

Anonymous

  • 986 Answers
  • Posted on Oct 01, 2009

SOURCE: Need a diagram for the firing order of a 1963 Ford

1 5 4 2 6 3 7 8, rotor turn counter clockwise,I hope this helps you

Ad

Anonymous

  • 97 Answers
  • Posted on Mar 02, 2010

SOURCE: 2004 Mercury Monterey 70k CEL code PO401

po401 egr flow insufficient vaulve could be stuck or disconected

Anonymous

  • 2926 Answers
  • Posted on Nov 25, 2010

SOURCE: looking for an emissions diagram

ledsled378_10.gif
You will have to copy the diagram and paste it to MS paint to zoom in on it. The file is otherwise too large for the site.

Anonymous

  • 645 Answers
  • Posted on Jan 06, 2011

SOURCE: how can I find a vacuum hose diagram for a 1978

Orielly auto parts or Auto zone should have a repair manual for that car. They go for about $25.00. The manuals have vacuum diagrams.

gerry bissi

  • 4390 Answers
  • Posted on Aug 10, 2011

SOURCE: need a vacuum hose routing diagram for a 2000

go to yahoo group for villager quest owners. lot's of help there.

Ad

Add Your Answer

×

Uploading: 0%

my-video-file.mp4

Complete. Click "Add" to insert your video. Add

×

Loading...
Loading...

Related Questions:

0helpful
1answer

2003 Mercury Mountaineer 4.6. Vacuum hose diagram please?

Question edited for clarity and spelling.
Question moved to make model category.

Same as Ford Explorer. Click the link and also click on the images tab.

https://www.google.com/search?q=2003+Mercury+Mountaineer+Vacuum+hose+diagram

..
0helpful
1answer

I need serpentine belt diagram for a 2005 Mercury Monterey with 4.2 litre v-6

http://www1.prodemand.com/img/G04004441 this link may work or it may not sorry if not...otherwise Auto zone has belt routing book or your local library has the book also
0helpful
1answer

How to clear vacuum hose on 2007 milan?

if you know there is suppose to be vac.pull it off aand feel with your finger you can feel it.mechanics wire, carb cleaner with red supplied tube,maybe easier to splice new peice in.
0helpful
2answers

Where are the fuse boxes located a 2004 mercury monterey?

I know there are at least two. The first being under the dash to the left. Second being in engine bay above the driver side tire.

BIll
0helpful
1answer

Unlock code for cd radio 2007 mercury monterey

Best I can tell you is to contact the dealer. Sometimes the default code is 0000. Hope this helps
0helpful
1answer

2004 ford taraus transmission burps fluid after turning off car

Hi, welcome to FixYa.com my name is Shawn and I will be answering your question.

FORD: 2000-2007 Taurus
2000-2003 Windstar
2004-2007 Freestar MERCURY: 2000-2005 Sable
2004-2007 Monterey
This article supersedes TSB 05-14-5 to update the Service Procedure and vehicle model years. ISSUE: Some 2000-2007 Taurus, 2000-2005 Sable, 2000-2003 Windstar, and 2004-2007 Freestar/Monterey vehicles, equipped with a 4F50N, AX4N, or AX4S transaxle, may exhibit an erratic fluid level reading on the transaxle dipstick and possible leaks around the filler tube and grommet. The condition may be due to a restricted transaxle vent.
ACTION: Repair the transaxle vent restriction by replacing the transaxle vent with a 90° vent stem, small hose clamp, two (2) tie raps, and 24" (61 cm) of 5/16" (8 mm) vacuum hose. The 5/16" (8 mm) vacuum hose will be routed from the 90° vent on the transaxle back to the cowl area, next to the brake master cylinder and tie rapped in place with the end of the hose facing down. Refer to the following Service Procedures.
NOTE: ON WINDSTAR, FREESTAR AND MONTEREY SEAL THE COWL PANEL GRILLE (COWL TOP VENT PANEL) AREA, SEE TSB 06-14-10. NOTE: LEAKS MAY BE MISDIAGNOSED AS COMING FROM THE PAN GASKET. ALWAYS FOLLOW WORKSHOP MANUAL, SECTION 307-01 TO LOCATE THE SOURCE OF A LEAK, AND LEAK CHECK WITH BLACK LIGHT AND DYE. SERVICE PROCEDURE
  1. Disconnect the mass air flow (MAF) sensor electrical connector.
  2. Disconnect the crankcase vent tube(s) from the air cleaner outlet pipe.
  3. Loosen the clamp and disconnect the air cleaner outlet pipe from the throttle body.
  4. Release the air cleaner housing clamp(s).
  5. Separate the air cleaner cover from the air cleaner tray.
  6. Windstar, Freestar and Monterey only: Remove cowl panel grille by following the procedure in TSB 06-14-10.
  7. Disconnect the shift cable if located over the top of the vent.
  8. Remove the vent, pull straight up on the vent with locking pliers, or carefully pry the vent from the transaxle case.
  9. Install the replacement 90° vent stem.
    • Windstar, Freestar, Monterey, Taurus, and Sable with column shifter - Must face to the right rear of the vehicle with the flat edge of vent base parallel to the chain cover boss (Figure 1)
    • Taurus and Sable with floor shifter - Must face to the rear of the vehicle with the flat edge of vent base parallel to the chain cover boss (Figure 2)


    tb8635a.gif
    Figure 1 - Article 06-18-13


    tb8636a.gif
    Figure 2 - Article 06-18-13

  10. Install one end of a 24" (61 cm) long piece of 5/16" (8 mm) vacuum hose to the 90° vent stem and secure with a small hose clamp.
  11. Route the vacuum hose back and up to the cowl area and down next to the brake master cylinder. Carefully tie rap the hose in place next to the brake master cylinder (do not tie rap to brake lines), be sure the end of the hose is facing down and not directly above anything hot.
    • Windstar, Freestar, and Monterey (Figure 3, 4, and 5)
    • Taurus and Sable with column shifter (Figure 6)
    • Taurus with floor shifter (Figure 7)


    tb8637a.gif
    Figure 3 - Article 06-18-13


    tb8638a.gif
    Figure 4 - Article 06-18-13


    tb8639a.gif
    Figure 5 - Article 06-18-13


    tb8640a.gif
    Figure 6 - Article 06-18-13


    tb8641a.gif
    Figure 7 - Article 06-18-13

  12. Connect the shift cable, if removed.
  13. Install the air cleaner cover and outlet pipe. NOTE: USE THE ALIGNMENT NOTCHES TO CORRECTLY ALIGN THE AIR CLEANER COVER TO THE AIR CLEANER TRAY.
  14. Install the air cleaner housing clamp(s).
  15. Connect the air cleaner outlet pipe to the throttle body and tighten to 35 lb-in (4 N-m).
  16. Connect the crankcase vent tube to the air cleaner outlet pipe.
  17. Connect the MAF sensor electrical connector.
  18. Windstar, Freestar, and Monterey only, follow TSB 06-14-10 to seal and install the cowl panel grille.

PART NUMBER PART NAME 1C3Z-7034-AA Vent

I hope my assistance helped you and resolved your concern, if you need further assistance please ask.
0helpful
1answer

2004. What causes erratic radio and CD player operation?

Mercury Monterey Audio - Radio, Speaker, Subwoofer, Stereo

www.crutchfield.com/.../Mercury-Monterey-Ster...

Crutchfield CorporationCrutchfield - Seriously into audio since 1974 ..... Find car audio products that work with your Mercury Monterey ... 2004 - 2007 Mercury Monterey: Best Sellers .... time to talk to you through installation snags, troubleshooting, or everyday use.

Mercury Monterey Car Stereo Removal and Repair 2004-2007

? 2:45
https://www.youtube.com/watch?v=DhSfvjoLGPU
Dec 6, 2012 - Uploaded by Factory Car Stereo Repair
F R E E - R E P A I R - E S T I M A T E S http://www.carstereohelp.com/ford.htm.
0helpful
1answer
0helpful
2answers

2005 Mercury Monterey van - fuse location

Hello Kevin I hope I can help you find this fuse and fix this for you.The fuse location number should be 63 it should be a 30 amp fuse.I don't know if your manual will show you this location but I do hope it does.But if not I'll do my best to try and help you find it.In your fuse box look about middle ways in it.I hope you see a line of the standard small size plug-in fuse's a row or 4, just below those should be a row of 2, the row of 2 is what your looking for fuse number 63 is the one on the left if your looking straight at the fuse box, or the one on the driver,s side it should have 30 amp on it.Check that fuse or just replace it.I hope that was helpful Tim
Not finding what you are looking for?

987 views

Ask a Question

Usually answered in minutes!

Top Mercury Experts

ZJ Limited
ZJ Limited

Level 3 Expert

17989 Answers

Thomas Perkins
Thomas Perkins

Level 3 Expert

15088 Answers

Arnie Burke
Arnie Burke

Level 3 Expert

7339 Answers

Are you a Mercury Expert? Answer questions, earn points and help others

Answer questions

Manuals & User Guides

Loading...